
RTL is a very specific feature desired by people whose language is written from right to left. In this post you’ll learn how to implement RTL in Ionic 4. I will also show how various Ionic components look in an RTL layout.
All the layouts used in this blogpost can be found in Ionic 4 Full app starter
Ionic 4 has updated majority of its features with RTL capability, but a stable version is yet to be officially released. You can follow this issue for more detailed information
What is RTL (Right to Left)
LTR (left-to-right) and RTL (right-to-left) are the two major layout patterns based on various languages in the world. The major difference between LTR and RTL language scripts is the direction in which content is displayed:
- LTR languages display content from left to right
- RTL languages display content from right to left
RTL content also affects the direction in which some icons and images are displayed, particularly those depicting a sequence of events. For example, ion-item component has a left-to-right flow by default, whatever element is added inside it. But making the content RTL makes the whole layout mirrored.
In general, the passage of time is depicted as left to right for LTR languages, and right to left for RTL languages.

In the above image, notice the
- Change in text alignment
- Change in position of * on the words
- Position of down arrow for the dropdown
- Change is position of Hamburger menu and filter icon in header
This will give you a basic idea of RTL layouts.
Notice that since both the images above have English as the language, you still see the actual sentence going from left-to-right. But when you are writing in an RTL language, this will be exact opposite.
What is Ionic 4
I know most of the readers reading this blog will know what is Ionic 4, but just for the sake of beginners, I explain this in my every blog.
Ionic is a complete open-source SDK for hybrid mobile app development. Ionic provides tools and services for developing hybrid mobile apps using Web technologies like CSS, HTML5, and Sass. Apps can be built with these Web technologies and then distributed through native app stores to be installed on devices.
In other words — If you create native apps in Android, you code in Java. If you create native apps in iOS, you code in Obj-C or Swift. Both of these are powerful, but complex languages. With Cordova (and Ionic) you can write a single piece of code for your app that can run on both iOS and Android (and windows!), that too with the simplicity of HTML, CSS, and JS. I’m a huge fan of Ionic and been developing Ionic apps for last 4 years.
How to implement RTL in Ionic 4 apps
Implementing RTL in Ionic 4 apps is very easy. It can be done in two ways
- Using
dir="rtl"attribute in HTML tags - Using
direction= rtlin css
All implementations revolve around these two methods. Following are the ways you can implement RTL in your Ionic 4 app.
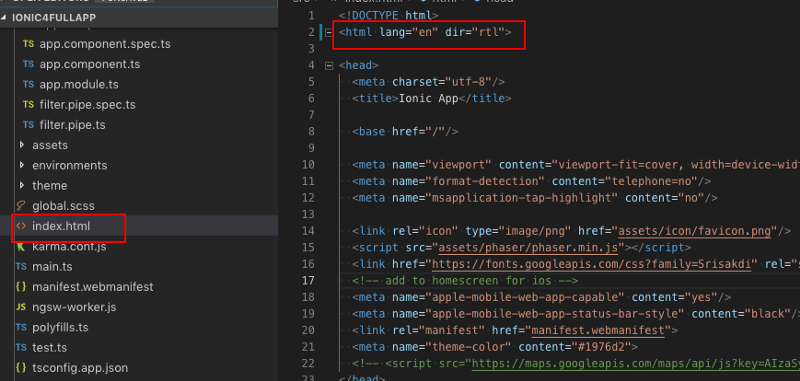
1. Using HTML tag
If you want to convert the complete app into RTL layout, then use dir="rtl" on <html> tag itself. For Ionic 4 apps, the parent HTML is index.html in src folder
2. Using router-outlet or ion-app
Editing HTML tag with dir="rtl" is not a good solution if you want to change the layout dynamically from a setting inside the app.
In such case, you can make use of ion-router-outlet or <ion-app> tag which is the parent of all the pages in Ionic 4 apps. Use dir="rtl" on <ion-router-outlet> or <ion-app>tag, and all the pages under that will get RTL layout

One thing to notice here, when you apply RTL on ion-router-outlet , the sidemenu behaves opposite to how it behaves with dir="rtl" on <html tag

Notice in both cases, the Hamburger menu icon in header is on right, but the menu opens in different way for both implementations.
3. Using CSS at global level
You can also convert the complete app to RTL using CSS in global.scss
:root {
   direction: rtl;
}
This will apply this to all pages and components. Again, sidemenu in this implementation behaves a little different from Method 1

So RTL at root css level and dir="rtl" on <ion-app> tag have same effect.
4. Using CSS at Page level
If you only want to convert a particular page to RTL, then you can make use of CSS at the page level. Just add direction: rtl; on a page level class, and you’ll get the page in RTL layout.
Ionic 4 components in RTL (right-to-left) Layout
Now let’s take a good look at how different Ionic 4 components and pages look in RTL. Please note that these are valid for Ionic 4.12.0, as there may be changes after that.
All the layouts used below can be found in Ionic 4 Full app starter
Instagram Layout — ion-items ✅

Whatsapp Layout — Header and ion-items ✅

Youtube layout — ion-items ✅

Horizontal Sliders ✅


Segments ❌

Notice the segment in the header. RTL layout has small border issue in Segments. I believe this has been resolved in future release 4.5.0, as mentioned in this Github issue.
Ion-items ✅

Notice how both the left-side and right-side icons have shifted in RTL layout
Content-loaders (Skeleton text) ✅

Skeleton text changes as per RTL layout as well.
Chat Layout 🤔

As you can see, the chat layout is a edge case for RTL. You really need to know if the users of your RTL language are habitual of seeing their text on the right or left. Accordingly, you’ll have to change the CSS of your chat layout
Date pickers 🤔

You can see most of the Date picker input fields adjusted as per RTL, but the floating type input couldn’t. Also the ticker shown for picking value does not change as per RTL.
Action sheet ✅

Alert and prompts ✅

Range selectors ✅

Notice the minimum and maximum value of range selectors get swapped in RTL, and so is the movement of slider to increase value.
Grid layout

These two almost look the same, but if you look closely, you’ll notice that the first product in the grid starts from the right in RTL layout.
Slider ❌
Ionic slider does not work correctly in RTL layout. This is probably the most noticeable bug in RTL layout so far.


Buttons ✅

Notice how the button icons shift in RTL layout. The text centered in the button stays centered.
Filtering List ✅

Conclusion
We looked at various methods of implementation of RTL in Ionic 4. We also had a look at various layouts and how they look in RTL layout.
This is not an exhaustive list of all Ionic components and what all combination are possible. But all these example give us an idea of how the app will look and behave if we use RTL layouts.
All the layouts used in this blogpost can be found in Ionic 4 Full app starter
Next Steps
Now that you have learned the implementation RTL layout in Ionic 4, you can also try
- Ionic 4 PayPal payment integration — for Apps and PWA
- Ionic 4 Stripe payment integration — for Apps and PWA
- Ionic 4 Apple Pay integration
- Twitter login in Ionic 4 with Firebase
- Facebook login in Ionic 4 with Firebase
- Geolocation in Ionic 4
- QR Code and scanners in Ionic 4 and
- Translations in Ionic 4
If you need a base to start your next Ionic 4 app, you can make your next awesome app using Ionic 4 Full App

This article was originally published on Enappd.

Top comments (0)