
Firebase Starter Kit (Ionic 4): A great starter to get you started with Ionic 4 and Firebase.
Let’s take a dive to know the paramount benefits of Firebase for your Ionic 4 App.
Firebase is a mobile and web application development platform developed by Firebase Inc. in 2011, then was acquired by Google in 2014. Firebase is a toolset to “build, improve, and grow your app”. It gives you functionality like analytics, databases, messaging and crash reporting so you can move quickly and focus on your users.
Today Firebase is one of the fastest-growing platforms for application development. Some of the reasons are
- You don’t need to write a back-end from scratch. Firebase is a ready-made back-end, with a DB attached to it. You just integrate Firebase SDK in your app and you are good to go.
- It’s R-E-A-L T-I-M-E 🕺.If you are a developer, you understand the importance of a real-time back-end/database in today’s app market. Things like chat, news feeds, ratings, bookings, etc all are very easy if you factor in real-time operations
- Simple Authentication operations.The very first things required in a user-facing application is login/register operations. Firebase handles this very smoothly and with minimum coding effort. You can integrate a number of social authentication services like Facebook, Google etc. with Firebase as well.
- You get tonnes of additional features in-built e.g. push notifications, analytics, etc 😍😍
- It’s free, up to a certain usage limit. But this is pretty awesome for developers who are trying things, or making MVPs, or even for small scale app businesses. 🤑
In this article, we will focus on Firebase with ionic — hosting, Auth and DB Connection. Firebase has been around since Ionic 1, and has been changing ever since. So here are some of the latest plugins and functionalities you can implement using Firebase with Ionic 4.
1. Hosting with firebase in ionic 4 —
Hosting or deploying an ionic app on firebase is a pinch game. Not believing,
let us see how easy it is…..
Step 1: —
We are proceeding as you don’t have any already created firebase project. Let's create one by following these steps…
1. Go to https://console.firebase.google.com/
2. Click on add a project and fill the project name input field and check the terms & conditions block and click on create project button.
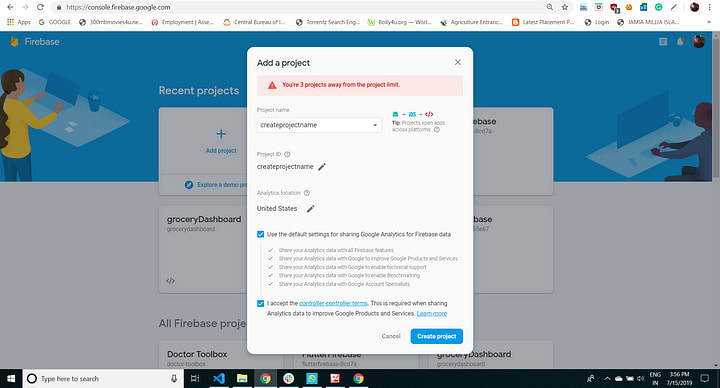
Now in the next step your project is ready, click on Continue.
Step 2: —
Next, in a Terminal, install the Firebase CLI:
npm install -g firebase-toolsfirebase login
firebase init
With the Firebase CLI installed, run firebase init within your Ionic project.
Now the dialog will bring up some questions and we need to select Hosting (using space, then hit enter).
The CLI prompts:
“Which Firebase CLI features do you want to set up for this folder?” Choose “Hosting: Configure and deploy Firebase Hosting sites.”
“Select a default Firebase project for this directory:” Choose the project you created on the Firebase website.
“What do you want to use as your public directory?” Enter “www”.
Note: Answering these next two questions will ensure that routing, hard reload, and deep linking work in the app:
Configure as a single-page app (rewrite all urls to /index.html)?” Enter “Yes”.
“File www/index.html already exists. Overwrite?” Enter “No”.
A firebase.json config file is generated, configuring the app for deployment.
The complete firebase.json looks like:
{
  "hosting": {
    "public": "www",
    "ignore": [
      "firebase.json",
      "/.*",
      "/node_modules/"
    ],
    "rewrites": [
      {
        "source": "",
        "destination": "/index.html"
      }
    ],
}
For more information about the firebase.json properties, see the Firebase documentation.
Step 3: —
Next, build an optimized version of the app by running:
ionic build --prodstep 4:-
Last, deploy the app by running:
firebase deployAfter the successful deploy, you will see a success message with two links in which one will be your project console and another will be hosting URL like below image

Now you can hit the hosting URL and see your app is hosted on the server.
2. Firebase Authentication in ionic 4 —
Ionic has made app authentications too easy for their developer, still not believing? Let us check this out here…
You may use our Firebase Starter Kit too to get started with Firebase Authentication and many more.

Everyone wants the identity of the user to save their data securely on the cloud to give them a smooth and reliable experience on all of the users’ devices after a single login. Users don’t want to fill the data again and again on every device, so Firebase Authentication provides us these facilities here.
Firebase Authentication provides backend services, easy-to-use SDKs, and ready-made UI libraries to authenticate users to your app. It supports authentication using passwords, phone numbers, popular federated identity providers like Google, Facebook and Twitter, and more.

In ionic install the plugin by executing this command:
ionic cordova plugin add cordova-plugin-firebase-authentication
npm install @ionic-native/firebase-authentication
Now Import the plugin in your component.
import { FirebaseAuthentication } from '@ionic-native/firebase-authentication/ngx';
constructor(private firebaseAuthentication: FirebaseAuthentication) { }
You can use the following functions to do various tasks in authentication modules.
I. Register a User with Email and Password
this.firebaseAuthentication.createUserWithEmailAndPassword('admin@enappd.com', '123')
.then((res: any) => console.log(res))
.catch((error: any) => console.error(error));
II. Send Email Verification
Initiates email verification for the current user.
this.firebaseAuthentication.sendEmailVerification()
.then((res: any) => console.log(res))
.catch((error: any) => console.error(error));
III. Send Password Reset Email
Triggers the Firebase Authentication backend to send a password-reset email to the given email address, which must correspond to an existing user of your app.
this.firebaseAuthentication.sendPasswordResetEmail()
.then((res: any) => console.log(res))
.catch((error: any) => console.error(error));
IV. Login with Email & Password
Asynchronously signs in using an email and password.
this.firebaseAuthentication.signInWithEmailAndPassword('test@gmail.com', '123')
.then((res: any) => console.log(res))
.catch((error: any) => console.error(error));
V. VerifyPhoneNumber(phoneNumber, timeout)
Starts the phone number verification process for the given phone number.
this.firebaseAuthentication.verifyPhoneNumber('+123456789', '30000')
.then((res: any) => console.log(res))
.catch((error: any) => console.error(error));
VI. Sign-in anonymously
Create and use a temporary anonymous account to authenticate with Firebase.
this.firebaseAuthentication.signInAnonymously().then(function(userInfo) {
// user is signed in
});
VII. Google login — signInWithGoogle(idToken, accessToken)
Uses Google’s idToken and accessToken to sign-in into firebase account. In order to retrieve those tokens follow instructions for Android and iOS.
VIII. Facebook login — signInWithFacebook(accessToken)
Uses Facebook’s accessToken to sign-in into firebase account. In order to retrieve those tokens follow instructions for Android and iOS.
IX. Twitter login — signInWithTwitter(token, secret)
Uses Twitter’s token and secret to sign-in into firebase account. In order to retrieve those tokens follow instructions for Android and iOS.
X. Sign out
Signs out the current user and clears it from the disk cache.
this.firebaseAuthentication.signOut().then(function() {
// user was signed out
});
3. Firebase Data Base Connection —
To connect your app with firebase database, at first, we need to install @angular/fire package in our app.
By executing this command firebase will be installed in your app:-
npm install @angular/fire firebase --save
Once AngularFire has been installed (the plugin that we’ll use to communicate our Ionic app with Firebase), we need to create a new project in Firebase. As we have already created a firebase project, hence go to the firebase console, where you’ll see the following menu:

Click on “Add Firebase to your web app” to see your new Firebase application’s credentials. We’ll specify these credentials to tell our Ionic application to communicate with our Firebase application.
The next step is to add firebase to our ionic app. For this go to the app/src/environment.ts file and paste the credentials copied from the “Add Firebase to your web app” dialog.
export const environment = {
 production: false,
 firebase: {
   apiKey: "YOUR_API_KEY",
   authDomain: "YOUR_AUTH_DOMAIN",
   databaseURL: "YOUR_DATABASE_URL",
   projectId: "YOUR_PROJECT_ID",
   storageBucket: "YOUR_STORAGE_BUCKET",
   messagingSenderId: "YOUR_SENDER_ID"
 }
};
Now goto firebase console and click on your project and then on the database on the left side menu.

Then create a database by filling the necessary details. Like,

After creating a database you can select real-time database

After selecting Real-time database, you will get the screen like,

Before starting,
import { AngularFirestoreModule } from ‘@angular/fire/firestore’; in your app.module.ts. So that you can access this in your components.
Now we are ready to start CRUD(Create, Read, Update, Delete) operations with firebase and ionic. We are going to see all these operations one by one:
import { AngularFirestoreCollection, AngularFirestore } from ‘@angular/fire/firestore’; in your page.ts
and in the constructor inject:
constructor(private firestore: AngularFirestore) { }
- Create
You will need to add the createDatabse() method to persist an item collection in the Firestore database:
createDatabse(items: Item){
    return this.firestore.collection('itemsList').add(items);
}
2. Read
You will need to add the readDatabse() method to retrieve the available item from the Firestore collection:
readDatabse() {
    return this.firestore.collection('policies').snapshotChanges();
}
3. Update
Next, you need to add the updateDatabse() method to update an item data by its identifier:
updateDatabse(items: Item){
    delete items.id;
    this.firestore.doc('itemsList/' + items.id).update(items);
}
4. Delete
Finally, you can add the deleteItem() method to delete an item by its identifier:
deleteItem(itemId: string){
    this.firestore.doc('itemsList/' + itemId).delete();
}Conclusion:
In this tutorial, we have learned how to deploy our ionic app on firebase using firebase hosting method, then we got to know what are the various tasks in firebase authentications modules with the ionic app and how to achieve those?
At last but not least we got to know how we can connect our firebase database with our ionic application very easily and we understood the methods and functions of firebase CRUD operation in the ionic application. Firebase provides us these facilities for free up to a limit. Firebase is truly a great match for modern-day mobile apps and is really developer-friendly.
Next Steps
Now that you have learned the implementation of Local Notifications in Ionic 4, you can also try
- Ionic 4 Payment Gateways — Stripe | PayPal | Apple Pay | RazorPay
- Ionic 4 Charts with — Google Charts | HighCharts | d3.js | Chart.js
- Ionic 4 Social Logins — Facebook | Google | Twitter
- Ionic 4 Authentications — Via Email | Anonymous
- Ionic 4 Features — Geolocation | QR Code reader | Pedometer
- Media in Ionic 4 — Audio | Video | Image Picker | Image Cropper
- Ionic 4 Essentials — Native Storage | Translations | RTL
- Ionic 4 messaging — Firebase Push | Reading SMS | Local notification
- Ionic 4 with Firebase — Basics | Cloud functions
If you need a base to start your next Ionic 4 app, you can make your next awesome app using Ionic 4 Full App


Top comments (0)