
This post is for Ionic React framework, using Capacitor. In this post you’ll learn how to implement push notifications in Ionic-React apps, using Firebase. First, I’ll cover this feature for Android apps, will update the blog with iOS implementation soon.
If you are looking for Push notification functionality in
- Ionic Angular app — Please check this blog
- React Native app — Please check this blog
- Ionic React app / Capacitor app — Continue reading 😄
As you can see from above, there are several options available for Hybrid app development these days, and it is easy to get confused between them. This post is focussed on Ionic framework with React as the front-end framework, and Capacitor as runtime and build environment.
Code for this tutorial is available on Github repo ionic-react-push
Let’s see a brief intro to each of the included frameworks:
- Ionic
- Capacitor
- Ionic-React
- Firebase
What is Ionic ?
You probably already know about Ionic, but I’m putting it here just for the sake of beginners. Ionic is a hybrid mobile app development SDK. It provides tools and services for developing hybrid mobile apps using Web technologies like CSS, HTML5, and Sass. Apps can be built with these Web technologies and then distributed through native app stores to be installed on devices by leveraging Cordova environment.
So, in other words — If you create Native apps in Android, you code in Java. If you create Native apps in iOS, you code in Obj-C or Swift. Both of these are powerful but complex languages. With Cordova (and Ionic) you can write a single piece of code for your app that can run on both iOS and Android (and windows!), that too with the simplicity of HTML, CSS, and JS.
It is important to note the contribution of Cordova in this. Ionic is only a UI wrapper made up of HTML, CSS and JS. So, by default, Ionic cannot run as an app in an iOS or Android device. Cordova is the build environment that containerizes (sort of) this Ionic web app and converts it into a device installable app, along with providing this app access to native APIs like Camera etc.
What is Capacitor ?
Cordova helps build Ionic web app into a device installable app. But there are some limitations of Cordova, which Capacitor tries to overcome with a new App workflow.
Capacitor is a cross-platform app runtime that makes it easy to build web apps that run natively on iOS, Android, Electron, and the web. Ionic people call these apps “Native Progressive Web Apps” and they represent the next evolution beyond Hybrid apps.
Capacitor is very similar to Cordova, but with some key differences in the app workflow
Here are the differences between Cordova and Capacitor
- Capacitor considers each platform project a source asset instead of a build time asset. That means, Capacitor wants you to keep the platform source code in the repository, unlike Cordova which always assumes that you will generate the platform code on build time
- Because of the above, Capacitor does not use
config.xmlor a similar custom configuration for platform settings. Instead, configuration changes are made by editingAndroidManifest.xmlfor Android andInfo.plistfor Xcode - Capacitor does not “run on device” or emulate through the command line. Instead, such operations occur through the platform-specific IDE. So you cannot run an Ionic-capacitor app using a command like
ionic run ios. You will have to run iOS apps using Xcode, and Android apps using Android studio - Since platform code is not a source asset, you can directly change the native code using Xcode or Android Studio. This give more flexibility to developers
In essence, Capacitor is like a fresh, more flexible version of Corodva.
Plugins
Cordova and Ionic Native plugins can be used in Capacitor environment. However, there are certain Cordova plugins which are known to be incompatible with Capacitor.
Other than that, Capacitor also doesn’t support plugin installation with variables. Those changes have to be done manually in the native code.
Why Ionic React ?
(Read carefully)
Since Ionic 4, Ionic has become framework agnostic. Now you can create Ionic apps in Angular, React, Vue or even in plain JS. This gives Ionic great flexibility to be used by all kinds of developers.
It is important to note that Ionic React apps are only supported by Capacitor build environment.
Same is not true for Ionic Angular apps — Ionic Angular apps are supported by both Cordova and Capacitor build environments.
Hence, if you want to build apps in Ionic React, you need to use Capacitor to build the app on device.
To build push notification functionality, you can either opt to
- Install a Cordova plugin for Push (I haven’t tried this yet, but I will), or
- Use Capacitor core push functionality
But since we are using Ionic-React, we need to stick to Capacitor.
I know if can get confusing as 4 frameworks are crossing their paths here. Bottom line for this post — Ionic + React + Capacitor + Firebase Push (using Capacitor core functionality, no Cordova)
Firebase
Firebase is a Backend-as-a-Service (BaaS) platform. It started as a YC11 startup and grew up into a next-generation app-development platform on Google Cloud Platform. It is getting popular by the day because of the ease of integration and variety of functionalities available on it.
Some of the quick integrations available with Firebase are
- Email Authentication
- Social logins
- Real-time database
- Analytics
- Crashlytics
- Push notifications ⬅️
- In-app messages
- Remote config
and much more. Firebase is quickly growing to become the most popular mobile app back-end platform.
Enough of story-telling, let’s dive into — How to implement Push notification in Ionic-React apps
Structure of post
I will go step-by-step so everyone can benefit
- Create a Firebase project
- Create a basic Ionic-react app and connect to Firebase
- Attach Capacitor to your Ionic-react app
- Implement Capacitor Push Notification functionality
- Build app on Android, and Test
Let’s get started with Ionic React Push Notification app !
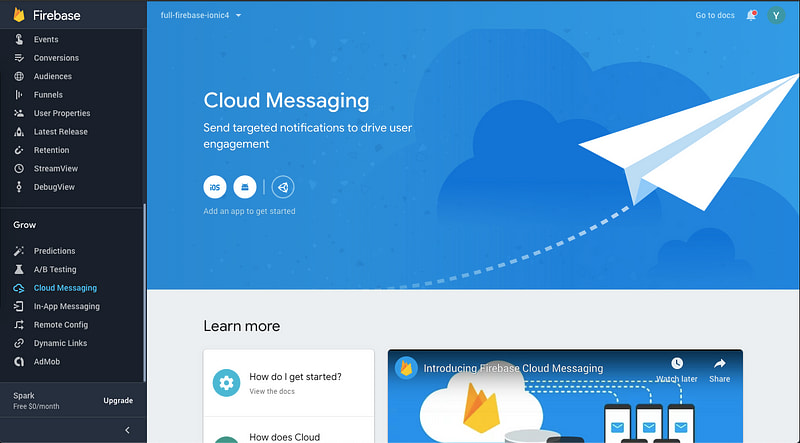
Step 1 — Create a Firebase project and find Push options
Go to Firebase and create your first project (or use an existing one). Your console should look like this

Note — It’s really easy to create a Firebase project, but if you still face any issue, follow step 1–4 of this blog
Click on your project and you’ll enter the project’s dashboard. Look for Cloud Messaging tab. This is where the magic will happen !
Create Android app in Firebase
For setting up options, you’ll first have to create an Android app in Firebase console. During the process, it will ask you to enter app’s package name and provide google-services.json.
Make sure you keep the package name same as what you are setting in ID of your Capacitor app

Step 2— Create a basic Ionic-React app
First you need to make sure you have the latest Ionic CLI. This will ensure you are using everything latest (Duh ! ) . Ensure latest Ionic CLI installation using
$ npm install -g ionic@latest
Creating a basic Ionic-React app is not much different or difficult from creating a basic Ionic-Angular app. Start a basic blank starter using
$ ionic start IonicReactPush blank --type=react
You see what just happened. The --type=react told the CLI to create a React app, not an Angular app !!
Run the app in browser using (yes you guessed it right)
$ ionic serve
You won’t see much in the homepage created in the starter. Let’s modify this page to include a button and a list to contain our push notifications

The code for this layout isn’t very complex
Step 3— Attach Capacitor to your Ionic-React app
Capacitor can be attached to an existing Ionic app as well. To attach Capacitor to your existing Ionic app, run
$ ionic integrations enable capacitor
This will attach Capacitor to your Ionic app. After this, you have to init the Capacitor app with
$ npx cap init
It will ask you the app name and ID. Give app name whatever you want. App ID is the domain identifier of your app (ex: com.example.app). Note, this ID should be exactly same as the one you provided in Firebase project (case-sensitive).
Add google-services.json
Add the downloaded google-services.json to your project in android/app folder

Configure gradle files
Make sure your gradle files are appropriately configured.
Project build.gradle should have google-services and gradle in dependencies
dependencies {
classpath 'com.android.tools.build:gradle:3.3.2'
classpath 'com.google.gms:google-services:4.3.2'
}
App build.gradle should have
// On the top
apply plugin: 'com.android.application'
// At the bottom of the file
apply plugin: 'com.google.gms.google-services'
Step 4— Implement Capacitor Push functionality
Capacitor has in-built Push notification capability. Import Push in your app/page with this
import { Plugins, PushNotification, PushNotificationToken, PushNotificationActionPerformed } from '@capacitor/core';
const { PushNotifications } = Plugins;
There are few plugins in-built in Capacitor/core . You can access these by simply importing.
There are four important listeners and one function for Push functionality
Register function
Register function registers your device on FCM server. In response, you receive a token . FCM uses this token to identify your device. That’s how you can pin point a device to send push notifications. You can register simply by
PushNotifications.register();
Listeners
-
registration — This listeners will fire when your token registration is successful. You receive the
tokenin the response as well - registrationError — This listener will fire when your registration is not successful. Without a successful registration you won’t receive push on the device. If this happens, you can ask user to try to register again
- pushNotificationReceived — This listener is very important, as it fires when you receive the notification when the app is open (in foreground). The listener provides you the notification payload which you can use to show message to user
-
pushNotificationActionPerformed — This listener is also very important, as it fires when you tap the notification received when the app is closed or in background. The listener provides you the data payload which you can use to show message to user, but the payload is a little different from the
pushNotificationReceivedlistener. You have to send useful information indatafield of the notification to receive it in this listener.titleandbodyfields are not received in this payload
Complete implementation of all this will look like the following (omitting layout code here)
I will attach the push() function ononClick event of the footer button, so we register on demand (simulating a situation where you ask user whether they want to receive notifications)
<IonButton expand="full" onClick={() => this.push()}>Register for Push</IonButton>
That’s it ! Push notifications are integrated ! Now all we gotta do is … test 😑
Step 5— Build app on Android, and test
Before adding a platform to Capacitor, you need to build the app once. Build the app using
$ ionic buildNow add Android platform (or iOS)
$ npx cap add android
This should add Android platform to your project.
Troubleshoot Tip
If you face an error saying
Capacitor could not find the web assets directory "/Users/abhijeetrathore/ionic-4-music/www".
Check your capacitor.config.json file. Make sure the webDir field has a value of www . If not, change the webDir field to have the same value as the last parameter of the url showing up in the above error
Note, you cannot run the project directly on the phone using CLI in Capacitor. You will have to open the project in Android Studio and run using the Android Studio IDE. Open the project in Android Studio using
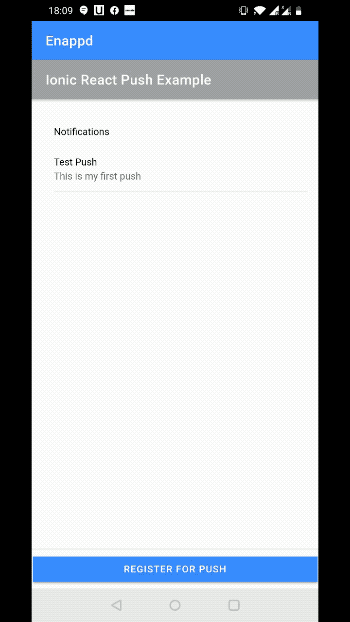
$ npx cap open androidNow run the app in your device using Android Studio, and you get this ! (Sample from my One Plus 6T, Android P)
Note: After adding a platform, if you make any changes in the app, you need to runionic buildand thennpx cap syncto reflect those changes in the native platform
Register your device for push notification
Click “Register for push” to register your device for push notifications. I have the token displayed in alert in the registration listener
Send push from Firebase console
To receive a push notification in the app, you will have to …. of course … send a notification first.
I have a detailed tutorial on how to send Notifications using Firebase console
To send a notification, we can use Firebase console → Cloud messaging section.
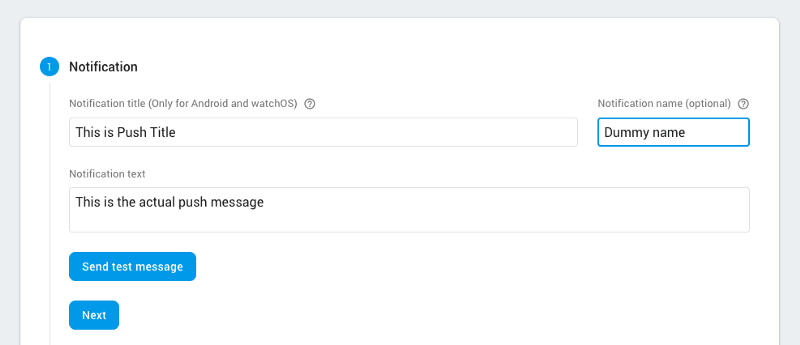
- Notification Title — This is the title that shows up in the push message in Android devices. iOS does not show this title on push messages
- Notification Text — This is the main body of the message. This is the text content that users see in the push notification
Enter both these info. Now, you have two choice
A. You can send a simple push notification, OR
B. You can send a test push notification using your registration token
Method B is very useful when you have a live app, and you don’t want your test push to go to every user. I’ll use this method to stick to development guidelines.
Sending test push notification — Method B
Click Send Test Message in the notification section. You will be presented with the following popup

You need to find out your device’s device_token (which you received after registering the device on FCM) and enter that here. Click Send to send a test push notification to ONLY your device. So handy, right?
Receive a push in Open app (in foreground)
In open app, you’ll receive the push without any notification in the notification tray. I have the notification data attached with the list, so the new notification will show up in the list, but you can always attach an alert in the pushNotificationReceived listener

I sent three push back to back, just in case you miss one. The data format received in foreground app is like this
{
 "id":"0:1569331101047632%008d0b4c008d0b4c",
 "data":{
  "body":"This is my second push",
  "title":"Test Push"
 },
  "title":"Test Push",
  "body":"This is my third push"
}
Receive a push in Background app (in background)
In minimized (background) app, you’ll receive the push with a notification in the notification tray. Once you tap the notification, the app with open, and the pushNotificationActionPerformed listener will be called. You can receive the data from this listener

The data format received in background app is like this
{
 "actionId":"tap",
 "notification":{
  "id":"0:1569331195228966%008d0b4c008d0b4c",
  "data":{
   "google.delivered_priority":"high",
   "google.sent_time":"1569331195220",
   "google.ttl":"2419200",
   "google.original_priority":"high",
   "body":"This is my second push",
   "from":"160012889513",
   "title":"Test Push",
   "collapse_key":"com.enappd.IonicReactPush"}
 }
}
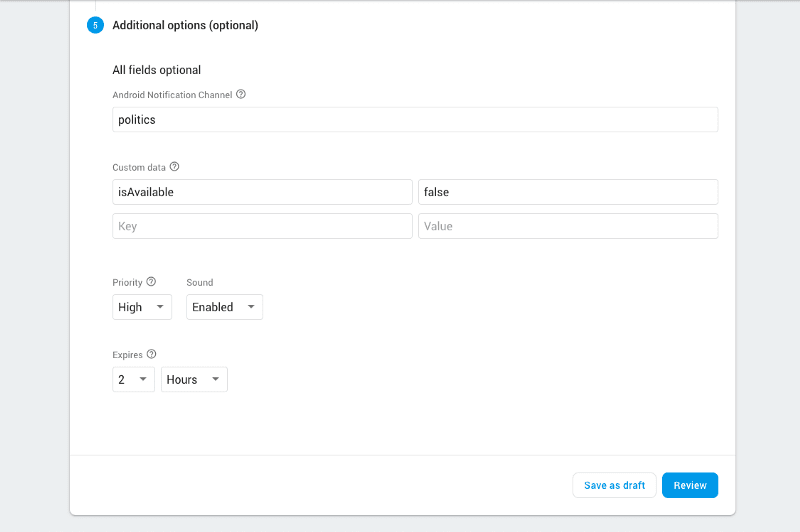
You can see here that you can access the title , body parameters inside the data field of the payload. This data field can be populated in Firebase console using Additional Options Section
Receive a push in closed/killed app
In a closed app, you’ll receive the push with a notification in the notification tray. Once you tap the notification, the app with open, but no listener will fire on this tap. Probably this feature isn’t yet available in Capacitor.
🎉🎉🎉 Congrats ! You just implemented Push notification functionality using Capacitor, in Ionic React App !
Conclusion
In this post, you learnt how to implement Push notification functionality in your Ionic React apps using Capacitor. We also tested the functionality on Android device, in an open, minimized and closed app.
Code for this tutorial is available on Github repo ionic-react-push
iOS implementation will be updated soon. Happy coding !
Next Steps
Now that you have learned the implementation of Push notification in Ionic React app, you can also try following blogs for Ionic apps
Ionic React Capacitor
- How to make basic apps in ionic-react-capacitor
- Camera and Image gallery in Ionic-React-Capacitor
- Push notification in Ionic-React-Capacitor apps
- Playing Music in Ionic Capacitor apps
- Adding Icon and Splash in Ionic React Capacitor apps
- Facebook login in Capacitor apps — Ionic React
If you need a base to start your next Ionic 4 React app, you can make your next awesome app using Ionic React Full App

Ionic Angular
- Ionic 4 Payment Gateways — Stripe | PayPal | Apple Pay | RazorPay
- Ionic 4 Charts with — Google Charts | HighCharts | d3.js | Chart.js
- Ionic 4 Social Logins — Facebook | Google | Twitter
- Ionic 4 Authentications — Via Email | Anonymous
- Ionic 4 Features — Geolocation | QR Code reader | Pedometer
- Media in Ionic 4 — Audio | Video | Image Picker | Image Cropper
- Ionic 4 Essentials — Native Storage | Translations | RTL
- Ionic 4 messaging — Firebase Push | Reading SMS
- Ionic 4 with Firebase — Basics | Hosting and DB | Cloud functions
If you need a base to start your next Ionic 4 Angular app, you can make your next awesome app using Ionic 4 Full App

Top comments (0)