
In this post, you will learn how to create HTML5 games using Phaser in Capacitor Ionic apps. We will create Zombie walker and a Space Invader game, which you can play both in app as well as browser. Space Invader was the first game I developed back in school, in JAVA, so it’s like a ‘Hello World’ of games for me !
HTML5 games can be made using Phaser framework, which is an awesome framework for 2D game development. Capacitor is the latest buzz in hybrid app world. It is created to be a replacement and an improvement over Cordova. We will learn more about these in following sections.
This demonstration is supported by Ionic 4 Full App Starter from Enappd. Complete source code of this tutorial is available in Github repo — Ionic-4-phaser (ZMB_capacitor branch & SI_capacitor branch)
Let’s see a brief intro to each of the included frameworks:
- Ionic
- Capacitor
- Phaser
Ionic Framework
You probably already know about Ionic, but I’m putting it here just for the sake of beginners. Ionic is a hybrid mobile app development SDK. It provides tools and services for developing hybrid mobile apps using Web technologies like CSS, HTML5, and Sass. Apps can be built with these Web technologies and then distributed through native app stores. These apps can be installed on devices by leveraging Cordova or Capacitor environment.
So, in other words — If you create Native apps in Android, you code in Java. If you create Native apps in iOS, you code in Obj-C or Swift. Both of these are powerful but complex languages. With Cordova (and Ionic) you can write a single piece of code for your app that can run on both iOS and Android (and windows!), that too with the simplicity of HTML, CSS, and JS.
It is important to note the contribution of Cordova/Capacitor in this. Ionic is only a UI wrapper made up of HTML, CSS and JS. So, by default, Ionic cannot run as an app in an iOS or Android device. Cordova/Capacitor is the build environment that containerizes this Ionic web app and converts it into a device installable app, along with providing this app access to native APIs like Camera etc.
Phaser Game Framework
Phaser, first released in 2013, is a 2D HTML5 game development framework. It has now become a huge name in 2D HTML5 games. Based on javascript, it can easily be integrated in a variety of javascript frameworks. 👾 👾 👾
So why integrate Phaser and Ionic ? 🚀 👾
While Ionic gives you the power of creating apps and PWA at a lightening speed, you cannot really make games with it. Phaser, while great at game building, is not really about building a structured mobile or web-app. Hence, building a neat looking game app or PWA with Phaser requires an HTML + CSS wrapper, a void which Ionic perfectly fills.
What is Capacitor ?
Cordova helps build Ionic web app into a device installable app. But there are some limitations of Cordova, which Capacitor tries to overcome with a new App workflow.
Capacitor is a cross-platform app runtime that makes it easy to build web apps that run natively on iOS, Android, Electron, and the web. Ionic people call these apps “Native Progressive Web Apps” and they represent the next evolution beyond Hybrid apps. It was built for Ionic, but it can run other frameworks as well. It is just a run-time system which “container-izes” your web-app and allows it to run in multiple places. With capacitor, you can run your game in
- Android App
- iOS app
- In browser as a Progressive web app, and
- In desktop application using Electron
In essence, Capacitor is like a fresh, more flexible version of Cordova. It makes the job of running hybrid apps on various platforms very easy.
Structure of the Post
We’ll follow a stepped approach to create a Phaser based game in our Ionic 4 Capacitor App. Following are the steps
- Step 1 — Create a basic Ionic 4 Angular app
- Step 2 — Include Phaser in the project
- Step 3— Integrate Capacitor in the app
- Step 4 — Implement Phaser game
- Step 5— Build the game into a mobile app
This is what we are going to build in this tutorial.

So let’s dive right in !
Step 1: Create a basic Ionic 4 Angular app
I have covered this topic in detail in this blog.
In short, the steps you need to take here are
- Make sure you have node installed in the system (V10.0.0 at the time of this blog post)
- Install ionic cli using npm (my Ionic version is ^4.7.1 )
- Create an Ionic app using
ionic start
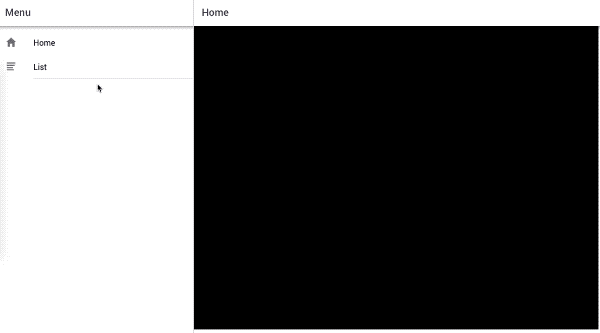
You can create a sidemenu starter for the sake of this tutorial. On running ionic start ioniser sidemenu , node modules will be installed. Once the installation is done, run your app on browser using
$ ionic serve
and check everything runs fine. For me it looks like following. Copy the code from the attached Github repo to change it into the game.

Step 2: Include Phaser in the project
Phaser is super-easy to include in the project. Essentially it is just a Javascript file that you need to include in your HTML5 project. There are two ways to do it
#1 — The cool “just-get-it-done” way (faster)
Download phaser.min.js from Phaser official downloads and link it with your project. For demo purpose, I will keep this file in assets folder, but you can link it from CDN as well.
Include the phaser.js file in index.html files as follows
<script src="assets/phaser.min.js"></script>
Now you can include phaser in your component .ts files using
declare var Phaser;
(To check what Phaser contains, try consoling the variable or its defaultState saved in this and you’ll get some insights into Phaser’s built.)
#2 — The complex “I-am-a-coding-nerd” way
Download the npm package from phaser with
npm install phaser-ce
Prepare webpack to compile the phaser package so you can import the package in the .ts file. You might have to prepare your own webpack-config for this and install additional modules. After this, you can import the variables as
import "pixi";
import "p2";
import * as Phaser from "phaser-ce";
Details are given here (Last I tried, this method had various bugs with Ionic, so I will stick with the method #1)
Step 3— Integrate Capacitor in the app
Capacitor can be attached to an existing Ionic app as well. To attach Capacitor to your existing Ionic app, run
$ ionic integrations enable capacitor
This will attach Capacitor to your Ionic app. After this, you have to init the Capacitor app with
$ npx cap init YOUR_APP_NAME YOUR_APP_ID
Step 4: Implement Phaser game
You can find the complete code in the Ionic 4 Phaser Starter (ZMB_capacitor branch)
For sample purpose, we’ll use a simple Phaser example where we will make a Zombie walk.
We will focus on home component that comes with the starter. So all the relevant javascript code will go in home.page.ts file. Replace the whole content in home.page.html file with the following
<ion-content>
  <div id="phaser-example"></div>
</ion-content>
We will identify the phaser-example in our javascript logic and instantiate the game in this div.
A basic Phaser game has three default functions — preload(), create() and update()
Preload()
As the name suggests, preloads assets etc. In our case, this function will load the zombie and background images.
preload() {
this.game.load.image('lazur', 'assets/thorn_lazur.png');
this.game.load.spritesheet('mummy', 'assets/metalslug_mummy37x45.png', 37, 45, 18);
}
Create()
Creates the game instance and loads the game state. In our game, this function will set the images in the scene. We will also create and set animation listeners here.
create() {
// Set background
this.back = this.game.add.image(0, -400, 'lazur');
this.back.scale.set(2);
this.back.smoothed = false;
// Set mummy from a sprite
this.mummy = this.game.add.sprite(200, 360, 'mummy', 5);
this.mummy.scale.set(4);
this.mummy.smoothed = false;
// Set mummy animation
this.anim = this.mummy.animations.add('walk');
this.anim.onStart.add(that.animationStarted, this);
this.anim.onLoop.add(that.animationLooped, this);
this.anim.onComplete.add(that.animationStopped, this);
this.anim.play(10, true);
}
Update()
Update the game state on looping, actions, physics interactions etc. For our game, this will update the animation by moving the background to create the effect of a “walk”
update() {if (this.anim.isPlaying) { this.back.x -= 1;}}
and Tada !!! 🎉 🎉🎉 We have our game running in the serve window
In the same way, you can run any Phaser game with Ionic. Trust me, there are some incredible looking games made in Phaser. We made a Mario replica some time back, and a Space Invader as well !
⭐️️️️⭐️️️️⭐️️️️ Important️️ ⭐️️️️⭐️️️️⭐️️️️
The Phaser implementation can leave you confused with the implementation of this . In short, once the Phaser scene is initialized, this contains the default game state. As an Ionic developer, or if you follow Ionic documentation, you will use this to refer to the component’s class. So you end up using conflicting this . For a quick work-around, I assign the Ionicthis to another variable that (😅) and then use it to point to class functions.
A common mistake is to declare that = this . Yes, it does reference this via that , but as soon as this changes, that also changes, and hence there is no point of doing this. You might do that = Object.assign({},this) which is a good standard code. But you will find that this also does not result in what we want. Because in Ionic this contains the class functions inside _prototype , to copy those functions into that you should define it like
that = Object.create(this.constructor.prototype);
And then use that in place of this to call functions
E.g. that.animationStarted points to a function animationStarted . Using this here would throw an error because create() function is a Phaser default and contains scene’s default state inside this
If you are not comfortable with the thisconcept, you can read more about it here.
(As another work-around, you can put the complete javascript code outside the class implementation of Ionic, or worse even, in a <script></script> tag in index.html , but that is too much of a hack. You won’t be able to write huge game codes this way)
Step 5: Build the game into a mobile app
Building a Capacitor app with Phaser is exactly same as building a regular Capacitor app. For those who are not familiar with the process in Ionic 4, first build the ionic web assets
$ ionic build
Then add a platform to the app using any of these commands
$ npx cap add android
$ npx cap add ios
Once the platform is added, you can open the native IDE of that platform and run the app in device or simulator.
$ npx cap open android // opens Android Studio
$ npx cap open ios // opens Xcode
You might want to adjust the canvas size as per the device size using window.innerWidth and window.innerHeight . With this, you can adjust the game canvas for all mobile devices sizes.
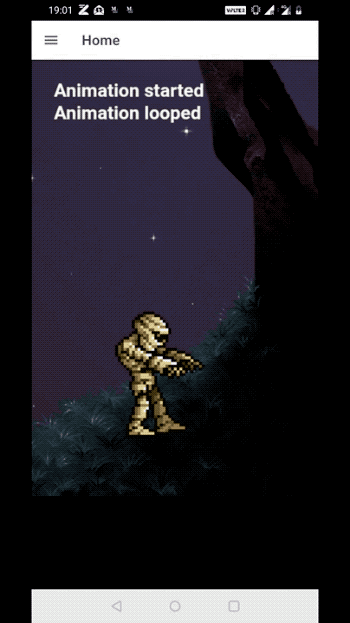
With these tweaks, the game looks like above. Not bad, huh. 👻
Cool thing is, you can still have the sidemenu, or tabs like a mobile app and put in all regular functionalities of the app in the game (or vice versa) like login, signup etc. making use of Ionic plugins.
Space Invaders ?
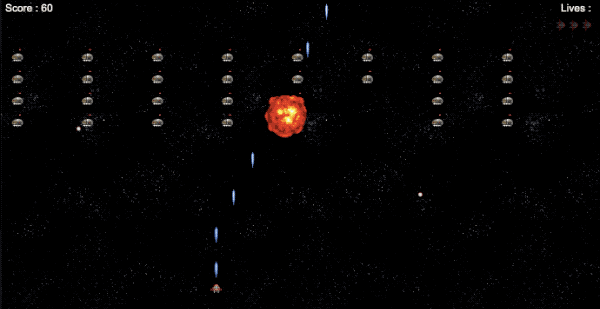
Thinking of making your own PUBG or space invader game in Ionic ? We have something for you ! We have included Space Invader game in Ionic Capacitor Github repo — Ionic-4-phaser (SI_capacitor branch)

Run the code from the SI_capacitor branch of the repo, and you’ll get a cool Space Invader game app ! Looks like this on Android device

Conclusion
Ionic is super fast in making mobile apps, while Phaser is great for making 2D HTML5 games. Capacitor is a great run time environment to containerize web-apps to run on variety of platforms. Combining Ionic, Capacitor and Phaser, you can create some cool Game apps. You can always include the game in a regular Ionic Capacitor app as well, which makes it much more versatile.
This demo is supported by Ionic 4 Full App Starter from Enappd. Complete source code of this tutorial is available in Github repo — Ionic-4-phaser (ZMB_capacitor branch & SI_capacitor branch)
We do more such fun stuff at Enappd on a regular basis. Feel free to browse through our interesting app starters.
Next Steps
Now that you have learned the implementation of Music playback in Ionic Capacitor app, you can also try following blogs for Ionic apps
Ionic React Capacitor
- How to make basic apps in ionic-react-capacitor
- Camera and Image gallery in Ionic-React-Capacitor
- Push notification in Ionic-React-Capacitor apps
- Playing Music in Ionic Capacitor apps
- Adding Icon and Splash in Ionic React Capacitor apps
If you need a base to start your next Ionic 4 React Capacitor app, you can make your next awesome app using Ionic React Full App

Ionic Angular
- Ionic 4 Payment Gateways — Stripe | PayPal | Apple Pay | RazorPay
- Ionic 4 Charts with — Google Charts | HighCharts | d3.js | Chart.js
- Ionic 4 Social Logins — Facebook | Google | Twitter
- Ionic 4 Authentications — Via Email | Anonymous
- Ionic 4 Features — Geolocation | QR Code reader | Pedometer
- Media in Ionic 4 — Audio | Video | Image Picker | Image Cropper
- Ionic 4 Essentials — Native Storage | Translations | RTL
- Ionic 4 messaging — Firebase Push | Reading SMS
- Ionic 4 with Firebase — Basics | Hosting and DB | Cloud functions
If you need a base to start your next Ionic 4 Angular app, you can make your next awesome app using Ionic 4 Full App


Top comments (0)