Arduino boards are a type of electronic board that is used just as microcontrollers in the electronic embedded system to control and regulate electric instruments, like motor control, actuators, robotic structures, and much more. They provide support for both software and hardware functionality.

The official programming software used for the Arduino device is Arduino IDE. They are much easier to operate than microcontrollers because they have some extra features such as like GPO pins, PWM, analog pins, microprocessors, and much more. We also don't need a lot of extra hardware to use them, they are easily programmable even a non -tech person can do programming on it.
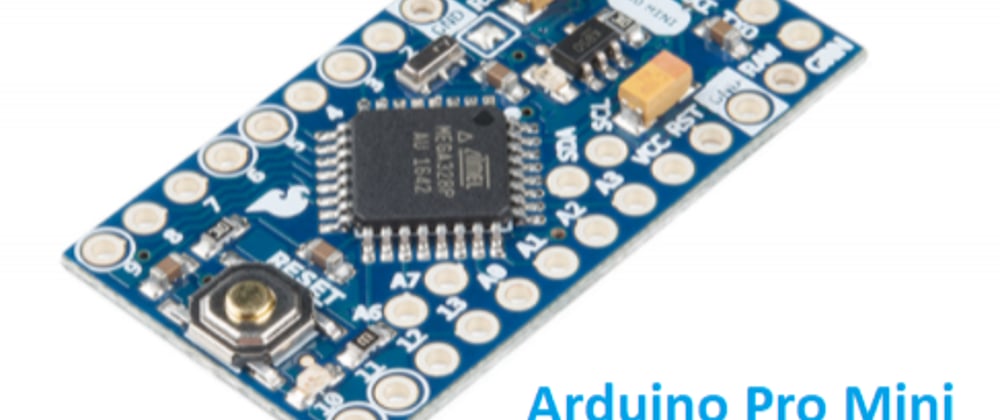
Arduino Pro Mini:
Arduino pro mini is a type of Arduino board with having Ategma 328 microcontrollers. Ategma 328 is also known as the brain of the audio device. The board is divided into two types based on voltage source and operating frequency.
- Arduino device runs on 5v voltage source with 16 MHZ clock frequency
- Arduino device runs on 3.3v voltage with 8MHZ operating frequency.
Board overview:
Overall, the board is copied version of audio uno, with some little bit changing, as USB ports 2.0 which are available in the Arduino Uno are not present in audio mini, moreover two voltage regulators which are present in audio UNO and Arduino mega are reduced to only one in Arduino mini.

Arduino pro mini contains14 input-out pins with 6 pins reserved for Pulse width modulation. The pins named AO to A7 are known as analog pins.
The board size is small in size which means it is a good choice for those circuits in which compact space is available for operations. A detailed figure of the Arduino mini is shown in the figure.
Main components:
Pins:
Different types of pins inputs are available on the board, they are classified as per their requirements, they are used for transferring data, giving power source and for controlling commands, they are defined as.
Input/ output pins:
14 input and output pins are available on the board, they are present on the right and left side corners, these pins are used for the connection of external hardware devices.
PWM PINS;
PWM pins are used for the modulation and control of embedded systems such as circuit boards, controlling actuators, motors, and dc invertors, these pins are 8 in number to do pulse width modulation.
Analog Pins:
Analog pins are used for the conversation of signals, they usually convert analog signals to digital signals, from these 14 pins on the board 6 are known as analog pins.
Reset Pins:
Reset pins are the unique feature of this model. these pins are provided to rest the device if it has up during running, Arduino Mini usually got stuck during program operations, and by pressing these pins one can reset the device.
Micro Sd card Port:
An SD card port is available on the board to store the information and commands. A Micro Sd card of any size can be installed in the device.
External Interrupts:
Two External interrupts pins are available on the board, these pins are used for generating interrupting signals, they are named T0 at pin 4 and T1 at pin 5.
Ground Pins:
The Arduino mini has 3 ground pins available on the board.
SPI:
Arduino mini Has 4 ports for the SPI communication protocol. These ports are named 10(ss), 11(MOSI), 13(CSK), and the last one is 12(MISO) ports. These all are used to carry out SPI communication.
USART communication:
USART series communication contains two pins on the board is Known as TX and RX. The TX pin is used to transmit serial data, whereas the RX pin which is on the upper side is used to receive Serial data.
Voltage Regulator AND VIN:
As Arduino Mini is a compact version of the Arduino series, that’s in this model company introduce only one voltage regulator. the input voltage require for the power source is between 4v to 8 v.

Way to program Arduino MINI:
The main programming software for audio Devices is Arduino IDE, which is the official software of Arduino Company. The device can be easily programmed through this software as per the functionality we want to perform through it. But there is a little bit of difference between the two different Arduino minis.
Firstly, attach the device with the computer system, if you are using windows 10 or XP then the driver software would automatically be installed, if not go to the setting icon, then Settings—device manager—there you can find an option related to Arduino mini, click the option then press add a button to install the device drivers. The procedure is depicted in the figure below.

In the second step Follow the instructions as an Example—Basic---BLINK, from here you can get a clear view of the Arduino board too. You can see the arrangements of ports and the input and output devices connected.

After that go to the tools selection and select your board option there that name “Arduino MINI”. If you can find it go to the device manager and see that whether your driver is properly installed or not.
As the Arduino mini has two types of boards so for 3.3 v with 8 MHz board you see the option as Pro Mini (3.3V, 8 MHz) w/ ATmega328P and for 5.5 v you see an option Arduino Duemilanove or Nano w/ ATmega328P over there selected the board carefully to properly install the drivers.
As the board is selected the last step, we have to do is to install the device program, which goes to the file section of the blinking software and select install programming, it will take a few minutes to install, when the installation is complete the LED is start blinking which means the device is ready to use.


Top comments (0)