Arduino Mega 2560 :
Arduino 2560 is a just like a mini-computer that support both software and hardware approach to operate devices and control electronic equipment. It is an upgraded model of Arduino UNO with more INPUt out pins, advanced processor, and it is helpful in those operating conditions where complex embedded systems and electronic devices are needed to operate.

The official Programming software for this device is Arduino Software known as IDE, it is the official Programming software launched by the Arduino company for this device. The biggest distinction between microcontrollers and Arduino boards is that Arduino boards are simple to use and come with everything you need, like GPO pins, PWM, analog pins, and more. We also don't need a lot of extra hardware to use them.
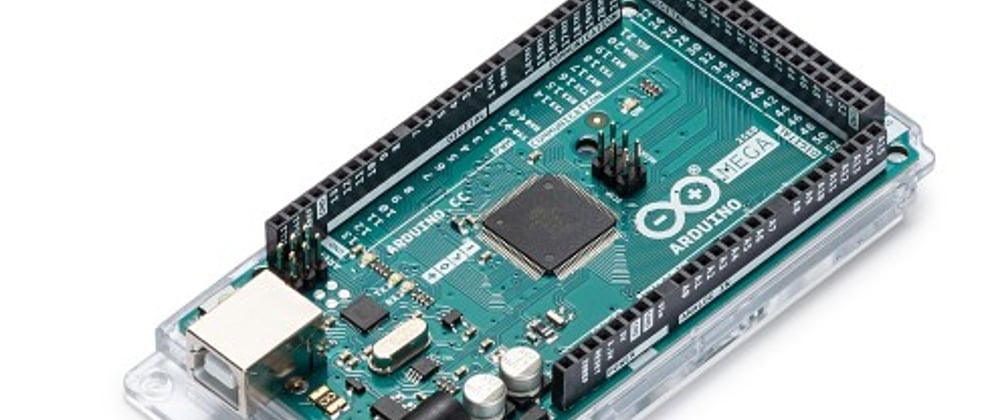
Different Arduino boards are available in the market depending on their capability, but the Arduino UNO is the most trustworthy and user-friendly device. The image below shows a glimpse of Arduino.
Board Overview :
The Processor Board used in Arduino Mega 2560 is Atmega 2560 Microcontroller, which is the same one that is used in Arduino UNO, But it is used in those devices where we need more input out devices, complex operations.
As is mentioned the board contains GPIO pins, which include 54 input-output pins with 15 pins reserved for PWM operations. A Dc power source of 5V is required to turn on the device, A power jack is attached to the board, A alternative power source can also be given through VIN Pin which is available on the board.

Two voltage regulators were also attached with the input power supply jacket, The Ategma 2560 microcontroller has three types of memory devices that are flash memory of 256 KB, SRAM memory of 8KBN, EEPROM memory chip of 4kB, for external memory a small micro SD card port is also available to save the programming commands.
Main components.
Stigma 328: Also known as the Arduino's brain, the Stigma 328 is a microcontroller that is put on the chipboard and saves the audio programming and commands. When used in embedded systems, the Arduino's functionality is also implemented by the stigma 328.
Pinout :
The chipboard contains numerous sorts of pins that are classified based on their function. They are utilized in a variety of ways, from programming to control gadgets. devices. The main benefit of this model of Arduino is the pin structure provided on the board.
Input/ output pins :
There are a total of 54 input and out pins that are available on the Arduino boards, they are available on both the right end and left end.
PWM PINS ;
Among these 54 pins, 15 pins are reserved for the PWM known as pulse width modulation, More PWM pins mean the board can be used to operate more devices like controlling motors, actuators, LEDs, robotic structures, and much more.
Analog Pins: There is a total of 16 analog Pins that are available on the board, they are used for the conversion of signals from analog to digital, they are named as A) to A15 on the board.
USB ports: used for external device connection.
Micro Sd card Port :
An SD card port is available on the board to store the information and commands. A Micro Sd card of any size can be installed in the device.
External Interrupts:
Six pins are available for generating signals external interrupts those pins named as 0,3,18,20,21.
Power Sorce & Led :
The device can be powered by a 5v power supply. On the board, there is a Power Source LED that indicates the device's connection. It starts blinking when we attach the power supply.
SPI:
SPI known as serial peripheral interface system is also available on the device, this system supports the transfer of data from other peripheral devices and the controller.
USART communication:
The board has a feature of USART communication, which allows the operator to transmit and receive serial data through the pins known as TX and RX.
Voltage Regulator AND VIN :
A voltage regulator controls the voltage that is supplied to the board, and it is attached to the VIN device known as voltage input.
Way to Program Arduino MEGA 2560 :
To program, the device you have to install Offical Arduino software, that is Arduino desktop IDE. , if you are using windows 10 and 7 the windows automatically detect the device, otherwise you should add the device manually.
- TO add the device firstly you should follow the steps as Settings—Device Manager---Add device. There you see an option of Arduino 2560
- From there choose the option “Arduino. inf” file and click ok if you are using an old version then it may be named “Arduino UNO.INF”.
The driver's installation is started after that you have to connect the board, for connection USB 2.0 option is available on the device, connect the device with a data cable with the computer system. Now open the option name as blink.
A window will open, from there you have to choose Example---Basics---Blink, the glimpse of steps is shown below.

After that select your desired board, for that purpose go to the option named as tools—board” Arduino /Geniuno mega 2560”—Arduino mega 2560

Now select the port from which you desire to start the hardware, which is mostly COM3, if you knew your desire post you have to disconnect the port and again attach it as the layout is displayed in the menu when you attach the board.

Now you are ready to install the software on your device, Now go to the environment tag and Press the button “UPLOAD” to start installing the Programming software. Wait for some time, after the installing is complete Press the button ok, and you will see TX and RX led are start flashing. That’s mean’s you have successfully program the Device, now detach the Arduino mega and you are free to use it for your desire application.


Top comments (0)