Greetings to all,
Recently, we all can observe that the popularity of Single Page Applications (SPA), in other words, projects created with technologies such as VueJS, React, and Angular, is increasing in the web world.
I will explain step by step how we can deploy our SPA projects on Amazon Web Services (AWS).
In my article, I will get on with the demo project I had prepared with Vue.
What kind of structure would be better for us to set up regarding the performance and security of our application? Which AWS can we use for it? Together, we'll explore the answers to these questions.
Amazon Web Services to use:
- Certificate Manager
- S3
- CloudFront
- Route53
AWS that we're going to use will be Certificate Manager, S3, CloudFront, and Route53.
AWS that we're going to use will be Certificate Manager, S3, CloudFront, and Route53.
We will create an SSL certificate with Certificate Manager (ACM) to provide the HTTPS connection.
We will use the S3 service to store the content of our website, that is, to work as Object Storage.
We will use CloudFront for the CDN service and, finally, Route53 for our DNS redirects.
Let's take a quick look at these services 🚀
AWS Certificate Manager
AWS Certificate Manager (ACM) is a service that we can use to create, manage, and distribute SSL/TLS certificates.
![]()
With this service, we can easily perform certificate renewal transactions automatically.
AWS S3
AWS S3 is an object storage service that offers data availability and performance capabilities.

Using this service, we can store data for various usage scenarios such as repository, web pages, mobile applications, backup and restore, and archiving.
S3 is the cheapest object storage option. For example, in Frankfurt, you pay a monthly fee of $1.2 for 50TB of data you store on a bucket.
AWS CloudFront
By using a global network of edge locations, CloudFront provides CDN service for us.

In other words, the content of our website is cached on Amazon servers in different locations around the world, and each request to our website by the end user is responded to from the servers in the region closest to the end user, thanks to CloudFront.
In this way, CloudFront helps us to lower our costs as it minimizes response time and maximizes bandwidth speed.
CloudFront also allows us to set up security issues such as blocking users in certain locations from accessing content and requiring the user to access content using CloudFront URLs and protects against DDoS attacks.
AWS Route53
AWS Route53 can be used both for domain purchase and to manage the domain we purchased from a different place.

Each domain that we keep on Route53 is called Hosted Zone.
We can route a domain we have purchased to the IP or CNAME address we want by creating DNS records such as A record, CNAME, and MX within this service.
How about pricing for Route53?
For the first 25 hosted zones you create in your account, you will be charged $0.50 per month per hosted zone. When you start to keep more than 25 zones, you will only be charged $0.10 per zone.
Pricing per inquiry is charged according to the Routing Policy you use.
Standard inquiries are charged $0.40 for every million inquiries for the first one billion inquiries per month and $0.20 for one million queries for those over 1 billion.
How will we use these services we have mentioned?

If we examine the structure we will create through this diagram:
Here, the traffic from the end user will first reach Route53, enter DNS resolution, and from there to CloudFront.
The CloudFront CDN service will ensure that the content of our website in our S3 bucket reaches the end user from the cache.
In this structure, our SSL certificate, which we created using ACM for a secure connection, will be activated and will play a role in establishing the HTTPS connection.

If we consider different scenarios,
Of course, instead of CloudFront, we could've used our own servers that we would've rented and configured the CDN service ourselves. However, when the traffic increases on the site, we need to rent more servers and deal with the management of these servers. This, in return, will be reflected as effort and cost.
We can create the same structure without CloudFront but using only S3. For this, it will be enough to enable Static Website Hosting from the Properties of the S3 bucket.
However, each request that a website hosted on S3 will create an additional cost. This method might be too much expensive for a high-traffic website. Therefore, using CloudFront within the structure can ensure that our website is more efficient with less cost.
Things to do:

I. Creating an IAM user on AWS for the Bitbucket deployment step.
II. Creating an SSL certificate for the HTTPS connection.
III. Creating an S3 bucket.
IV. Creating a CloudFront CDN.
V. DNS forwarding via Route53.
Creating an AWS IAM user

On AWS IAM, we click Add Users and create a user and select Programmatic Access to get the Access Key ID and Secret Access Key information that we will use to deploy our project over Bitbucket.

We need to create and assign two policies so that the user we have created can perform deployment and cache clear operations as in the example.
We ensure access security by typing the name of the S3 bucket that we will create in these policies and specifying the IP addresses published by Bitbucket in a source IP condition. Thanks to this authorization, we will be able to operate Get, List, Put and Delete Object on our bucket.
Bitbucket-Deployment-Policy to upload the files of our project to the S3 bucket:
{
    "Version": "2012-10-17",
    "Statement": [
        {
            "Sid": "S3BucketPolicy",
            "Effect": "Allow",
            "Action": [
                "s3:PutObject",
                "s3:GetObject",
                "s3:ListBucket",
                "s3:DeleteObject"
            ],
            "Resource": [
                "arn:aws:s3:::BUCKET_NAME",
                "arn:aws:s3:::BUCKET_NAME/*"
            ],
            "Condition": {
                "ForAnyValue:IpAddress": {
                    "aws:SourceIp": [
                        "34.199.54.113/32",
                        "34.232.25.90/32",
                        "34.232.119.183/32",
                        "..."
                    ]
                }
            }
        }
    ]
}
If we look at CloudFront-Cache-Clear-Policy, here we authorize to create of Invalidation in the CF Distribution we will create.
Invalidation will be required to make our cache clear in our CDN service after the deployment of the project, which we will use in the pipeline step.
CloudFront-Cache-Clear-Policy;
{
    "Version": "2012-10-17",
    "Statement": [
        {
            "Sid": "CloudFrontCacheInvalidationPolicy",
            "Effect": "Allow",
            "Action": "cloudfront:CreateInvalidation",
            "Resource": "arn:aws:cloudfront::ACCOUNT_ID:distribution/CF_DISTRIBUTION_ID",
            "Condition": {
                "ForAnyValue:IpAddress": {
                    "aws:SourceIp": [
                        "34.199.54.113/32",
                        "34.232.25.90/32",
                        "34.232.119.183/32",
                        "..."
                    ]
                }
            }
        }
    ]
}
Creating SSL certificate

On AWS Certificate Manager, we need to click on the Request a Certificate button from Certificates and request an SSL certificate.

On the screen that pops up, we click on "Request a public certificate" and proceed.

After that, we specify the FQDN, namely the Domain Name we'd like to use.

For SSL, we must choose a validation method. Here AWS gives us two options.
DNS validation is the recommended method.
If we choose it, we will verify our SSL certificate by adding CNAME records to our Hosted Zone on Route53.
Our other validation method is,
Email validation, we send a verification email to the mail account authorized for the domain. We can verify our SSL certificate with it.
Creating S3 Bucket

Now, we choose S3 on AWS Console.
On this screen, we can list our existing buckets by clicking on Buckets from the menu on the left, and in the same way, we can choose Create Bucket on the right and start creating a new one.

After proceeding to the bucket creation step, we can make the general settings of our bucket here.
First, we will name our bucket and then choose which region we want it to be in.

If there is a bucket we had created before, we can create a new bucket with the same settings of that bucket by choosing "Copy settings from the existing bucket".
By default, in the S3 buckets we create, an S3 object belongs to the AWS account that uploaded it, and we can change it with the ACL, that is, the Access Control List, from the Object Ownership screen when creating the S3 bucket.

Disabling ACL is recommended here.
ACLs are not recommended, except for unusual situations where you need to control access for each object separately.
Instead, we must grant permissions using bucket policies. We will continue by choosing recommended one.

In this section, we see the restricted options regarding the accessibility of the bucket we created. Here we will proceed by closing the public access to the bucket.
Because if our bucket URL exposes and receives many requests from malicious ones, there will be additional costs for us.
In the following steps, we will ensure that only CF, which we will use as a CDN, can access the bucket, and in this way, we will reduce our S3 cost.
At this stage, we can manually upload the build or static HTML files of our project into the bucket we created by clicking on Add files or Add Folder.

But instead of manually uploading the file, we will continue by showing how we can deploy our project with Bitbucket Pipeline.
Bitbucket Pipeline

We received the Access Key ID and Secret Access Key information for the user that we created in the AWS IAM creating a user step, which was mentioned at the beginning of the article.
To upload the build files of our project to our S3 bucket with Bitbucket Pipeline, we need to define these keys as variables from the Repository Variables section by selecting the project's Repository settings.

First of all, if we take a look at the folder structure of our project, our bitbucket-pipelines.yml file should be in the main directory.

On Pipeline, we can see the "Build & Deploy to S3" step that will be applied if a commit is sent to Master Branch in the example given. In this step, we first run "npm install" in the runtime mode and then get it to build in the production mode.

Afterward, we deploy the dist folder containing our build files to S3, using the keys of the IAM user for which we have given the S3 and CF authority that we have created for the deployment. Here we need to write the region code and the bucket name.
After the deployment, we need to clear the cache for the changes made to be active on CloudFront.
We perform this by typing our CF Distribution ID in the second pipe section of the pipeline.
After we prepare our Pipeline in this way, we can run it. 🚀

If we take a look at our S3 bucket after the successful pipeline step, we can see that the build files of our project are there.

Creating a CloudFront Distribution

We click on CloudFront, which we will use as a CDN service, and list the current distributions or create a new distribution from Distributions on the left side of the menu.
Or, we can directly choose "Create a CloudFront Distribution" and proceed to the creating step from the screen below.

In order to create a Distribution, we first need to fill out Origin Domain. That is, we will choose what distribution will use as a source.

Here, we select the bucket named demo.techses.net, which is the S3 bucket that we created before, and specify it as a source.
If we want, we can specify a path in this S3 separately. It will be named as the selected resource.
When we created our S3 bucket, we hadn't allowed it public access. That's why we're now about to create an Origin Access Identity (OAI) for the CloudFront Distribution to access the S3 bucket.
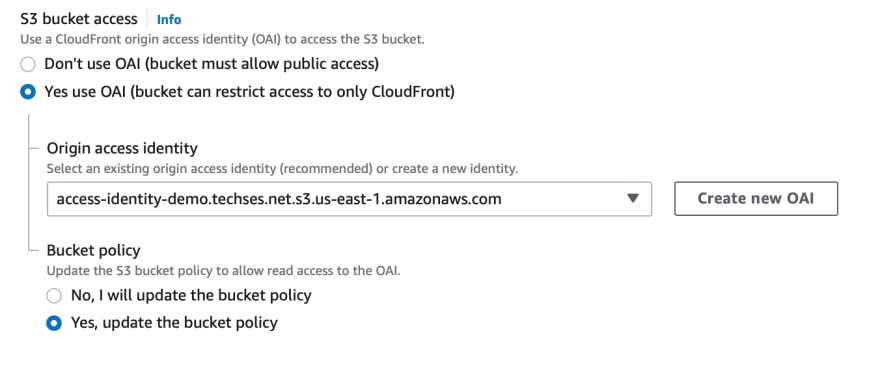
For this identity to access the S3 bucket and the objects in the bucket, we need a Bucket Policy with GetObject permission.
For this policy to come up automatically, in the Bucket Policy section on the screen we are on, we continue by selecting, Yes, update the bucket policy and ensure that the policy is defined simultaneously while completing all stages of creating a CDN.
Here, we can request CloudFront to respond to incoming traffic HTTP and HTTPS requests separately, redirect HTTP requests to HTTPS, or respond only to HTTPS requests.

Here, we will ensure that incoming HTTP traffic is redirected to HTTPS for security reasons.
Again, on the same screen, we can make a restriction by choosing which HTTP methods we allow. For example, we can prevent the end user from sending a PUT or DELETE request.
Here we can choose which edge locations we want to use from Price Class for our CDN.

We can make a choice according to the location of our S3 bucket; we will continue by choosing all locations for the best performance.
If we want to restrict access to our website or define special firewall rules, we can activate access rules by selecting web ACL with optional AWS WAF.
Here we can enter the URL we want to use to access our CDN as an Alternate Domain Name. This step will allow us to add an Alias Record while forwarding DNS on Route53.
Here we will select the SSL certificate that we created on ACM, and we will ensure that our CDN offers a secure connection with HTTPS; we can choose our TLS version in the Security Policy section; we will continue with recommended TLS version here.

We set up our CDN. Here we can have a look at our current configuration and edit them later if we wish.

On your left, number 1 gives you the DistributionID information.
By specifying this ID in the second pipe section of the pipeline, we use it to clear the cache automatically on CDN after the deployment.
However, if we wish to do this manually, we select the Invalidation tab, which is signed as number 2 on the CloudFront Distribution screen, and specify the directory in which we want to clear the cache or if we want to have the cache removed in all our files, we can complete it by specifying as /*.
Route53 DNS rounting

We have created our resources and prepared our infrastructure with ACM, S3, and CloudFront, and now it's time for DNS routing.
For this, we need to select Route53 from AWS Console and click on Hosted Zone, where our domains are, and enter the domain that we will use for our website.

We start creating our DNS record by selecting Create Record on the Domain screen.
Here, we continue by entering Record name and choosing Record type we will make.

We need to create an A record for the DNS record, which we will route to our website. Since we usually make an A record, we must enter the IP address to which we will monitor the traffic.
However, AWS offers us the option of Alias Record as a method we can use for its services.
By choosing Alias Record, we determine which service the source to which we will monitor the traffic is working and which region it is in.
In other words, we choose CloudFront and Virginia, the region where we use this service.
Then, we can see the list of CloudFront distributions in this region and select the distribution we created for our website from here.
A minor detail here; there was the Alternate Domain Name part that we specified when creating our CDN, and we entered the URL that we wanted to use for the website.
The benefit of doing this is that:
It matches the Record Name we entered while forwarding and only lists the CDN. We directly select the relevant CDN and create our DNS record with the Simple Routing Policy.
And voila! As you can see, our website is ready. ☺️

You can find the demo project and bitbucket-pipelines.yml file I used for my article from my Github repo :)
You can watch the Youtube stream here. For your questions, you can reach me on my Twitter or LinkedIn accounts.
Thank you for reading. I hope it has been helpful 🙌

Top comments (0)