Deploy an App on Kubernetes (GKE) with Kong Ingress, LetsEncrypt and Cloudflare.

If you have a small app (hopefully a couple of microservices, Frontend and Backend) I wouldn’t recommend you use Kubernetes to deploy them. There are better fully managed alternatives out there. But…
If you think you really need it or you want to provide this kind of service to others, then this guide will serve as blueprint.
Inputs, Outputs and Steps.
Our end result will be: A web application served on our domain with TLS enabled, robust enough to withstand a DDoS attack.
For this, Kong Ingress will help us have our frontend to be served on the root path and a backend service on the /api path. LetsEncrypt will provide TLS certificates and Cloudflare will provide extra security and DNS services. All hosted on a Kubernetes cluster on GKE.
(Note: Kong Ingress is not strictly necessary since we only have a couple services, but, considering once you go microservices route there is usually an internal explosion of new services we might want to be prepared)
To achieve this we need:
- Frontend app: We will be using NextJS (https://nextjs.org/) for its simplicity
- Backend app: Will only resolve static requests. (Connecting to a DB or any other resource is out of this guide’s scope)
- A domain: You can buy one on: Google Domains (https://domains.google/), Cloudflare (https://www.cloudflare.com/) or GoDaddy (https://www.godaddy.com/). The one I picked for this guide is outsrc.dev (on Google Domains, .dev domains on Google Chrome are forced to use TLS)
- A Google Cloud account. (https://cloud.google.com/)
Backend Service
Our backend service is very simple and it does not depend on any external dependency. We only want to have a couple of APIs we can use.
/states Returns a list of US States, only the 2 letter code.
/states/<code> Returns an object with the State code and the State’s name
The code is hosted here: https://github.com/ernestofreyreg/outsrc-demo-back
Is a little bit of Javascript and most important a Dockerfile
Frontend Application
Our frontend application is very simple. Only 2 pages, First will load a list of States from API, second will show State’s detail (also from API). States will get pulled from the backend service.
/ Front page, shows a list of US States with links
/state?state=<code> Shows the State code and name and a back link.
Code was written in Typescript, you can find the source code here: https://github.com/ernestofreyreg/outsrc-demo-front
Also, contains a Dockerfile We want to ship this Application as a container.
Step 0: Create a GCP Project.
Go to the Google Cloud Console at (https://console.cloud.google.com/) and create a new Project. (I named mine Outsrc and the project’s ID is outsrc)
Step 1: Build, Tag & Push Docker images for Frontend and Backend.
Let’s clone and build the 2 services for Frontend and Backend.
First Frontend:
$ git clone [git@github.com](mailto:git@github.com):ernestofreyreg/outsrc-demo-front.git
$ cd outsrc-demo-front
$ docker build -t outsrc-demo-front .
$ docker tag outsrc-demo-front:latest gcr.io/outsrc/outsrc-demo-front:1.0.0
$ docker push gcr.io/outsrc/outsrc-demo-front:1.0.0
Backend:
$ git clone [git@github.com](mailto:git@github.com):ernestofreyreg/outsrc-demo-back.git
$ cd outsrc-demo-back
$ docker build -t outsrc-demo-back .
$ docker tag outsrc-demo-back:latest gcr.io/outsrc/outsrc-demo-back:1.0.0
$ docker push gcr.io/outsrc/outsrc-demo-back:1.0.0
Once we finished we will have this on our GCP Console on the Container Registry service.

Step 2: Create a Kubernetes Cluster on GCP
For this we will use GCP’s Managed Kubernetes service or GKE (Google Kubernetes Engine)
GCP Console -> Kubernetes Engine -> Clusters -> Create Cluster

I used the First Cluster template (small pool of nodes, good for experimenting, just changed the pool size to 3 from 1)
Creating a cluster takes some time.
Once created we can connect our local dev box to the cluster, so we can use the kubectl command to control our cluster.
$ gcloud container clusters get-credentials outsrc-cluster --zone us-west1-a --project outsrc
Check cluster nodes (should show 3 nodes in the cluster)
$ kubectl get nodes
NAME STATUS ROLES AGE VERSION
gke-outsrc-cluster-pool-1-f00215b6-7d0t Ready \<none\> 11h v1.14.8-gke.12
gke-outsrc-cluster-pool-1-f00215b6-dvvl Ready \<none\> 11h v1.14.8-gke.12
gke-outsrc-cluster-pool-1-f00215b6-tct2 Ready \<none\> 11h v1.14.8-gke.12
Step 3: Deploy our Applications on Kubernetes
To deploy our application on Kubernetes we need several things:
Step 3.1 Namespace
Our apps will share the same Namespace in Kubernetes.
We will use the kubectl apply command to create all of our Kubernetes artifacts.
$ kubectl apply -f outsrc-namespace.yml
namespace/outsrc created

$ kubectl get namespaces
NAME STATUS AGE
default Active 12m
kube-node-lease Active 12m
kube-public Active 12m
kube-system Active 12m
outsrc Active 19s
We need to include the parameter --namespace=outsrc to all commands or… we can:
$ kubectl config set-context --current --namespace=outsrc
Context "gke\_outsrc\_us-west1-a\_outsrc-cluster" modified.
All subsequent kubectl commands will already mapped to the outsrc namespace (you can override by setting the --namespace=... parameter.
Step 3.2: Deployments
Our 2 services Frontend and Backend need Deployment resource files.
Backend:
$ kubectl apply -f outsrc-back-deployment.yml
deployment.apps/outsrc-back-deployment created
Frontend:
Frontend service requires one runtime parameter: the API_URL pointing to the backend service. Since this service will be accessed from the outsrc.dev domain then we need to specify a URL + path where we are going to serve the backend of this App. In this case will be https://outsrc.dev/api
$ kubectl apply -f outsrc-front-deployment.yml
deployment.apps/outsrc-front-deployment created
At this point we created 2 services running on our cluster, each with 2 replicas.
$ kubectl get deployments
NAME READY UP-TO-DATE AVAILABLE AGE
outsrc-back-deployment 2/2 2 2 11m
outsrc-front-deployment 2/2 2 2 2m48s

$ kubectl get pods
NAME READY STATUS RESTARTS AGE
outsrc-back-deployment-5cbf946975-6tshn 1/1 Running 0 18s
outsrc-back-deployment-5cbf946975-prtqk 1/1 Running 0 11m
outsrc-front-deployment-7995b6bdc4-g9krr 1/1 Running 0 35s
outsrc-front-deployment-7995b6bdc4-mlvk2 1/1 Running 0 2m54s
To check Frontend services logs:
$ kubectl logs -l service=front
\> Ready on [http://localhost:3000](http://localhost:3000)
\> Ready on http://localhost:3000
Step 3.3: Services
Services is a networking resource Kubernetes uses to manage access to running Pods. Create a couple of Services resource definition for Frontend and Backend services.
Frontend:
Backend:
$ kubectl apply -f outsrc-front-service.yml
service/outsrc-front-service created

$ kubectl apply -f outsrc-back-service.yml
service/outsrc-back-service created
How is our cluster looking so far? From the GCP Console we can see this:


Step 4. Install Kong Ingress
An Ingress is an object that allows access to your Kubernetes services from outside the Kubernetes cluster. We are going to use Kong’s Ingress controller. (https://konghq.com/solutions/kubernetes-ingress) Even if we not necessarily need it for this exercise I included because of its versatility and support for extensions/plugins.
According to its Github repo (https://github.com/Kong/kubernetes-ingress-controller):
$ kubectl apply -f [https://bit.ly/k4k8s](https://bit.ly/k4k8s)
namespace/kong created
customresourcedefinition.apiextensions.k8s.io/kongconsumers.configuration.konghq.com created
customresourcedefinition.apiextensions.k8s.io/kongcredentials.configuration.konghq.com created
customresourcedefinition.apiextensions.k8s.io/kongingresses.configuration.konghq.com created
customresourcedefinition.apiextensions.k8s.io/kongplugins.configuration.konghq.com created
serviceaccount/kong-serviceaccount created
clusterrole.rbac.authorization.k8s.io/kong-ingress-clusterrole created
clusterrolebinding.rbac.authorization.k8s.io/kong-ingress-clusterrole-nisa-binding created
configmap/kong-server-blocks created
service/kong-proxy created
service/kong-validation-webhook created
deployment.apps/ingress-kong created
(If you have problems installing Kong Ingress Controller please check https://github.com/Kong/kubernetes-ingress-controller/blob/master/docs/deployment/gke.md)
Once Kong Ingress is installed a LoadBalancer will be created with a public IP Address. We need this IP Address for next step, DNS.
$ kubectl get service --namespace=kong
NAME TYPE CLUSTER-IP EXTERNAL-IP PORT(S) AGE
kong-proxy LoadBalancer 10.40.12.83 35.212.152.27 80:30435/TCP,443:32312/TCP 72m
kong-validation-webhook ClusterIP 10.40.9.92 \<none\> 443/TCP 72m
As you can see External IP Address is on the kong-proxy service is: 35.212.152.27
Step 5: Setup Domain.
I bought the outsrc.dev domain on Google Domains. You could also use your preferred provider. Once you have your domain, proceed to register on Cloudflare and add your domain. You will need to set up your domain with Cloudflare’s DNS (You can see that on the next image)
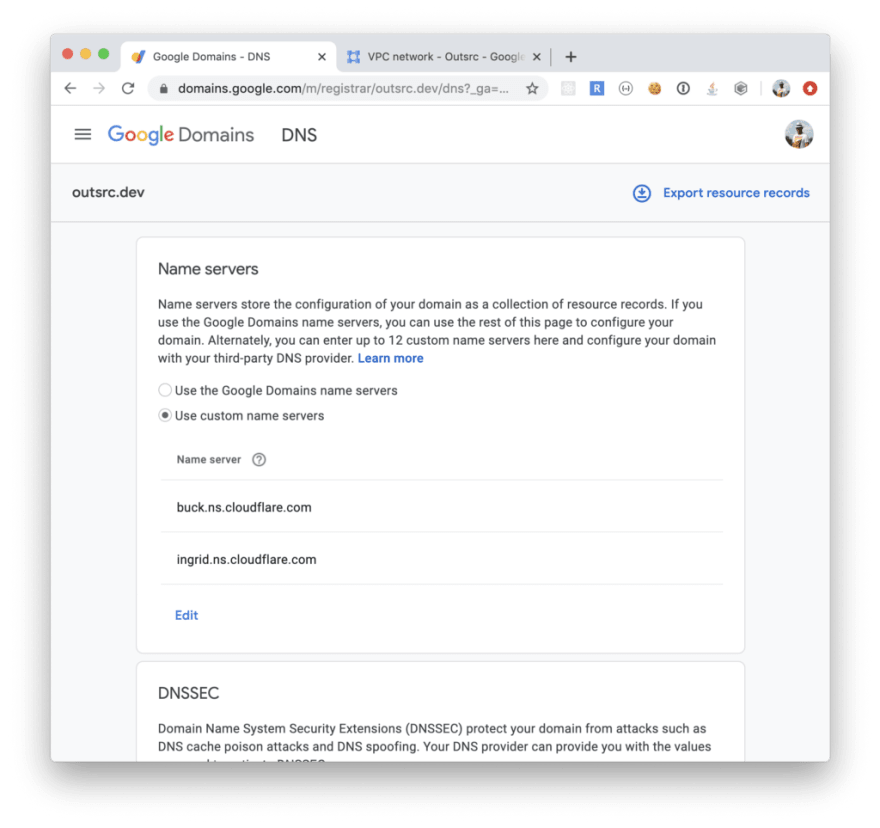
Once finished this step, create the following registries on the Cloudflare DNS service:
First: proxy.outsrc.dev, type A, points to the public IP: 35.212.152.27. This is the only registry that needs to point to the public IP address. All other registries will use a CNAME registry pointing to proxy.outsrc.dev
Second: Main domain where the app will be deployed:
outsrc.dev, type CNAME, points to proxy.outsrc.dev

Also notice we didn’t activated the Proxy mode on the main outsrc.dev domain. For now we will use only the Cloudflare’s DNS service.
Step 6: Cert Manager + LetsEncrypt
CertManager is a native Kubernetes certificate management controller. It can help with issuing certificates from a variety of sources, such as Let’s Encrypt, HashiCorp Vault, Venafi, a simple signing key pair, or self signed.
Let’s install it on the Kubernetes Cluster: (https://cert-manager.io/docs/installation/kubernetes/)
$ kubectl create namespace cert-manager
namespace/cert-manager created

$ kubectl apply --validate=false -f [https://github.com/jetstack/cert-manager/releases/download/v0.12.0/cert-manager.yaml](https://github.com/jetstack/cert-manager/releases/download/v0.12.0/cert-manager.yaml)
customresourcedefinition.apiextensions.k8s.io/certificaterequests.cert-manager.io created
customresourcedefinition.apiextensions.k8s.io/certificates.cert-manager.io created
customresourcedefinition.apiextensions.k8s.io/challenges.acme.cert-manager.io created
customresourcedefinition.apiextensions.k8s.io/clusterissuers.cert-manager.io created
customresourcedefinition.apiextensions.k8s.io/issuers.cert-manager.io created
customresourcedefinition.apiextensions.k8s.io/orders.acme.cert-manager.io created
Warning: kubectl apply should be used on resource created by either kubectl create --save-config or kubectl apply
namespace/cert-manager configured
serviceaccount/cert-manager-cainjector created
serviceaccount/cert-manager created
serviceaccount/cert-manager-webhook created
clusterrole.rbac.authorization.k8s.io/cert-manager-cainjector created
clusterrolebinding.rbac.authorization.k8s.io/cert-manager-cainjector created
role.rbac.authorization.k8s.io/cert-manager-cainjector:leaderelection created
rolebinding.rbac.authorization.k8s.io/cert-manager-cainjector:leaderelection created
clusterrolebinding.rbac.authorization.k8s.io/cert-manager-webhook:auth-delegator created
rolebinding.rbac.authorization.k8s.io/cert-manager-webhook:webhook-authentication-reader created
clusterrole.rbac.authorization.k8s.io/cert-manager-webhook:webhook-requester created
role.rbac.authorization.k8s.io/cert-manager:leaderelection created
rolebinding.rbac.authorization.k8s.io/cert-manager:leaderelection created
clusterrole.rbac.authorization.k8s.io/cert-manager-controller-issuers created
clusterrole.rbac.authorization.k8s.io/cert-manager-controller-clusterissuers created
clusterrole.rbac.authorization.k8s.io/cert-manager-controller-certificates created
clusterrole.rbac.authorization.k8s.io/cert-manager-controller-orders created
clusterrole.rbac.authorization.k8s.io/cert-manager-controller-challenges created
clusterrole.rbac.authorization.k8s.io/cert-manager-controller-ingress-shim created
clusterrolebinding.rbac.authorization.k8s.io/cert-manager-controller-issuers created
clusterrolebinding.rbac.authorization.k8s.io/cert-manager-controller-clusterissuers created
clusterrolebinding.rbac.authorization.k8s.io/cert-manager-controller-certificates created
clusterrolebinding.rbac.authorization.k8s.io/cert-manager-controller-orders created
clusterrolebinding.rbac.authorization.k8s.io/cert-manager-controller-challenges created
clusterrolebinding.rbac.authorization.k8s.io/cert-manager-controller-ingress-shim created
clusterrole.rbac.authorization.k8s.io/cert-manager-view created
clusterrole.rbac.authorization.k8s.io/cert-manager-edit created
service/cert-manager created
service/cert-manager-webhook created
deployment.apps/cert-manager-cainjector created
deployment.apps/cert-manager created
deployment.apps/cert-manager-webhook created
mutatingwebhookconfiguration.admissionregistration.k8s.io/cert-manager-webhook created
validatingwebhookconfiguration.admissionregistration.k8s.io/cert-manager-webhook created
To use CertManager create a ClusterIssuer, this is an object that will create the certificates we need. In this case using a LetsEncrypt issuer.
$ kubectl apply -f letsencrypt-staging.yml
clusterissuer.cert-manager.io/letsencrypt-staging created

$ kubectl apply -f letsencrypt-production.yml
clusterissuer.cert-manager.io/letsencrypt-production created
LetsEncrypt being a free public service has to protect itself for unfair use so, if you are testing and unsure your DNS zone is correctly configured, etc. I would recommend you use the letsencrypt-staging issuer.
Step 7: Ingress
The Ingress resource definition for outsrc.dev Application have several references to the elements we already have: Backend and Frontend services, Kong Ingress, LetsEncrypt production issuer.
$ kubectl apply -f outsrc-dev-ingress.yml
ingress.extensions/outsrc-dev-ingress created
After creation the service will be immediately accessible at http://outsrc.dev but TLS won’t be probably configured yet. Issuing a certificate for the domain takes a short time. After that this is what we get:
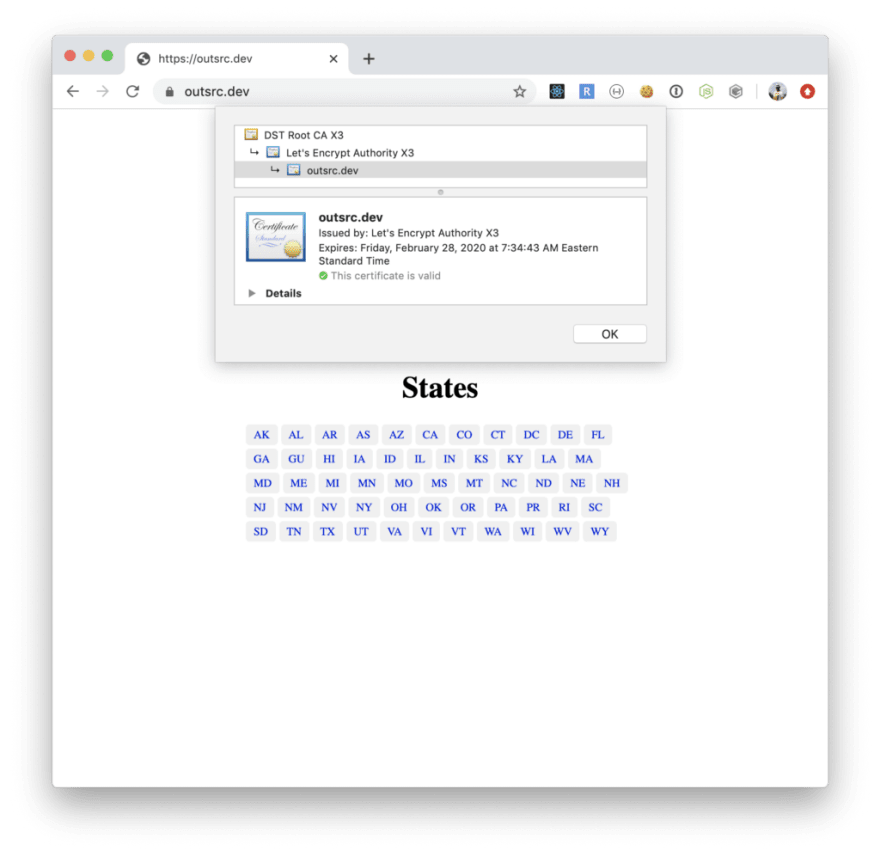
As you can see our Application is served by our Kubernetes Cluster hosted on GKE, using Kong Ingress Controller and LetsEncrypt for TLS. Last step is activate Cloudflare’s Proxy mode.

Once we set Proxy mode on our main outsrc.dev domain. Cloudflare will provision a Certificate and proxy all request to our application. Enabling extra security and DDoS protection.

The Frontend service is immediately visible, Backend not so much (although all data on the Frontend comes from the Backend), But, is ok to test Backend services too:
$ curl [https://outsrc.dev/api/states/CA](https://outsrc.dev/api/states/CA)
{"state":"CA","name":"California"}
Last Step: Conclusions
As you can see deploying a fairly simple Application on Kubernetes (via GKE) can be straightforward. But this doesn’t mean is simple, specially securing it, which is not covered in this guide (only partially) and maintaining it (We will see how rolling upgrades and rollbacks in other guides)
Happy hacking…

Top comments (1)
LetsEncrypt have revoked around 3 million certs last night due to a bug that they found. Are you impacted by this, Check out ?
DevTo
[+] dev.to/dineshrathee12/letsencrypt-...
GitHub
[+] github.com/dineshrathee12/Let-s-En...
LetsEncryptCommunity
[+] community.letsencrypt.org/t/letsen...