Introduction
Redux is used to enhance your application when the complicity continues to grow by simplifying the state management. States can include data from 3 different sources:
- Servers
- Cache
- Locally
This can be complicated in order to manage and this is where Redux enters the party. Redux is a State Management Tool for Javascript applications such as React.
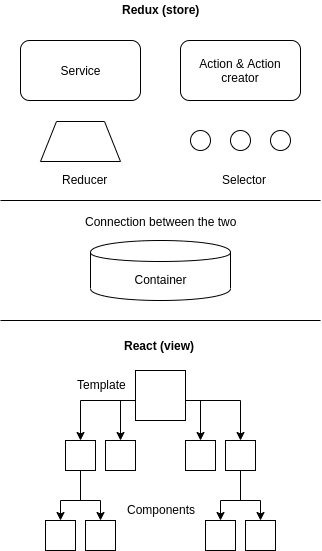
Redux stores the entire states of the application in a central location (called a store) so state manipulation and inner communication can be simplified. In the image below, the view is delivered by React with a template and various components. Redux takes the responsibility of managing the states using various components like Actions, Reducers, Action creators and Selectors. In order to connect Redux and the view (React) a Connector is been used in the form of a Container.
Let's get started
Create a new file called index2.html in your public folder of a brand new React application. Past the following code and start adding my sections one by one in place of [ INSERT SECTIONS HERE ]
<!DOCTYPE html>
<html>
  <head>
    <meta charset="UTF-8">
    <title>REDUX STATES</title>
    <link rel="stylesheet" href="https://cdnjs.cloudflare.com/ajax/libs/normalize/4.1.1/normalize.min.css" type="text/css">
    <link rel="stylesheet" href="app.css" type="text/css">
    <link rel="stylesheet" href="https://cdnjs.cloudflare.com/ajax/libs/font-awesome/4.6.1/css/font-awesome.css" type="text/css" />
  </head>
  <body>
    <div id="app">
     Application Initiailizing...
    </div>
    <script src="https://cdnjs.cloudflare.com/ajax/libs/lodash.js/4.11.2/lodash.min.js"></script>
    <script src="https://cdnjs.cloudflare.com/ajax/libs/redux/3.5.2/redux.js" type="text/javascript"></script>
    <script src="https://cdnjs.cloudflare.com/ajax/libs/react/15.0.1/react.js" type="text/javascript"></script>
    <script src="https://cdnjs.cloudflare.com/ajax/libs/react/15.0.1/react-with-addons.js" type="text/javascript"></script>
    <script src="https://cdnjs.cloudflare.com/ajax/libs/react-redux/4.4.5/react-redux.js" type="text/javascript"></script>
    <script src="https://cdnjs.cloudflare.com/ajax/libs/babel-core/5.8.23/browser.min.js" type="text/javascript"></script>
    <script src="https://cdnjs.cloudflare.com/ajax/libs/react/15.0.1/react-dom.js" type="text/javascript"></script>
    <script type="text/babel">

[ INSERT SECTIONS HERE ]

    </script>

  </body>
</html>
Libraries
We begin by declaring all the required libraries and objects. I will explain them one by one:
- connect and Provider from ReactRedux is used to connect Redux to Reacts components
- Redux is used for various methods like createStore which is used to build the store
- Component from React is used to build a React component
- Map is used to manipulate content
      const {connect, Provider} = ReactRedux;
      const {createStore, compose} = Redux;
      const {Component} = React;
      const {map} = _;
Create Event Handlers
Create a component called ListTable and extend from Component. Add a constructor with props and context. Let's bind our Event Handlers so we can declare them to dispatch. Dispatch will sent the event to Redux to manipulate our states.
      class ListTable extends Component {
        constructor (props, context) {

          super(props, context);
          this.addItem = this.addItem.bind(this);
          this.removeItem = this.removeItem.bind(this);
          this.editItem = this.editItem.bind(this);
        }

        /* EVENT HANDLERS */
        addItem () {
          this.props.dispatch(addItemAction())
        }
        removeItem (index) {
          this.props.dispatch(removeItemAction(index))
        }
        editItem (index, event)  {
          this.props.dispatch(editItemAction(index, event.target.value))
        }
Render
Lets render the outcome of items. Pretty much selfdeclaring, but just to be sure:
- onChange is to edit the item on every input
- onClick is to remove the item when clicked the delete button
- onClick is also used to add a new item when clicked on add
        render () {
          const {items, addItem} = this.props;

          return (<div>
            <table>
              <tbody>
                {map(items, (item, index) => {
                  return (<tr key={index}>
                    <td><input onChange={this.editItem.bind(null, index)} type="text" value={item} /></td>
                    <td>
                      <button onClick={this.removeItem.bind(null, index)} className="delete">
                        remove
                      </button>
                    </td>
                  </tr>);
                })}
              </tbody>
            </table>
            <button onClick={this.addItem} className="add">
            Click
            </button>
            <InfoBox />
          </div>);
        }
      }
Component
This is the most important method, this is how you integrate Redux with React. Whenever there is a change in state, this will call the method mapStateToProps. This will map the states to the props of the React component.
      class InfoBox extends Component {
        render () {
          return (<div>
            <p className="spiel">
             SKill soft redux
            </p>
          </div>);
        }
      }
      /* MAP STATE TO PROPS */

      const mapStateToProps = (state) => {
        return {
          items: state.items,
        }
      }
Reducers
Reducers will listen to all actions that are dispatch and react according to the logic we apply. We now so far that all the states and Redux are immutable because they never change, so we have to return a new state object, that is what we are specifying in the reducer. We are adding appReducer and declaring items following which we are slicing items.
Slice is an important method which clones an array without storing any reference of it. This is used when deciding which event to process. All the events we've specified will be processed through the appReducer.
- If the action type is addItem, it push a new item.
- If it's removeItem, it will remove an item
- And if it's editItem, it will keep the new data value
      /* Reducers */
      const appReducer = (state = {items: []}, action) => {
        let items = state.items.slice();
        console.log('Actions', action);
        switch (action.type) {
          case 'ADD_ITEM':
            items.push('') // Add an extra element to items
            break;
          case 'REMOVE_ITEM':
            items.splice(action.index, 1); // Removes element at `index`
            break;
          case 'EDIT_ITEM':
            items[action.data.index] = action.data.value; // Change value of `index` to new value
            break;
        }

        const newState = {
          items: items,
        }
        console.log('Current State', newState);
        return newState;
      }
Store
Let's creat a Redux store to store our states. Redux provides the capability of maintaining a centralized store to store the data that we want to project. To specify a store we will create a store with the createStore method and pass our appReducer.
      /* REDUX STORE */
      let store = createStore(appReducer, {
        items: [
          'item1',
          'item2',
          'item3',
          'item4'
        ]
      }, window.devToolsExtension ? window.devToolsExtension() : undefined)

      // Use Redux connect to attach our mapStateToProps and so to our ListTable component
      const ListApp = connect(
        mapStateToProps
      )(ListTable)
Redux DevTools
I have added a devtool which is downloadable for Chrome and Firefox to ensure that Redux connect will attach the method mapStateToProps to the ListTable component.
- Chrome: Redux DevTools
- Firefox: Redux DevTools
      ReactDOM.render(
        <Provider store={store}>
          <ListApp />
        </Provider>,
        document.getElementById('app')
      );
      if (window.devToolsExtension) {
        window.devToolsExtension.open();
      }
Tadaa!
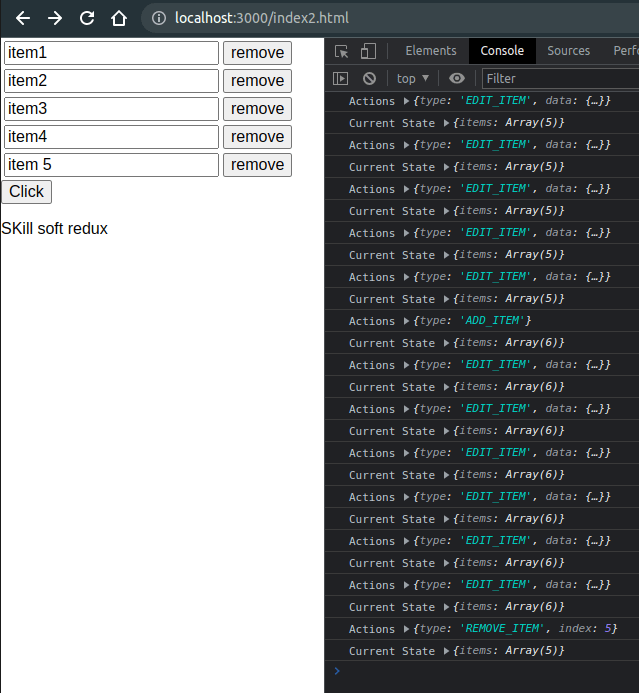
You have created your own React app with Redux. Checkout your index2.html page in the browser, open the console and try to add, remove and edit items. You should see every action you make as output in the console from the Reducer.
Check out the full index2.html from my Github and see for your self https://github.com/eelcoverbrugge

Top comments (0)