Cloudflare’s Full (Strict) SSL/TLS mode ensures that traffic is encrypted between visitors and Cloudflare and between Cloudflare and your origin server, using a certificate that Cloudflare trusts. In this post, we'll walk through generating a Cloudflare Origin Certificate, configuring Apache to use it, and enabling Full (Strict) SSL.
When using Cloudflare as a proxy for your website, you can choose different SSL/TLS encryption modes. The most secure option is Full (Strict). In Full (Strict) mode, Cloudflare only accepts a valid SSL certificate on your server – it must be unexpired and issued by a trusted authority (either a publicly trusted CA or Cloudflare’s own Origin CA). This means:
- Traffic from visitors’ browsers to Cloudflare is encrypted with Cloudflare’s certificate (as usual).
- Traffic from Cloudflare to your Apache web server is encrypted and the certificate presented by Apache is verified by Cloudflare for authenticity.
Why is this important? Modes like Flexible (which uses HTTPS for visitors but HTTP to your server) leave the connection between Cloudflare and your origin unencrypted – effectively defeating the purpose of SSL. Even Full (non-strict) encrypts to the origin but doesn’t validate the origin’s certificate, which could allow an attacker to intercept with a self-signed cert. Full (Strict) ensures end-to-end encryption and verification, eliminating man-in-the-middle risks and misconfigurations. In short, Full (Strict) mode is recommended whenever possible for maximum security.
1. Generating Cloudflare Origin Certificates
Cloudflare offers Origin CA certificates for free. These certificates are signed by Cloudflare and trusted only by Cloudflare (not by browsers). They allow you to secure the connection from Cloudflare to your server easily. You can generate an Origin Certificate via the Cloudflare dashboard.
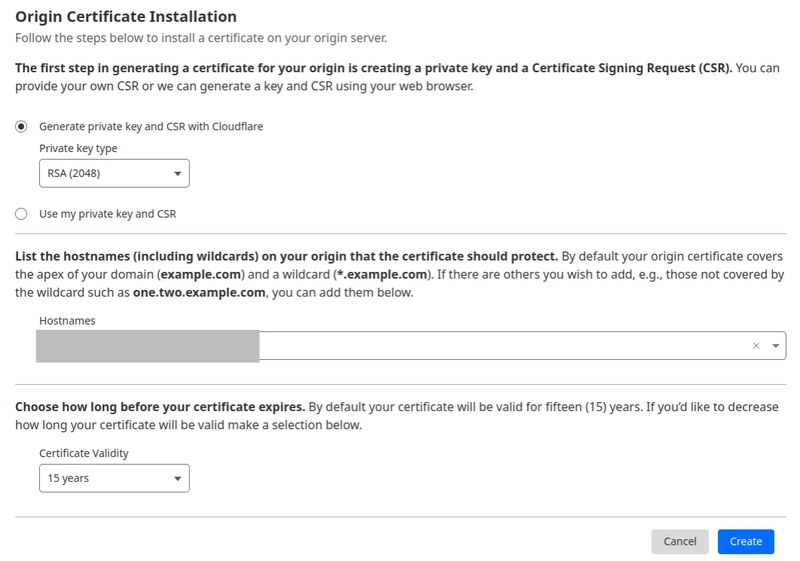
Step 1 – Navigate to Origin Certificates:
- Log in to the Cloudflare dashboard and select your domain.
- Go to the SSL/TLS section, then click the Origin Server tab.
- Click on “Create Certificate”.

Step 2 – Configure the certificate options:
- Choose “Generate private key and CSR with Cloudflare” (this is the default option).
- For Private key type, select RSA 2048.
- Under Hostnames, your domain (e.g.
example.com) and its wildcard (e.g.*.example.com) are likely pre-filled. You can add subdomains if needed. - For Certificate Validity, select your desired duration. Cloudflare allows up to 15 years for origin certs – the default is often 15 years.
- Leave the Key format as PEM.
- Click Create to generate the certificate.
Cloudflare will now show you two text boxes: one is the Origin Certificate and the other is the Private Key. Copy both and save them to files on your server:
-
Origin Certificate (BEGIN/END CERTIFICATE text) – save as
/etc/ssl/certs/cloudflare-origin.pem -
Private Key (BEGIN/END PRIVATE KEY text) – save as
/etc/ssl/private/cloudflare-origin-key.pem
(Optional) Step 4 – Get Cloudflare’s CA root certificate:
Cloudflare’s Origin CA is signed by a Cloudflare root certificate. If needed, Cloudflare provides an Origin CA root cert (PEM) for download. You can download the Cloudflare Origin CA Root (RSA or ECC to match your cert) and save it as /etc/ssl/certs/cloudflare-origin-ca.pem.
With the certificate and key in place, we need to configure Apache to serve HTTPS using this certificate. We’ll create (or edit) an Apache virtual host configuration for your site to enable SSL on port 443 and redirect HTTP to HTTPS.
2. Configuring Apache
Step 1 – Enable SSL and rewrite modules (if not already enabled):
Ensure Apache has the SSL module and rewrite module active, as we’ll need both. On Debian/Ubuntu systems, you can run:
sudo a2enmod ssl
sudo a2enmod rewrite
Then reload Apache to load those modules (e.g., sudo systemctl reload apache2).
Step 2 – Edit the Apache virtual host configuration:
Open your site’s Apache config file. For example, if your site is example.com, you can create file like /etc/apache2/sites-available/example.com.conf. Run:
sudo nano /etc/apache2/sites-available/example.com.conf
Now, update the file to include two <VirtualHost> blocks: one for port 80 (HTTP) to handle redirects, and one for port 443 (HTTPS) to handle secure traffic. Use the following configuration as an example, replacing example.com with your domain and updating file paths to point to your certificate files:
<VirtualHost *:80>
    ServerAdmin info@example.com
    ServerName example.com
    ServerAlias www.example.com

    # Redirect all HTTP requests to HTTPS
    RewriteEngine On
    RewriteCond %{HTTPS} !=on
    RewriteRule ^/?(.*) https://%{SERVER_NAME}/$1 [R=301,L]
</VirtualHost>

<VirtualHost *:443>
    ServerAdmin info@example.com
    ServerName example.com
    ServerAlias www.example.com

    SSLEngine on
    SSLCertificateFile /etc/ssl/certs/cloudflare-origin.pem
    SSLCertificateKeyFile /etc/ssl/private/cloudflare-origin-key.pem

    # If you downloaded Cloudflare's CA root cert, also include:
    # SSLCertificateChainFile /etc/ssl/certs/cloudflare-origin-ca.pem

    DocumentRoot /var/www/example.com/public
</VirtualHost>

<Directory /var/www/example.com >
    Options -Indexes +FollowSymLinks -MultiViews
    AllowOverride All
    Require all granted
</Directory>
After editing, save the file.
Step 3 – Enable the site configuration:
If this is a new config file, enable it in Apache. On Ubuntu/Debian use:
sudo a2ensite example.com.conf
This creates a symlink in sites-enabled/ for your site. Always good idea to disable default apache virtual hosts by running sudo a2dissite 000-default.conf and sudo a2dissite default-ssl.conf.
Restart Apache: Once permissions are set, restart (or reload) Apache to apply the changes:
sudo systemctl restart apache2
Apache should start/restart without errors. It’s a good idea to run sudo apache2ctl configtest before restarting to catch any syntax errors in your config. If everything is OK, you’ll see Syntax OK. If there’s an error, fix it as indicated and test again before restarting.
After restarting, Apache is now serving your site over HTTPS with the Cloudflare Origin Certificate. Next, we’ll verify that everything is working correctly.
4. Verifying the Setup
With Apache configured and running, and your Cloudflare Origin Certificate in place, it’s time to switch Cloudflare to Full (Strict) mode and test the site.
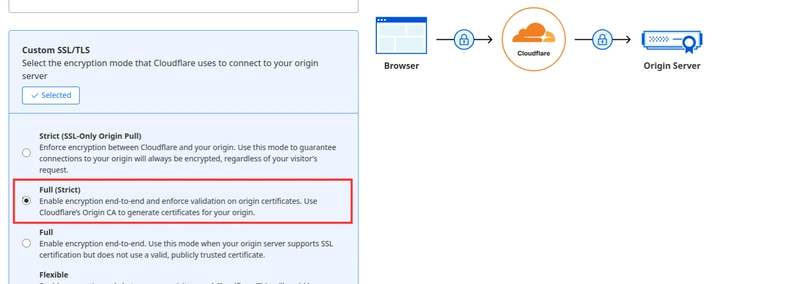
Step 1 – Enable Full (Strict) in Cloudflare:
Log in to the Cloudflare dashboard, navigate to SSL/TLS for your domain (the “Overview” subpage), and set the SSL/TLS Encryption Mode to Full (strict). This tells Cloudflare to enforce certificate verification for the connection to your origin. If all your origin setups have a valid cert (as we just installed), Full (strict) is the best choice.
Step 2 – Test your website in a browser:
Open a web browser and visit your domain (make sure to use https://). If everything is configured correctly, your site should load normally over HTTPS. Since Cloudflare is proxying, you will see Cloudflare’s certificate in your browser’s lock icon details – this is expected. The important part is that you don’t see any security errors.
Try both the root domain and the www (if you configured both). Also test that domain with http:// automatically redirects to the https:// version.
Conclusion
Now, all traffic from visitors to Cloudflare is secured with HTTPS, and importantly, the traffic from Cloudflare to your origin is also secure and verified. This end-to-end encryption setup protects your data in transit at every step.

Top comments (0)