
In this article, I would be integrating Continous Integration (CI) tools (Travis CI & Coveralls) to a Node API.
In my previous article, I talked about writing tests for node API with Mocha and Chai, and I am going to be building on the project used in that article. Find the link to the article below.

What is Continous Integration
Continuous Integration (CI) is a software development practice of integrating regular changes to a project via version control after which automated test builds are run. Each commits triggers a build process, during which tests are run to determine if anything is broken in the project.
Why is this necessary
CI tools are necessary for a project because it can help in quickly figuring out where bugs exist and also ensures quality code is been shipped/deployed.
Integrating Travis CI
Create an account on Travis CI, if you don't have one created yet.
After creating a Travis CI account, connect your Github to your Travis CI account.
Then select the repository you want to connect to Travis CI.
The next step is to create a .travis.yml file in the root of your project.
Then add the configuration below
language: node_js

node_js:
  - 10.14.1
Note: In the configuration above, we specified the language as nodejs and the version of nodejs we want Travis CI to install and use in running our tests. Also, different configurations could be specified based on the language used.
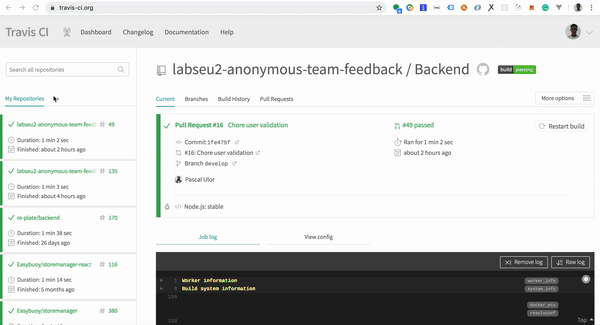
After adding the configuration above to the created .travis.yml file, push changes to Github. After pushing, Travis CI would create a build and automatically run your tests. An example of a build is shown in the image below.

Environment Variables
If you've made use of environment variables in your project, you can also add them to Travis CI by following the steps shown in the image below

Travis CI Badge
You can add the Travis CI status badge to your project readme file by copying the markdown on Travis to your project readme file. An example is shown below.

Integrating Coveralls
Create an account on Coveralls, if you don't have one created yet.
After creating a Coveralls account, connect your Github to your Coveralls account.
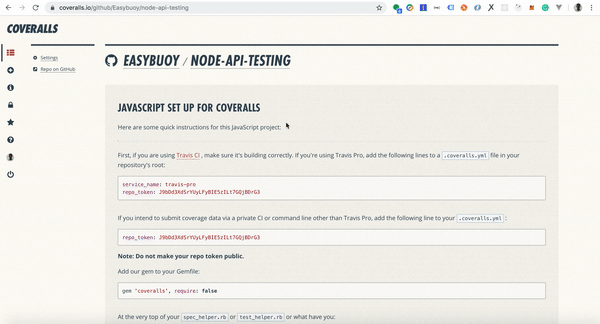
Then select the repository you want to connect to Coveralls. An example is shown in the image below
Back in our project, install the dependencies below
npm i nyc coveralls --save-dev
After installing the dependencies, add the scripts below to the package.json file.
"coverage": "nyc npm test && nyc report --reporter=text-lcov | coveralls"
Note: You can run coverage locally by running the command
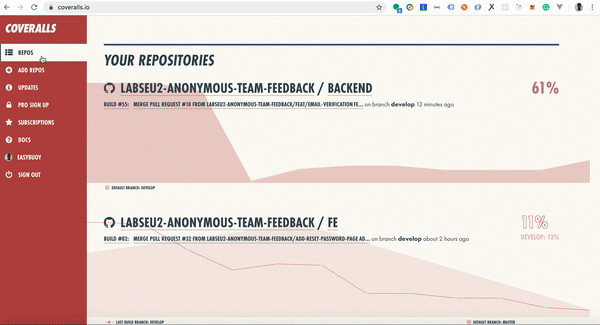
npm run coverageon your terminal. Example of coverage report below

Then edit the .travis.yml file by adding the command below
after_success:
  - npm run coverage
After adding the configuration above, push changes to Github. After pushing, Travis CI would create and run the coverage after running the test. Once this process is completed, your coveralls dashboard would be updated.
Note: In cases where coverage does not reflect on your coveralls dashboard, create a
.coveralls.ymlfile in the root of your project and add the configuration below and push changes to Github.
repo_token: as8dgas87dgadasdasd // repo_token is gotten from your coveralls dashboard.
Coveralls Badge
You can add the Coverage status badge to your project readme file by copying the markdown on Travis to your project readme file. An example is shown below.
Conclusion
In this article, we have been able to look at how to integrate CI tools in our projects, and why it is needed to have them in our project.
Find more on Continous Integration here
Find more on Travis CI here
Find more on Coveralls here
If you have any questions or feedback about this article, feel free to leave a comment.
Thanks for reading.
This article was originally posted on my blog


Top comments (0)