Build Your Own E-Commerce Keystone.js-Based System — Environment Setup and Base Models
This week, we are going to get our hands dirty and start coding
Photo by Ludovic Charlet on Unsplash

Introduction
Last week's article was the first of the series about building an e-commerce system using Keystone.js, and it was mostly focused on system requirements and its basic architecture. This week we are going to get our hands dirty a little and start coding. First, we will talk about the development environment and its setup. Then about Keystone and Next setup, and lastly, about basic models setup. Also, the finished code for this article is available on my GitHub.
Dev Environment Setup
Let’s start and create a project folder for our system, keystone-e-commerce, in my case, and create some necessary files. Run the following command in the console:
mkdir keystone-e-commerce && cd keystone-e-commerce
touch README.md docker-compose.dev.yml .gitignore .env.example .env
According to the previous article, the data layer of this system contains two elements: database and search engine. The easiest way to use them locally in our development environment is to use Docker for that. So, it’s time to update our docker-compose.dev.yaml file. Just add the following:
Also, I’ve added here pgAdmin. This is a nice to have and very useful tool, especially in the dev environment. Next, the necessary thing is to set up environment variables for the system. The easiest way to do it is to create one .env file and use it across all containers. OK, let’s add all the necessary variables as shown below:
I’ve already added variables required by Cloudinary integration; we will get
back to them later. Next update the .gitgnore file. For now, this is enough. The following code will help:
**/node_modules
.env
Now, with this basic setup, we can start our containers with this command:
docker-compose -f docker-compose.dev.yml up
Kesytone.js and Next.js Setup
With this setup done, we can focus on other parts of the system. First, let’s create our Next.js client app. To be honest, here we are only going to create it and add it to our Docker setup. More work with it will be done in upcoming articles in this series. Let’s run the appropriate command:
yarn create next-app --typescript
The script will ask us for the name of the app. I’ve called mine client. After installation, we have to create Dockerfile.dev for this app to use with other containers. It’s a rather simple one, as you can see:
FROM node:16

WORKDIR /usr/app

CMD yarn dev -p 3000
Additionally, update the docker-compose.dev.yml file under services section with this code:
A solution like this allows one main .env file, which is nice and gives centralized control of all system secrets. Also, it encapsulates the whole system in one closed docker network. And for now, that’s all about this part of the app. So, let’s switch to the backend part and set up Kesytone.js.
First, run the script to create the app. I’ve chosen backend as the folder name for it.
yarn create keystone-app
After that, it’s basically ready to use, but first, we have to update the database and other configurations. In keystone.ts, add credentials and update import for lists:
Then, create additional folders in order to have a nice and easy to understand structure, with this code:
mkdir consts enums schema
Also, importing in the main config file requires us to add index.ts in schema folder to work properly. The last setup element left to do is to create Dockerfile.dev file and update docker-compose.dev.yml. It will be pretty similar to the previous one, as shown below:
FROM node:16

WORKDIR /usr/app

CMD yarn dev
This will also allow us to start the entire system with one command.
Models Setup
With setup work done, we can start and create all necessary Keystone lists (and data models in our case). Let’s start with User model. Basically, it’s going to hold all user data including roles and privileges inside the system. Create user.schema.ts in schema folder. For now, we are only concerned by the fields property of the list. We have to add all necessary fields there, as you can see below:
Fields name, email, and password are rather obvious. Its purpose is to identify user, and it is necessary for the authorization and authentication process. All three of them are required. Additionally, email has to be unique, and in Admin UI it can be used to filter all the users. More interesting is the role field. Its type is select and holds information about user privileges in the system. It will create enum column in the database to keep it nice and clean. I’ve moved the options values to a separate file in the consts folder.
Here’s the code:
Also, I’ve moved all the values into the file in enums folder:
For now, these two roles are sufficient. Later, we are going to need more of them. The last field holds a reference to Address list. Precisely, it is a one-to-many relationship. The next list contains all addresses associated with users; each one can have more than one. So, create address.schema.ts as shown below:
This list contains all of the necessary address information that will be needed in the shipment of user orders. Most fields are required in order to provide sufficient delivery information. Also, this list holds timestamps of the creation of the record and its last modification. The last field is a reference to user, owner of this address, and in this case, it is a many-to-one relationship.
Next, tightly associated with the user list is Cart model. It contains all the information about the products added to the cart by the user, their sum, and the date of the last modification. Each user has one Cart, so it is a one-to-one relationship. Here’s the code:
In each Cart there can be many products added, and the same product can be added to multiple carts, so it creates a many-to-many relationship.
With that out of the way, we can focus on other models. Next, related to User and loosely coupled to Cart is Order list. It contains all the information about orders currently in processing and already processed. The first field is a reference to user, owner of this order, a one-to-may relationship. Each user can have multiple orders, but each order has only one owner.
The next field contains information about products in this order serialized into JSON. This way we can hold information about all the products in order, not only ones currently in stock, but also removed from offer too.
Next, two fields hold a relationship to Payment and Shipment lists, both one-to-one relationships. The last three fields contain information about the creation date, last modification, and order status. The last one is in select type, I moved all options and values to separate files like with user roles before.
The next two lists complement Order model and hold information about Payment and Shipment associated with it. Both of them hold basic information about timestamps and statuses of both business processes (created the same way as order status) and their relationship to Order.
The first of them additionally holds information about the sum of orders, its currency, and transaction ID from a third-party provider. I haven’t thought yet about specific integration in this matter, but probably it will be Stripe because I’m most familiar with it.
On the other hand, the Shipment model holds information about the employees responsible for processing this shipment, packing, and sending it. Similarly, like in the previous one, there’s also information about an external ID from a third-party system responsible for processing the delivery.
For now, all status fields contain only one option — Created. In the next parts of this series more focused on these sections of the system, we are going to add other necessary options.
The last group of models is focused on products. The main Product list contains basic product information like name, description, SEO description, price, rating (stars), and timestamps. The rest of the fields establish various relationships to more specific product information like product images, categories, and stocks.
The first one creates a one-to-many relationship; the second one a many-to-many, and the last one is a one-to-one relationship. Basically, a product can have multiple images, but the image belongs only to one product. Each may have categories and category has many products, and lastly, each has only one stock information (as I mentioned in the previous article I’ve decided to support only one warehouse setup).
The next list holds products images. There are two important fields here: alt and image. The first one contains the information necessary to fill in the HTML alt attribute for each image. The second allows uploading images directly into Cloudinary CDN. All that is supplemented with timestamp fields.
The next list, Stock, contains information about the amount of available-to-order products. Additionally, there’s information about the next expected delivery and the number of products in it. It’s necessary for cases when a user tries to order more products than are available.
The last model, Category, holds information about products categories and their relationships to one another. Fields here include category name, related products, and parent category (if there’s one) and usual timestamps. This internal relationship allows creating categories tree easily which will be useful when creating our system’s frontend.
The last thing to do here is to import all models into index.ts, which is imported into keystone.ts main config file shown below:
A quick note about timestamps, each one of them has a set of default values and should not be edited by users. But more on that topic in the next article.
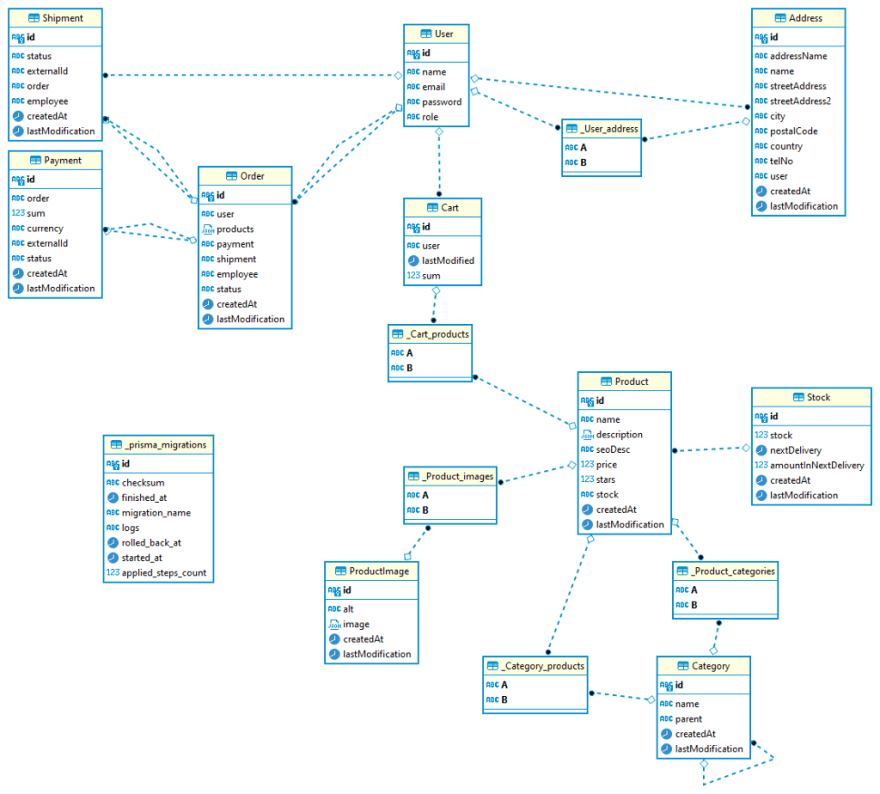
ER diagram
OK, that concludes all models we have to create. Now it’s time to create necessary migrations and corresponding tables in the database. Start with spinning up the database container.
docker-compose -f docker-compose.dev.yml up database
After that, start in the separate terminal of our backend:
cd backend && yarn dev
The script will ask for the name of the new migration, type initial_models and hit enter. It will handle the table's creation and generate migration files. Now we can stop both processes and start the whole system.
docker-compose -f docker-compose.dev.yml up database
Summary
Now we have a working dev environment and basic models setup, so it gives us a solid foundation for our system. Next time, we will start building up additional features needed in the e-commerce system. First, we will focus on access control and user privileges to access different parts of the system.
I hope you liked it. If you have any questions or comments, feel free to ask.
Have a nice day!


Top comments (0)