Recently, applications or websites have been built with some form of chat. Whether it is through social media messaging or customer support chat, talking to someone via the internet who is miles away has become the norm.
Note: This article assumes you have basic Node.js knowledge and are comfortable with environment variables. The code snippets in this article were run on a Windows OS.
This GitHub repo contains all the files used in this article.
Stream Chat is a solution that provides scalable, real-time messaging infrastructure.
Elasticsearch, on the other hand, offers text-search features, fuzzy matching, and data analytics.
Combining these two can give a boost to your regular chat experience:
- Real-Time Conversations: Instantly updated chat feeds and user presence.
- Robust Search: Full-text search, filters, custom analyzers, synonyms, etc.
- Analytics and Insights: Aggregations via Kibana or direct Elasticsearch queries.
This guide covers the end-to-end process, including environment setup, webhook configuration, indexing messages into Elasticsearch, and verifying the data—plus key troubleshooting tips we discovered along the way.
Table of Contents
1. Comparison of Built-In Stream Search vs. Elasticsearch
2. Creating a Stream Account
3. Project Setup & Architecture
3.1. Explanation of schematic:
3.2. Folder Structure Example
4. Installing and Running Elasticsearch
5. Creating a Node.js Server for Stream Webhooks
6. Configuring the Stream Chat Webhook
6.3. Enable Webhooks in Stream
7. Sending Test Messages via Server-Side Script
7.4. Confirming Elasticsearch Indexing
7.5. Curl / Postman
8. Quick Troubleshooting Reference
9. Further Reading & Resources:
Comparison of Built-In Stream Search vs. Elasticsearch
| Feature | Stream’s Built-In Search | Elasticsearch |
|---|---|---|
| Basic Text Matching | Yes | Yes (Match, Term, etc.) |
| Fuzzy Matching | Limited | Yes (Fuzziness, N-grams) |
| Synonyms / Custom Analyzers | Limited | Yes (Synonym filters, custom analyzers) |
| Aggregations / Analytics | No | Yes (Buckets, metrics, etc.) |
Creating a Stream Account
Before you can begin sending or receiving chat messages, you’ll need to set up a Stream Chat account:
Try Stream for Free
- Head to the official Try for Free page.
- Create an account or log in if you already have one.
Create a Chat App
- In your Stream dashboard, click Create App.
- Note down your API Key and API Secret, which are required for server-side operations.
Follow the Getting Started Guide
- If you’re brand-new to Stream Chat, check out the Stream Getting Started Guide for a quick overview of key concepts like channels, messages, and user tokens.
After this, you’ll have the necessary credentials to integrate Stream Chat into your application—and to follow the rest of this tutorial.
Project Setup & Architecture
Below is a schematic of how messages flow from Stream Chat to Elasticsearch:
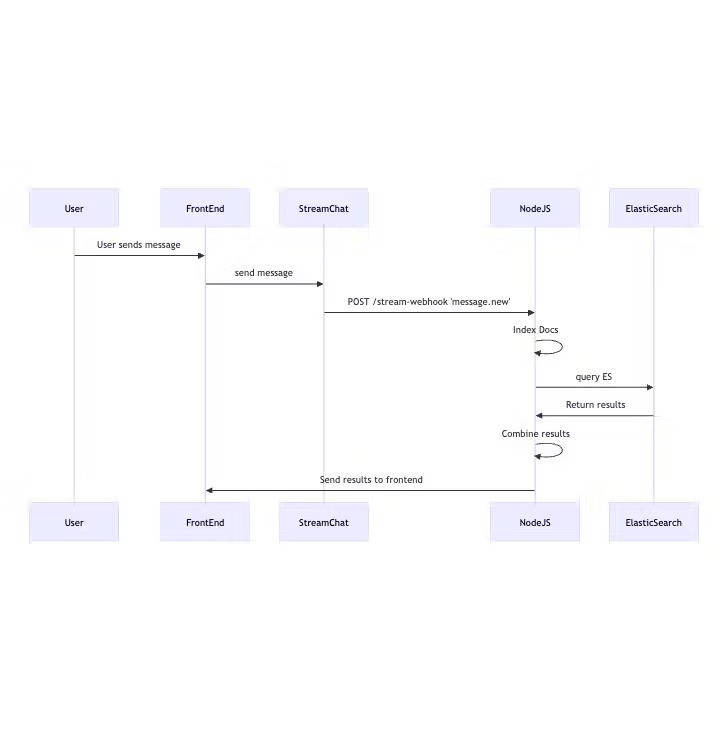
Explanation of schematic:
- User sends a chat message via Stream.
- Stream triggers message.new event → calls your Node.js webhook (/stream-webhook).
- Node.js indexes the message in Elasticsearch. Optional: Another endpoint (like /search) queries Elasticsearch.
- Results can be rendered by your front-end, or you can just verify them in Kibana or cURL.
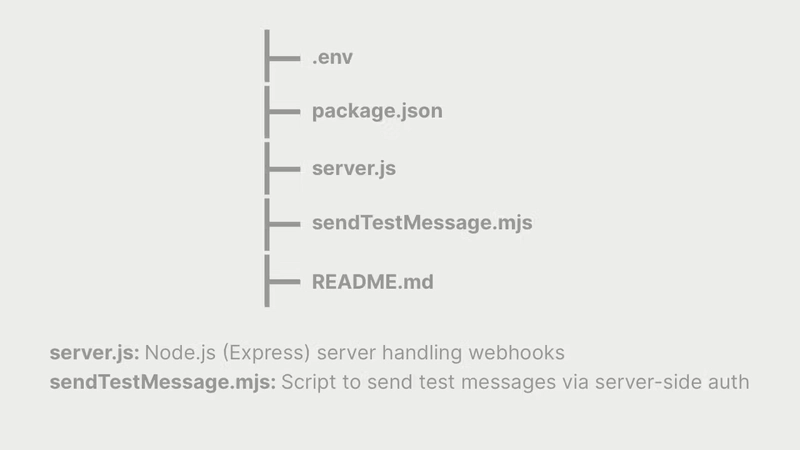
Folder Structure Example
Installing and Running Elasticsearch
If Docker is not installed on your local computer, you can go to the Docker installation page to get the correct version of Docker desktop for your OS.
Once installed, run this on your terminal
docker run -d -p 9200:9200 -p 9300:9300 \

  -e "discovery.type=single-node" \

  -e "xpack.security.enabled=false" \

  -e "ES_JAVA_OPTS=-Xms512m -Xmx512m" \

  --name es-dev \ docker.elastic.co/elasticsearch/elasticsearch:8.10.2
If run successfully, you should see this as the output on your terminal.
Creating a Node.js Server for Stream Webhooks
Now that we are certain that our docker image was spun successfully, it is time to face the Node.js side of our application.
Install Dependencies:
On your terminal, run:
npm install express body-parser @elastic/elasticsearch stream-chat dotenv
.env File:
Once the above install has been achieved, successfully, create a .env file and populate it with your stream API key and API secret like this:
STREAM_API_KEY=<YOUR_STREAM_API_KEY>

STREAM_API_SECRET=<YOUR_STREAM_API_SECRET>

ELASTICSEARCH_NODE=http://localhost:9200

PORT=3000
server.js:
The next step is to create a file to store our server configurations, server.js
import 'dotenv/config';
import express from 'express';
import bodyParser from 'body-parser';
import { Client as ElasticsearchClient } from '@elastic/elasticsearch';
import { StreamChat } from 'stream-chat';
const app = express();
app.use(bodyParser.json());
// Starting up the Elasticsearch client
const esClient = new ElasticsearchClient({
node: process.env.ELASTICSEARCH_NODE,
});
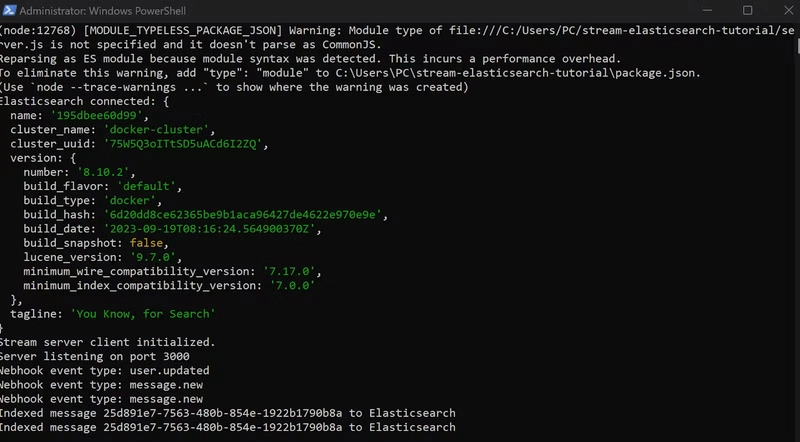
await esClient.info()
.then(() => console.log('Elasticsearch connected'))
.catch((err) => console.error('ES connection error:', err));
// Stream server client (needs API_KEY & API_SECRET)
const serverClient = StreamChat.getInstance(
process.env.STREAM_API_KEY,
process.env.STREAM_API_SECRET
);
app.post('/stream-webhook', async (req, res) => {
try {
const { type, message } = req.body;
console.log('Webhook event type:', type);
if (type === 'message.new') {
await esClient.index({
index: 'stream-chat',
id: message.id,
body: {
text: message.text,
user_id: message.user.id,
channel_id: message.channel_id,
created_at: message.created_at,
},
});
console.log(`Indexed message ${message.id} to Elasticsearch`);
}
res.status(200).send('Webhook processed');
} catch (error) {
console.error('Error in webhook route:', error);
res.status(500).send('Server error');
}
});
app.get('/', (req, res) => {
res.send('Server is up and running');
});
const port = process.env.PORT || 3000;
app.listen(port, () => {
console.log(`Server listening on port ${port}`);
});
Configuring the Stream Chat Webhook
Enable Webhooks in Stream
- Log in to your Stream Dashboard.
- Navigate to Chat, and in the overview section: add a new webhook with the URL pointing to your server,
http://localhost:3000/stream-webhook.
(Wait till step 7 to learn how to bypass this. )
-
Select the event types to receive: message.new message.updated message.delete.
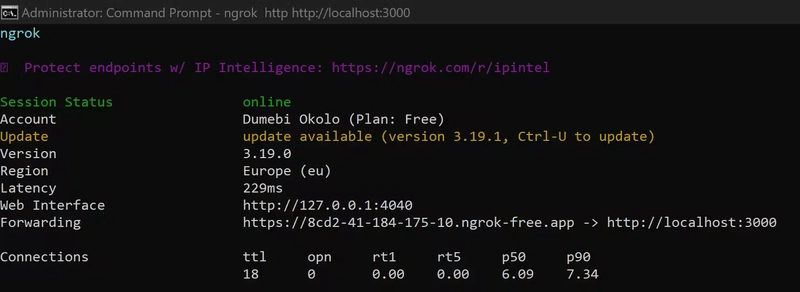
Publicly Exposing Your Webhook (Using ngrok)
By default, Stream can’t call
http://localhost:3000/stream-webhook. You need a public URL.
The easiest way to overcome this challenge is to use ngrok to publicly host our server. Install ngrok: https://ngrok.com/download
Then, Run:
ngrok http 3000
Copy the generated Forwarding URL, e.g.:
Forwarding https://abc123.ngrok.io -> http://localhost:3000
Set that URL + /stream-webhook in your Stream dashboard under Events & Webhooks, for example:
https://abc123.ngrok.io/stream-webhook
- Enable
message.new(and any others you need).
Now, Stream can deliver events to your local server.
If ngrok is set up successfully, you should see this on your terminal.
We are pretty much done with our app. But how do we test if everything works perfectly?
Stay with me.
You can build a custom UI to interface with the application you have just built—leveraging Stream’s official Chat UI Kit if you’d prefer a ready-made set of messaging components. However, in this guide, we’ll write our own custom Node.js script to test our application programmatically.
Sending Test Messages via Server-Side Script
- Create a new file,
sendTestMessage.js, and populate it with the following:
import 'dotenv/config';

import { StreamChat } from 'stream-chat';

const API_KEY = process.env.STREAM_API_KEY;

const API_SECRET = process.env.STREAM_API_SECRET;

(async () => {

  try {

    const serverClient = StreamChat.getInstance(API_KEY, API_SECRET);

    // Ensure user 'tester' exists

    await serverClient.upsertUser({ id: 'tester', name: 'Tester' });

    // Create or get a channel named 'test-channel'

    const channel = serverClient.channel('messaging', 'test-channel', {

      name: 'Test Channel',

      members: ['tester'],

      created_by_id: 'tester', // Required for server-side channel creation

    });

    await channel.create(); // Create if not existing

    // Send a test message

    const res = await channel.sendMessage({

      text: 'Hello from server side test script!',

      user_id: 'tester',

    });

    console.log('✅ Message sent successfully!', res.message);

  } catch (error) {

    console.error('Error sending test message:', error);

  }

})();
- On a separate terminal, Run node sendTestMessage.js.
- On your
server.jsterminal, you should see this log, “Webhook event type: message.new” and indexes the message in Elasticsearch. Your server should look a lot like this.
Confirming Elasticsearch Indexing
With each new message, your server logs something like “Indexed message to Elasticsearch”. To verify the documents really exist, you can:
Curl / Postman
To further test our our new app. We will be using curl.
In Windows PowerShell, use curl.exe:
curl.exe \-X GET "http://localhost:9200/stream-chat/\_search?pretty"
This should return a JSON hits in the terminal,
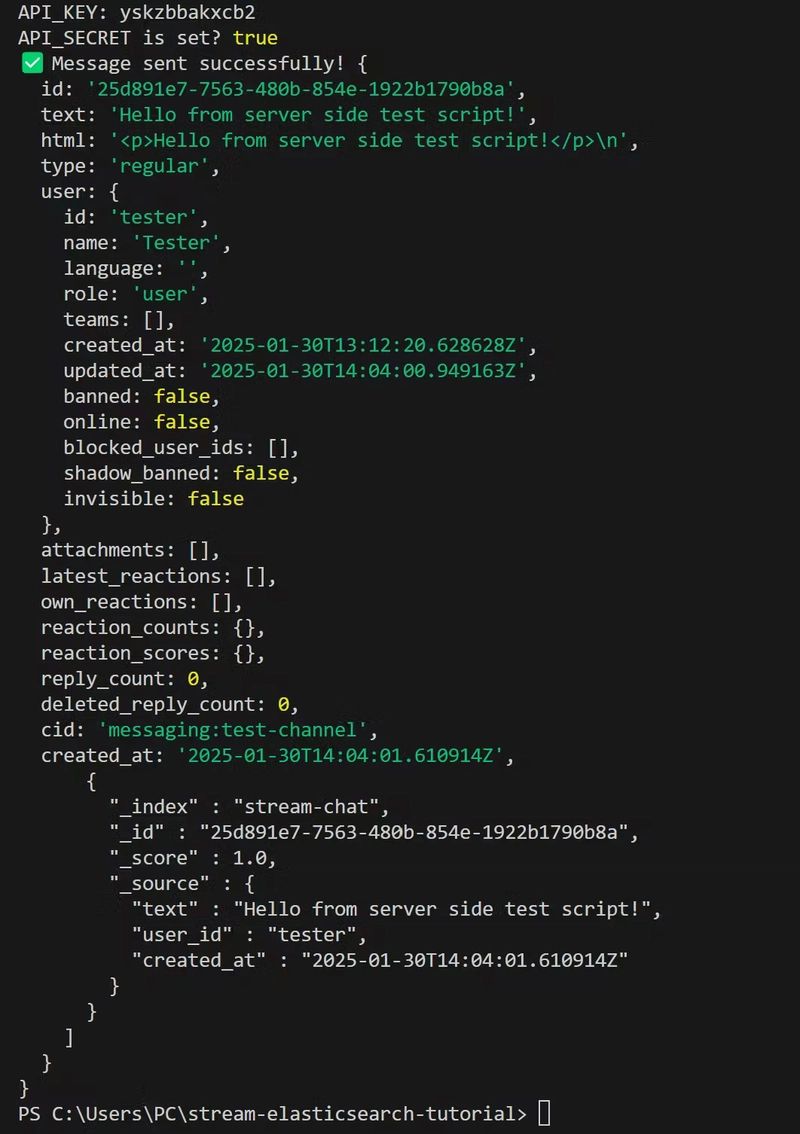
The screenshot above is both the JSON hit and the Stream success message.
Quick Troubleshooting Reference
| Error / Symptom | Likely Cause | Fix |
|---|---|---|
message.new not logging in server |
Webhook URL not public, not hitting /stream-webhook
|
Use ngrok, check Stream Dashboard webhook config |
"Either client.connectUser wasn't called..." |
Missing API_SECRET (client mode triggered) |
Set env var, confirm logs: API_SECRET is set? true
|
"Either data.created_by or data.created_by_id must be provided..." |
Missing created_by_id in channel creation |
Use channel('messaging','id',{created_by_id:'tester',...})
|
"Cannot find module 'sendTestMessage.js'" |
File path or name mismatch | Check directory, file extension (.js vs .mjs) |
Invoke-WebRequest : A parameter cannot be found '-X' |
PowerShell using an alias for cURL
|
Use curl.exe or Git Bash / WSL or correct Invoke-WebRequest syntax |
Through this article, you’ve established a foundation for capturing and indexing messages in real-time. From here, you can refine your system by:
✅ Implementing webhook security (verifying signatures)
✅ Adding Kibana dashboards for deeper analytics
✅ Building a polished front-end search experience to instantly surface relevant messages
Further Reading & Resources:
Stream Chat Official Docs
Elasticsearch Reference
Ngrok Documentation
Kibana Guide
(Note: For production, consider robust error handling, SSL/TLS, webhook signature validation, and more advanced pipeline architecture. But this article provides a solid foundation to get started.)
I write technical articles for companies and individuals. If you enjoyed this, you can connect with me on LinkedIn for a chat.
Below are some blogs that I write on!

 Medium


Top comments (0)