Which JavaScript framework are you? Our smart application will choose from between React, Vue, Angular, Ember and Backbone. We'll use some JavaScript code to tie together smart APIs from Watson, Twilio and we'll even use an npm module to run a simple Bayesian analysis in our local code. Let's get started!
Table of Contents
- Step 1: Create your Watson Natural Language Understanding Service
- Step 2: Create a Twilio Function
- Step 3: Call your Watson NLU service from your Twilio Function
- Step 4: Create a Chatbot with Twilio Autopilot
- Step 5: Link it all Together: Make your Chatbot smart with Watson
- Conclusion & Next Steps
- Resources
Step 0: Create your Free Accounts
First, we'll create our accounts on IBM Cloud and Twilio. If you already have accounts, you can skip this step.
❗❗❗ Remember to confirm your email address by clicking the links that are sent to your email address.
Step 1: Create your Watson Natural Language Understanding Service
Next, we'll create our Watson NLU service through the Cloud dashboard. Go to your IBM Cloud Dashboard and click the Create Resource button.

ℹ️ Having trouble with any steps of this lab? Please reach out to me on Twitter, my DMs are open!
Type "natural language" in the search box and hit return. You'll see Watson Natural Language Understanding show up. Click the box.

Now, we'll select the Lite tier (free forever!) and click Create.

Congratulations, you've created your free Watson Natural Language Understanding service! 🎉🎊🎏
While we're here, let's click Service Credentials and grab the apikey and url we'll need to call this service from our JavaScript code. Copy down the values and keep them handy for when we put them into our Twilio dashboard later.

Step 2: Create a Twilio Function
Next, let's log into our Twilio account. On the left hand side, click All Products and Services:

Then, scroll down and click Functions.

Now we'll create our first Twilio Function. Click the red plus button, and in the modal dialog that pops up, select "+ Blank" and click Create.

Hooray, we've created our Twilio function! We can now edit our function and deploy it in real-time to the Twilio cloud.
By default, our function starts out looking something like this:
exports.handler = function(context, event, callback) {
    let twiml = new Twilio.twiml.VoiceResponse();
    // twiml.say("Hello World");
    callback(null, twiml);
};
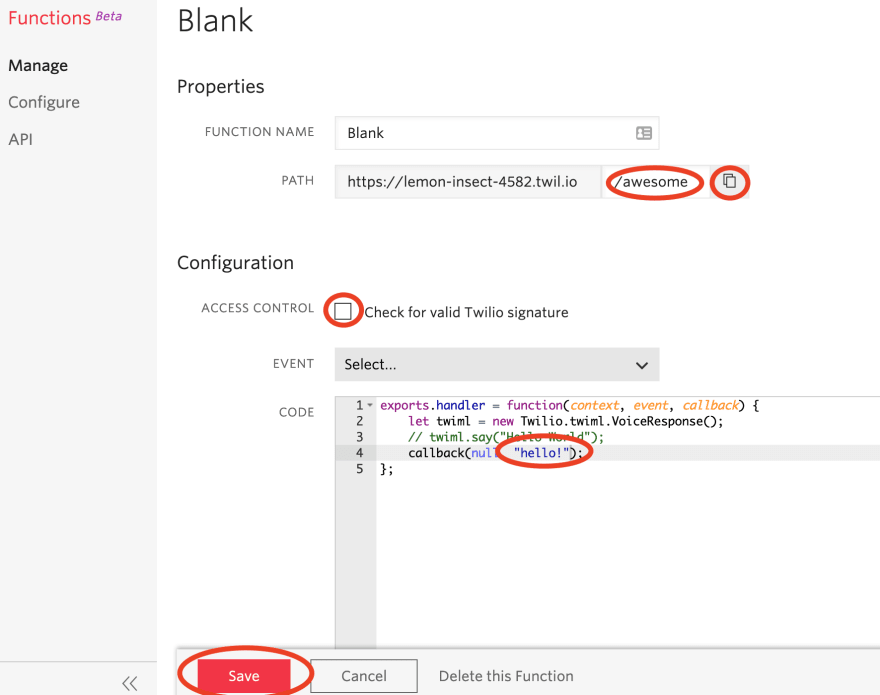
Let's test to make sure our function works! We'll make a few changes:
- Add a
paththat we can access this function at. I've used the path/awesomebut you can use whatever you like. - Click the Copy button to the right of the path to copy the path to your clipboard.
- Untick the Access Control checkbox for now. (We are going to test this function using our browser, which won't be authenticated.)
- Let's return an arbitrary String of data. I used the very creative string
"hello!" - Click Save at the bottom of your function.
Wait a few seconds for the Twilio Function to deploy. Then, paste the URL you copied into your browser. You should see your message appear as the payload!

Congratulations, your Twilio Function is now working successfully and the whole internet can use it! Next, let's make it smart with Watson.
Step 3: Call your Watson NLU service from your Twilio Function
It's time to re-write our Twilio Function to make it useful.
First, let's set up our IBM Watson NLU apikey and url that we copied down in Step 1.
Twilio has a way of storing secrets inside environment variables. To do this, click Configuration and then click the red plus sign. Create two variables, one called watson_apikey (where you will paste your apikey) and another called watson_url (where you will paste your url).
On that same screen, you'll see Dependencies. This is where Twilio imports npm modules which are required by our function. We'll be using IBM Watson's module to authenticate and interact with the service. Click the red plus sign next to dependencies and add ibm-watson as a package. I use a * in the version field to indicate the latest version.
Lastly, click Save at the bottom of the page.

Next, we'll replace the function body with some code that will call IBM Watson.
Copy and paste the code below into your Twilio Function:
exports.handler = function(context, event, callback) {
  const NaturalLanguageUnderstandingV1 = require('ibm-watson/natural-language-understanding/v1');
  const { IamAuthenticator } = require('ibm-watson/auth');
  const analyzeParams = {
    'url': 'http://news.google.com',
    'features': {
      "sentiment": {},
      "categories": {},
      "concepts": {},
      "entities": {},
      "keywords": {}
    }
  };

  const naturalLanguageUnderstanding = new NaturalLanguageUnderstandingV1({
    version: '2020-06-12',
    authenticator: new IamAuthenticator({
      apikey: context.watson_apikey,
    }),
    url: context.watson_url,
  });

  naturalLanguageUnderstanding.analyze(analyzeParams)
    .then(analysisResults => {
      callback(null, JSON.stringify(analysisResults, null, 2));
    })
    .catch(err => {
      callback(null, 'Error: ' + err);
    });
};
ℹ️ Note: this code is also available on GitHub.
You'll notice in this code that we're calling context.watson_apikey and context.watson_url to pull in the environment variables from your Twilio configuration.
This code makes a call to the IBM Watson Natural Language Understanding service that you just created. The analyzeParams variable tells Watson what to do.
const analyzeParams = {
    'url': 'http://news.google.com',
    'features': {
      "sentiment": {},
      "categories": {},
      "concepts": {},
      "entities": {},
      "keywords": {}
    }
  };
In this case, we're saying "Analyze the text at the following URL, and tell me all about the sentiment, categories, concepts, entities and keywords." By altering or removing these properties in the features property, we can receive less data.
Now, let's click Save, copy the path URL to our clipboard, and paste it into a new browser tab, and see what comes back. In my case, I get a large JSON object which starts like this:

Your response will probably look different, since the webpage news.google.com is updated frequently and changes based on your location, but the structure should be the same.
Hooray! We've blasted off some data 🧑🚀🚀🌞 and received back some deep insights from IBM Watson Natural Language Understanding. Next, we'll use a chatbot to gather some unique, individualized data from our users to provide personalized insights.
Step 4: Create a Chatbot with Twilio Autopilot
Twilio Autopilot lets us make a bot that can gather information from users and programmatically act based on that information.
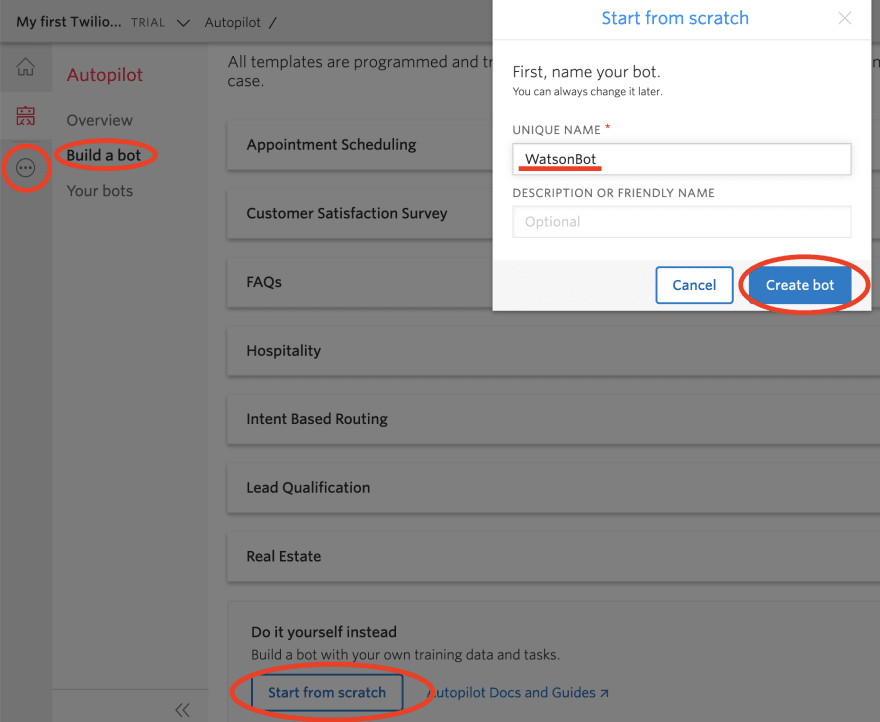
We can create an Autopilot bot by clicking All products and services, then selecting Autopilot. Click Build a bot, then scroll to the bottom of the list of templates and click Start from Scratch.
When the dialog box pops up, name your bot. I named mine WatsonBot because I am very, very creative:
Inside the Twilio Autopilot instance, we're going to add a new task, which will help our bot gather information from the end user. Click the blue Add a task button:

I'm going to call my task take_js_survey, then click the blue Add button on the far right.

Now let's train the model with some information about how we'll invoke this task. Click train on the right hand side of the row for train_js_model.
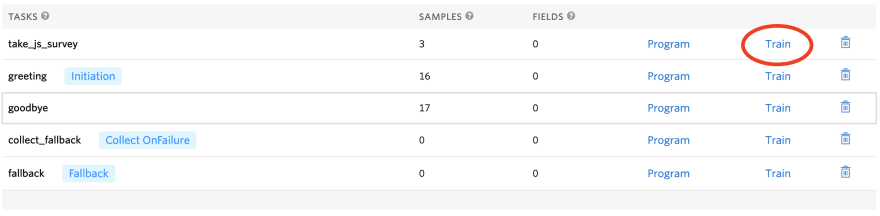
Add a handful of phrases that will indicate that the user wants to take your survey. Type them into the text box indicated in the diagram, and then click Add sample after each has been entered. In the below screenshot you'll see a few phrases I used. After you've entered a few and you see them reflected in the UI, click Build model at the bottom of the page. This will tell Twilio Autopilot to build a machine learning model of your phrases, and will direct a user to the survey if their intent closely matches.
Now, in the upper right of your screen, click Switch to Program Task.

In this screen, we'll write the Autopilot JSON that instructs Twilio what questions to ask the user. Copy and paste this code:
{
    "actions": [
        {
            "collect": {
                "name": "js_survey_questions",
                "questions": [
                    {
                        "question": "Hello! I'm the IBM / Twilio sentiment analysis bot. Tell me about your programming habits, and I'll tell you what JavaScript framework you are! Please share a few sentences about the following topics. First, what do you think of programmers who use a graphical IDE like V S Code, as opposed to vim or emacs?",
                        "name": "vim_emacs"
                    },
                    {
                        "question": "Thanks for the feedback! Some developers contribute to open source projects, whereas others submit documentation patches or find bugs and ask for things to be fixed. What do you think of programmers who don't contribute back to open source projects in some way?",
                        "name": "open_source"
                    },
                    {
                        "question": "People can be very proud of their GitHub contribution chart, which is the visual representation of how much code they have committed each day. Should this be a point of pride for programmers?",
                        "name": "contribution_chart"
                    },
                    {
                        "question": "Nice! Some programmers believe that the number of lines of code written is extremely important. One way to pad this mystical number is to have brackets not on the same line as a line of code, but instead on a new line. What is your take on the subject?",
                        "name": "lines_of_code"
                    },
                    {
                        "question": "Last question. A new programming hire joins your team. As they start to work on their code, you realize that instead of tabs to indent their lines, they are using spaces. What do you do to them? Be as graphic as possible.",
                        "name": "tabs_spaces"
                    }
                ],
                "on_complete": {
                    "redirect": "YOUR_URL_GOES_HERE"
                }
            }
        }
    ]
}
ℹ️ Note: This code is also available on GitHub.
At the bottom of the code, you'll see the text YOUR_URL_GOES_HERE. This is the URL to your Twilio Function that you created in Step 3. Replace this text with the URL of your Twilio Function, then click Save. You may also have to click Rebuild model.

Now, we've created our bot... let's make it smart, by ingesting insights from Watson NLU!
Step 5: Link it all Together: Make your Chatbot smart with IBM Watson
Let's go back to our Twilio Function. Click Configure and add the following dependency: whichx. This is a naive Bayesian classifier that we are going to use as a demo of running a brief, low-tech analysis on data directly inside our microservice.

Scroll to the bottom of the screen and click Save.

Click on Manage and select your function.
Replace the code in your function with this code from Dave's GitHub.
We'll go over a few of the new additions to the code!
The List of Frameworks
This section is a collection of our JavaScript frameworks, and a short description that our classifier will attempt to match to our user's supplied text.
const frameworks = {
      "angular": "If you like established, stateful toolkits favored by enterprise companies, you will find Angular.js an adequate framework.",
      "react": "You're not the newest framework out there, but you're established, popular, and youd don't have to prove anything. Nobody got fired for choosing React.",
      "vue": "No longer the new kid on the block, you're still gaining popularity and establishing yourself as a great performer. You've got all the hype and buzz!",
      "ember": "You have the vibe and backing of a supportive community and a well-designed ecosystem.",
      "backbone": "You're still being used even as the cool kids have moved on to different ecosystems. Hang in there!"
  }
Building our Local Bayesian Classifier
The more powerful and scalable way to do this would be to build a custom model in Watson, but I also wanted to demonstrate how easy it is to build a simple classifier locally.
//Build our Bayesian model
  var whichfw = new WhichX();
  whichfw.addLabels(["Angular", "React", "Vue", "Ember", "Backbone"]);
  Object.keys(frameworks).forEach((p) => { whichfw.addData(p.toLowerCase(), frameworks[p].toLowerCase()) } );
The Twilio Autopilot Integration
This section takes all the data given by the user (you'll notice the js_survey_questions property) and reduces the text into a single string, with all their responses concatenated together.
//Get answer from Memory
  const memory = JSON.parse(event.Memory);
  const inputText = Object.values(memory.twilio.collected_data.js_survey_questions.answers).reduce(
    (total, {answer}) => total + " " + answer, ""
  );
The Twilio Response
Finally, we'll put together some custom JSON that we will return to Twilio Autopilot to be read out to the end user.
      const twilioResponse = {
        "actions": [
          {
          "say": "We detected " + analysisResults.result.sentiment.document.label +
            " sentiments, and identified the keywords " +
            analysisResults.result.keywords.reduce((a,v,i) => {return a + (i===0?"":", ") + v.text}, "") +
            ". " + frameworkResponse
          }
        ]
      };
      callback(null, twilioResponse);
Conclusion & Next Steps
Congratulations on building a smart chatbot with Natural Language Understanding! 🎡⛱️🚀 Just to cover what we've done:
- We built an interactive virtual assistant and trained a model to respond to general user inquiries
- We connected the virtual assistant to Watson Natural Language Understanding to get insight into user emotions and entities
- We built a naive Bayesian classifier to do a simple match against our user data
In future posts, we'll explore more about machine learning and natural language understanding. Please if you'd have ideas for future integrations!


Oldest comments (1)
I prefer vim. It's clean and available on all systems. Old doesn't mean bad it means distinguished sips whiskey. I would never use emacs unless forced by gunpoint. VSCode and vscoders are dope tho. Can't get mad about that. GG Microsoft, congrats on the turnaround y'all.