
Here we will see the practical aspects of Orchestration Containers.
We will see how same task is perform by the Docker set of Commands comparing to the Kubernetes commands.
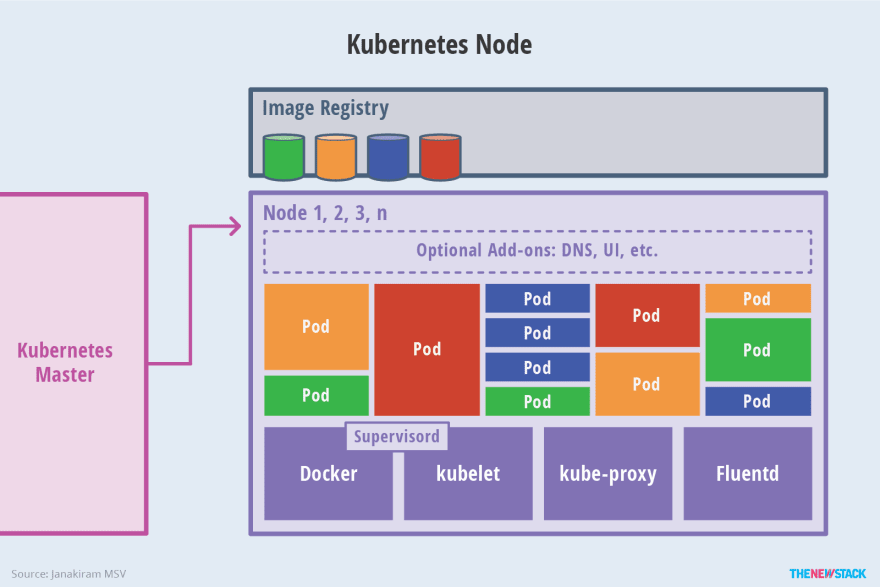
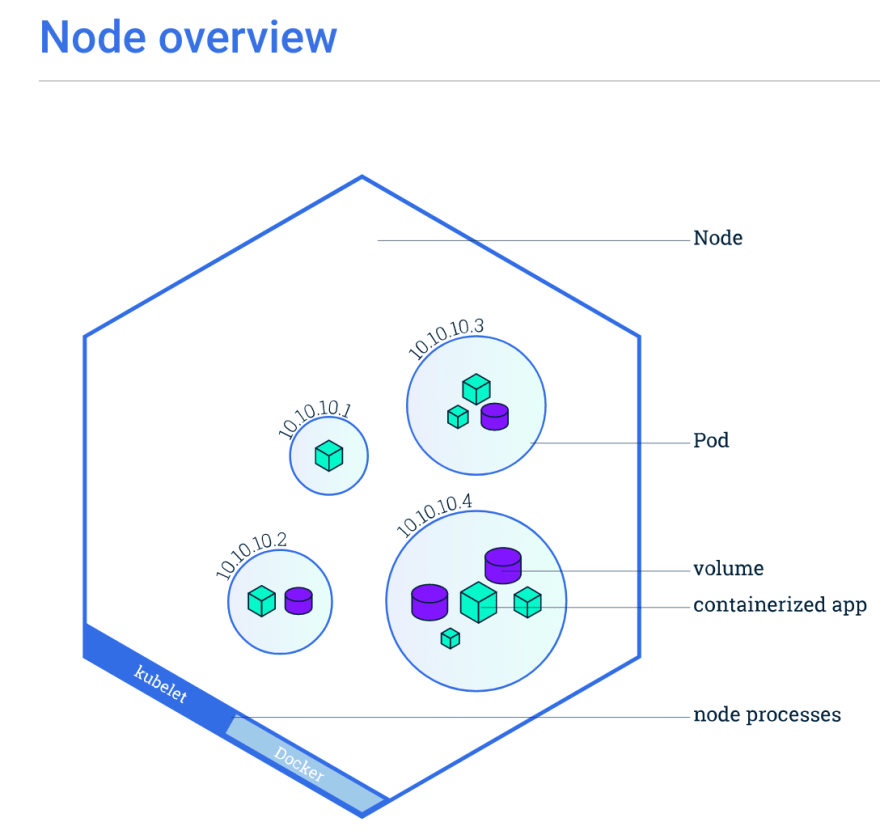
Architecture
Run Our First Container
Docker Command
docker run --name mywebserver nginx
Kubectl command
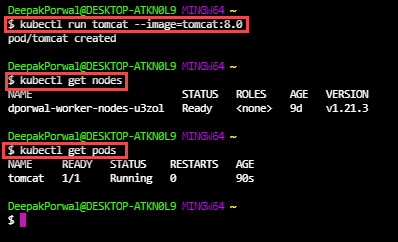
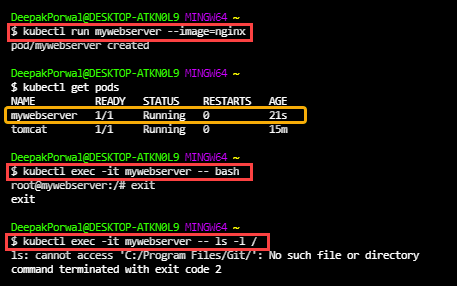
kubectl run mywebserver --image=nginx
Exec into Container
Docker Command
docker exec -it mywebserver bash
K8s Command
kubectl exec -it mywebserver -- bash
OR
kuberctl exec -it mywebserver -- ls -l /
Removing Container
Docker commands
Before removing the particular container we have to stop the container and then we can remove it
docker container stop mywebserver
docker container rm mywebserver
kubectl command
We don't need to stop the pod before removing, k8s take care of it.
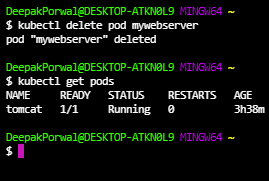
kubectl delete pod mywebserver
Benefits of Pods
Many applications might have more than one container which is tightly coupled in one-to-one relationship.
Here you need to know the relation between the containers, so to keep track on all the containers having dependencies. As if one goes down, complete application goes down.
Linking in Docker commands,
docker run -dt --name myweb01 function01
docker run -dt --name myapp01 function02
Whereas, in K8s Containers within a pod share an IP address and port space, and can find each other via localhost.
Not need to create individual container, just need to refer as a pod. No worries of one-to-one connection.
If pod1 is not working it can create another pod2 and be available whenever needed.
* Pod always runs on a Node
* A node is a worker machine in k8s
* Each node is managed by master
* A node have multiple pods
Launch multi containers Pod
We need to use yaml file to mention the different containers and Objects/Volumes.
apiVersion: v1
kind: Pod
metadata:
  name: sidecar-pod-1
spec:
  volumes:
  - name: log
    emptyDir: {}

  containers:
  - image: busybox
    name: main-container
    args:
     - /bin/sh
     - -c
     - >
      while true; do
        echo "$(date) INFO hello from main-container" >> /var/log/myapp.log ;
        sleep 1;
      done
    volumeMounts:
    - name: log
      mountPath: /var/log

  - name: sidecar-container
    image: busybox
    args:
     - /bin/sh
     - -c
     - tail -fn+1 /var/log/myapp.log
    volumeMounts:
    - name: log
      mountPath: /var/log
run the above yaml file, which I have named as pod.yaml
kubectl apply -f pod.yaml

Let us understand this YAML file:
- For the sake of understanding I have named my containers as main-container and sidecar-container.
- The main container will be our application which will continuously write something to /var/log/myapp.log
- The /var/log/ path is mounted on the containers using separate volume. This path is mounted using volumeMounts in both the containers so that the path is shared across both the containers.
- The sidecar container will read the log file content using tail -fn+1 /var/log/myapp.log
Benefits of Configuration File
- Integrates well will change review processes
- Provides the source of record on what is live within the Kubernetes cluster.
- Easier to troubleshoot changes with version control
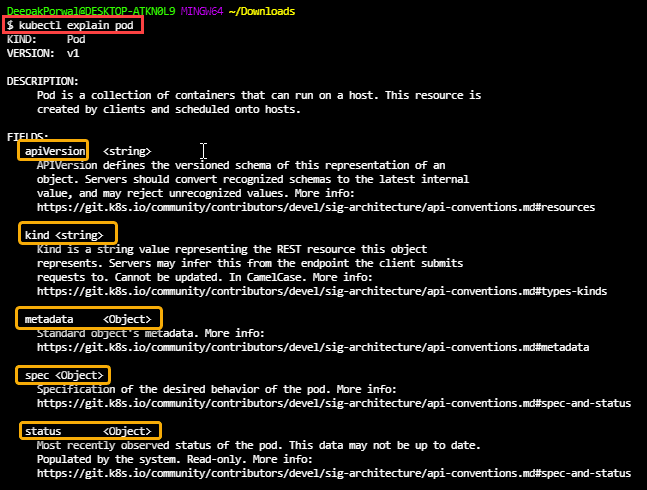
Understanding POD Configurations in YAML
In the above pod.yaml you would have seen many Important fields like apiVersion, kind, metadata, container etc.
| key | Description |
|---|---|
| apiVersion | Version of API |
| kind | kind of object you want to create |
| metadata name | name of the object that name uniquely identifies it |
| spec | Describe state of the object |
To check apiVersion we need to access API Primitives at path localhost:8080/api through
kubectl proxy --port 8080
For more fields references you can check
API Documentation
Github Documentation
you can also take reference from CLI using below commands, but these could be not updated details.
kubectl api-resources
#specific to pod details
kubectl explain pod
Exposing Ports for Pods
Here we have the yaml file that, to demonstrate how we expose port. It work similar way as in Docker.

Lets create a pod with container at port 8080 and we will see the pod details.
apiVersion: v1
kind: Pod
metadata:
  name: nginx-pod
spec:
  containers:
  - name: nginx
    image: democontainer
    ports:
      - containerPort: 8080

and checking details

to check for more details about the port field in document. you can run following command.
kubectl explain pod.spec.containers.ports

Generating Pod Manifests using CLI
# Create a pod from nginx Image
kubectl run nginx --image=nginx

#Create a pod and expose to port 8080
kubectl run nginx --image=nginx --port=8080

# Output the manifest file
kubectl run nginx --image=nginx --port=80 --dry-run=client -o yaml
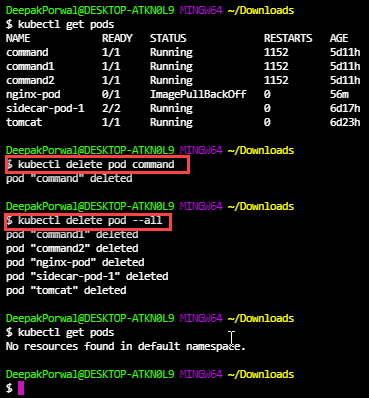
detele pods
#delete specific pod
kubectl delete pod command

#delete all pods
kubectl delete pod --all
References:
Official Documentation
Udemy Course
Getting Started with Kubernetes
Docker Commands
Credit:
Zeal Vora

Oldest comments (0)