
For personal projects and hacking around on Kubernetes, I'm a fan of inexpensive managed clusters (like the ones offered by Digital Ocean). For about ten bucks a month, I can spin up a small single-node cluster and hit the ground running. Unfortunately, with these small clusters you only get about a gig of usable RAM and a single vCPU at best. If you want more, prices quickly climb.
At home, I've got a pretty decent Linux box with 12 vCPU (thanks Ryzen!) and 48G of RAM that I've lovingly named tomorrowlan. A similar configuration on Digital Ocean would run about $240 a month! When I'm messing around on personal projects, I really don't care about resiliency or production worthiness. It would be awesome to use my existing hardware while retaining the ability to share what I've built with others on the wider internet.
Thanks to a handful of open-source tools, I can make this dream a reality. With Inlets, Contour, KinD, and external-dns, I can easily spin up new clusters and get them externally routable within seconds.
Components
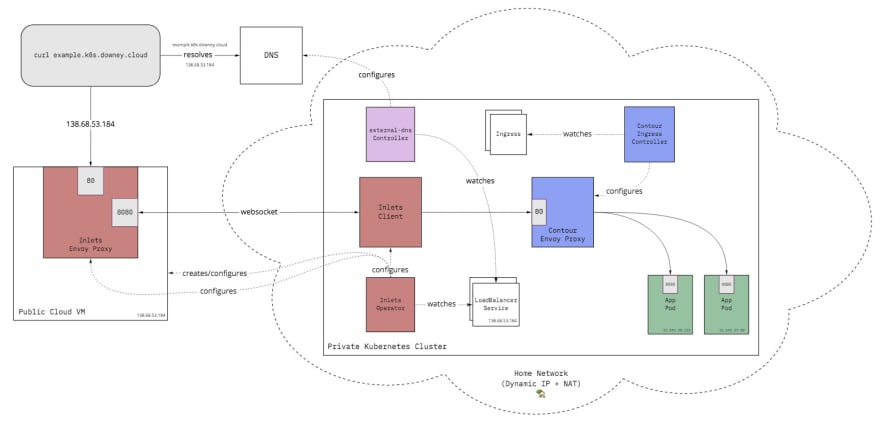
The diagram above provides an abridged view of how all of these components work together. It honestly looks more complicated than it actually is.
In this architecture, we have a Kubernetes cluster running on hardware running at home. It is behind a home router's NAT and whatever networking nonsense the home ISP is doing. Typically, this cluster would be utterly unreachable without special configuration of the router. Plus, you're most likely are issued a dynamic IP address from your ISP that will change over time. Besides, even if you did set this all up, you probably don't want randoms from the internet connecting directly to your home network.
Instead, we can use an inexpensive cloud VM with a public IP to serve as our entry point. Thanks to all of the components mentioned earlier, we can tunnel traffic from this VM to our private cluster. Now, I'm going to dig into what each of these components is doing. Additionally, I'll demonstrate how they can be used to expose a simple app to the outside world. What I'm not going to do is go in-depth on how to install or configure them. They're all well maintained and continuously updated, so that aspect of it is best left to the official docs.
Inlets
First, we'll start with Inlets since it's arguably the most important piece of all of this. We'll use it to tunnel traffic from a publically reachable cloud instance (I use a $5-a-month Digital Ocean VM) to our internal cluster. Inlets is open-core software, so if you need Layer 4 routing or TLS termination, you'll have to pay for the "Pro" version. For hobbyist use cases like my own, you can make do with what the free version provides. Specifically, we'll be using inlets-operator.
The inlets-operator is a Kubernetes operator that you'll install to the cluster. It continuously watches for new LoadBalancer services and uses inlets to provision what it calls an "exit node" VM on the cloud of your choice and a public IP to expose the LoadBalancer service. In this case, it will be exposing the LoadBalancer service of our Ingress Controller.
Installation
Follow this tutorial for getting started with the inlets-operator.
external-dns
This one is definitely a bit more of a "nice to have." Inlets will give you a public IP address that will work for reaching your apps. Raw IP addresses are pretty unwieldy, however. So instead, if you've got a domain handy, you can configure DNS to map that IP to your domain. For my cluster, I tend to use *.k8s.downey.cloud. This is typically a manual process, but it doesn't have to be!
You can use a project called external-dns to configure DNS for your LoadBalancer services automatically! It's pretty slick. All you've got to do is annotate the service with external-dns.alpha.kubernetes.io/hostname and your desired hostname. Then the external-dns controller will do the rest and configure your DNS for you! Since I'm using a Digital Ocean VM as my Inlets node, I have external-dns set up to configure Digital Ocean's Cloud DNS.
Installation
Installation of external-dns is pretty dependent on what DNS provider you're using. Follow the steps in the README for the cloud you're using. For Digital Ocean I followed these.
Contour Ingress Controller
Using an Ingress Controller with Inlets isn't strictly necessary. You could create a LoadBalancer service for every single app you want to expose, and Inlets will happily create VMs to route to those services. Though with that approach, costs will quickly add up.
With an Ingress Controller we can only expose a single proxy and have that proxy route to all of our apps internally. Any Ingress Controller will work for this purpose, but I like using Contour for several reasons:
- It's a Cloud Native Computing Foundation (CNCF) project just like Kubernetes
- It uses Envoy proxy, another CNCF project which has been battle-tested at scale and is pretty light on resource consumption
- Envoy proxy can hot-reload config changes, so there is no downtime as you add and remove backend apps
- It has excellent support for TLS termination out of the box (this is a moot point with the free version of Inlets, however -- you'd need the TCP routing support of inlets-pro -- but in general this is good)
Installation
Follow the Getting Started docs for quickly getting Contour up and running. Contour provides the LoadBalancer service YAML that Inlets will expose. To get it working well with external-dns, I use the following ytt overlay1 to annotate it with my domain:
#@ load("@ytt:overlay", "overlay")

#@overlay/match by=overlay.subset({"kind": "Service", "metadata":{"name": "envoy", "namespace": "projectcontour"}, "spec":{"type":"LoadBalancer"}}),expects=1
---
metadata:
  #@overlay/match missing_ok=True
  annotations:
    #@overlay/match missing_ok=True
    #@overlay/merge
    external-dns.alpha.kubernetes.io/hostname: "*.k8s.downey.cloud"
As an example, you can tweak the installation command slightly to do the ytt templating inline:
kubectl apply -f <(ytt -f https://projectcontour.io/quickstart/contour.yaml -f /tmp/external-dns-overlay.yaml --ignore-unknown-comments=true)
1 - If you haven't heard of ytt before, I recommend checking it out. It's part of the Carvel suite of Kubernetes utilities and is my go to for transforming YAML that I don't control. Like this Contour installation.
KinD
I use KinD, or Kubernetes in Docker, to run my clusters because I find it super convenient. All it requires is the kind CLI and having a Docker daemon running. It's very quick to spin up and destroy clusters when they're just running as Docker containers.
That said, there's plenty of other valid options here, such as microk8s, minikube, or directly on the OS with kubeadm.
Installation
To install KinD follow their quick start guide.
Demonstration
So, how does this all work together? Let's view it from the perspective of deploying a single app: httpbin.
We can deploy httpbin to the cluster with the following Deployment:
apiVersion: apps/v1
kind: Deployment
metadata:
  name: httpbin
spec:
  replicas: 2
  selector:
    matchLabels:
      app: httpbin
  template:
    metadata:
      labels:
        app: httpbin
    spec:
      containers:
      - image: docker.io/kennethreitz/httpbin
        imagePullPolicy: IfNotPresent
        name: httpbin
        ports:
        - containerPort: 80
Next we can make it easily reachable from within the cluster by creating a ClusterIP service for it.
apiVersion: v1
kind: Service
metadata:
  name: httpbin
  labels:
    app: httpbin
spec:
  ports:
  - name: http
    port: 80
    targetPort: 80
  selector:
    app: httpbin
That's cool. We can now reach it at httpbin.default.svc.cluster.local from within the cluster on port 80. This next step isn't necessary, but for fun we can also reach it locally from the by using the kubectl port-forward command.
tim@tomorrowlan:~/workspace/k8s-yaml$ kubectl port-forward service/httpbin 8000:80
Forwarding from 127.0.0.1:8000 -> 80
Forwarding from [::1]:8000 -> 80
With that running you can just curl localhost:8000 and hit the httpbin pods. So far so good!
Go ahead and kill the kubectl port-forward. It's time to make it reachable for everyone else.
We can do this by creating an Ingress resource to let Contour know about our httpbin service and what traffic should be routed to it.
apiVersion: extensions/v1beta1
kind: Ingress
metadata:
  name: httpbin
spec:
  rules:
  - host: httpbin.k8s.downey.cloud
    http:
      paths:
      - backend:
          serviceName: httpbin
          servicePort: 80
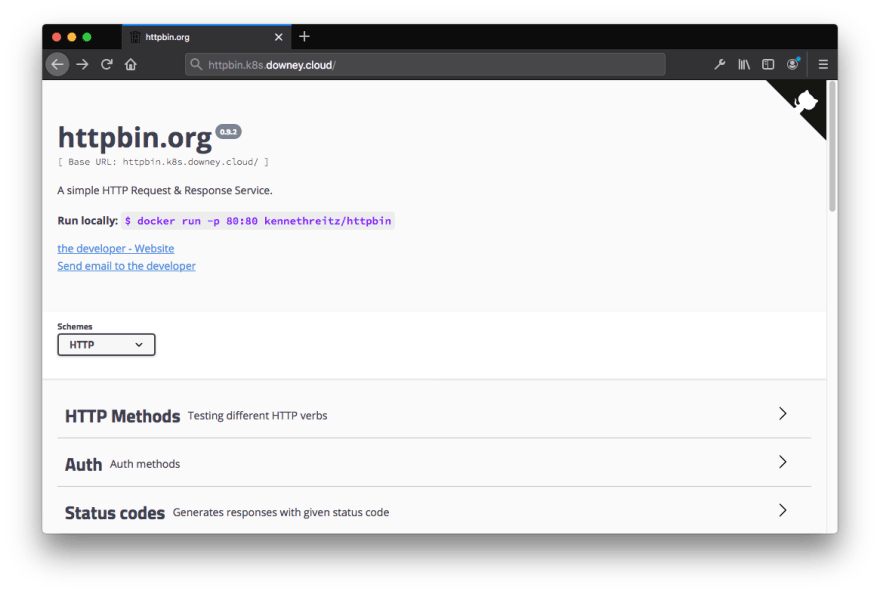
That's it! We can now access the httpbin app on the internet at http://httpbin.k8s.downey.cloud! 😌
Recap
So what all just happened? Well let's look back at the diagram from before...
- Contour came with a
LoadBalancerservice that points to its Envoy proxy which we annotated withexternal-dns.alpha.kubernetes.io/hostname: "*.k8s.downey.cloud" - The inlets-operator saw we have a
LoadBalancerservice that has no IP so it provisioned a cloud VM with a public IP - The inlets-operator oepened a tunnel between an Envoy running on the cloud VM and Contour's Envoy
- Since Contour's
LoadBalancerservice has theexternal-dns.alpha.kubernetes.io/hostnameannotation, external-dns configured DNS to point to the service's public IP - Contour saw the
Ingressresource we created forhttpbinand configured its Envoy to direct requests going tohttpbin.k8s.downey.cloudto thehttpbinClusterIPservice - The
httpbinClusterIPservice directed the traffic to thehttpbinpods - This Rube Goldberg machine resulted in our pods being publicly reachable
What's awesome is that the steps for the httpbin app itself are not actually any different than using a Deployment, Service, and Ingress on a managed Kubernetes cluster! There was a lot that happened behind the scenes, but once it was all set up it basically just works.
We've now had the chance to see one of my favorite aspects of Kubernetes -- how extensible it is! By combining a few building blocks, we're able to quickly replicate the LoadBalancer service experience of a managed Kubernetes cluster on a personal dev machine. I've got 12 vCPU and 48 gigs of RAM at my disposal so I have enough resources to develop non-trivial workloads and I can still demo the end result online. All for the five bucks a month it costs to run the Inlets exit node.
I, at least, think that's pretty cool.
Cheers! 🐢

Top comments (0)