
This is the fourth of a new series of posts on ASP .NET Core 3.1 for 2020. In this series, we’ll cover 26 topics over a span of 26 weeks from January through June 2020, titled ASP .NET Core A-Z! To differentiate from the 2019 series, the 2020 series will mostly focus on a growing single codebase (NetLearner!) instead of new unrelated code snippets week.
Previous post:
NetLearner on GitHub :
- Repository: https://github.com/shahedc/NetLearnerApp
- v0.4-alpha release: https://github.com/shahedc/NetLearnerApp/releases/tag/v0.4-alpha
In this Article:
- D is for Deploying to Azure App Service
- Right-Click Publish
- Web Apps in the Azure Portal
- Runtime Options
- Deployment Center
- GitHub Repos
- CLI Commands
- Azure DevOps and YAML
- References
D is for Deploying to Azure App Service
In this article, we’ll explore several options for deploying an ASP .NET Core web app to Azure App Service in the cloud. From the infamous Right-Click-Publish to fully automated CI/CD, you’ll learn about the latest Deployment Center option in the Azure Portal for App Service for web apps.
NOTE : If you’re looking for information on deploying to Docker or Kubernetes, please check out the following docs instead:
- Host and deploy ASP.NET Core: https://docs.microsoft.com/en-us/aspnet/core/host-and-deploy
- Deploy to Azure Kubernetes Service: https://docs.microsoft.com/en-us/azure/devops-project/azure-devops-project-aks
- Host ASP.NET Core in Docker containers: https://docs.microsoft.com/en-us/aspnet/core/host-and-deploy/docker
- Dockerize a .NET Core application: https://docs.docker.com/engine/examples/dotnetcore/
Right-Click Publish (aka Friends Don’t Let Friends Right-Click Publish)
If you’ve made it this far, you may be thinking one of the following:
a. “Hey, this is how I deploy my web apps right now!”
or
b. “Hey wait a minute, I’ve heard that you should never do this!”
Well, there is a time and place for right-click publish. There have been many debates on this, so I won’t go into the details, but here are some resources for you to see what others are saying:
- [MSDN] When should you right click publish : https://blogs.msdn.microsoft.com/webdev/2018/11/09/when-should-you-right-click-publish/
- _ Friends don’t let friends right-click publish _[by Damian Brady]: https://damianbrady.com.au/2018/02/01/friends-dont-let-friends-right-click-publish/
- _ In the wild _ [by Geoffrey Huntley]: https://rightclickpublish.com/
So, what’s a web developer to do? To quote from the aforementioned MSDN article, “Continuing with the theme of prototyping and experimenting, right click publish is the perfect way for existing Visual Studio customers to evaluate Azure App Service (PAAS). By following the right click publish flow you get the opportunity to provision new instances in Azure and publish your application to them without leaving Visual Studio:”
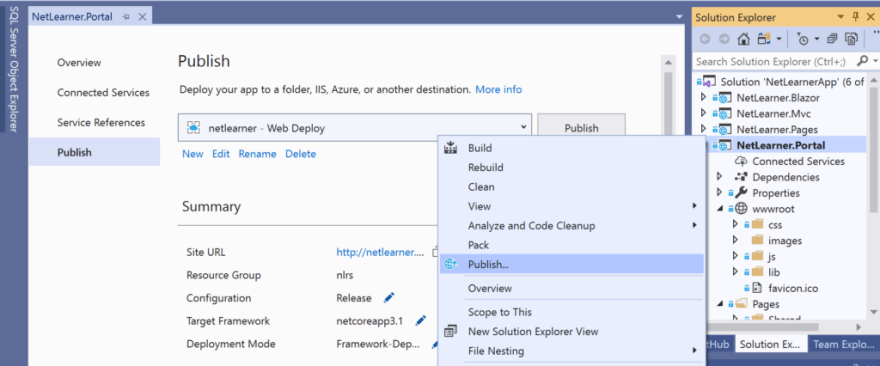
In other words, you can use this approach for a quick test or demo, as shown in the screenshots below for Visual Studio.
- Right-click your ASP .NET Core web app project in Solution Explorer and select Publish.
- Click the Start button on the screen that appears and follow the onscreen instructions.
- Ensure that you’re logged in to the correct Azure subscription account you want to publish to.

Web Apps in the Azure Portal
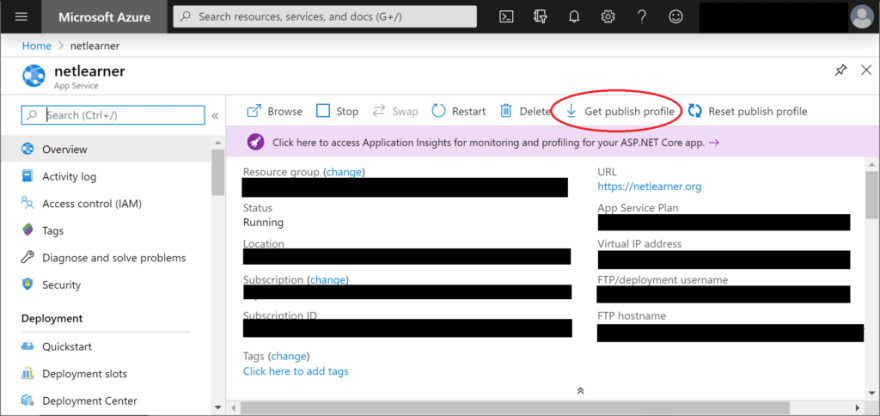
In the screenshot above, you may notice an option to “Import Profile” using the button on the lower left. This allows you to import a Web App profile file that was generated by exporting it from an _existing _Azure Web App. To grab this profile file, simply navigate to your existing Web App in the Azure Portal and click on “Get publish profile” in the top toolbar of your Web App, shown below:
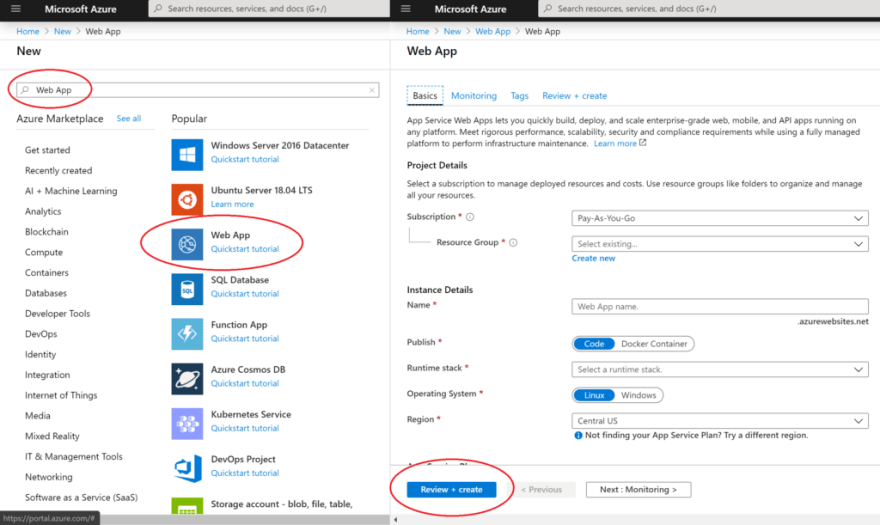
If you want to create a new Web App in Azure starting with the Azure Portal, follow the instructions below:
- Log in to the Azure at https://portal.azure.com
- On the top left, click + Create a resource
- Select “Web App” or search for it if you don’t see it.
- Enter/select the necessary values:
- Subscription (select a subscription)
- Resource Group (create or use existing to group resources logically)
- Web App name (enter a unique name)
- Publish (Code or Docker Image)
- Runtime stack (.NET Core)
- App Service Plan (create or use existing to set location and pricing tier)
- OS (Windows or Linux)
- Region (e.g. East US)
- Click Next through the screens and then click the Create button to complete the creation of your new Web App.
Now you can deploy to this Web App using any method you choose.
Runtime Options
If you like to stay ahead of ASP .NET Core releases, you may be using a pre-release version of the runtime. As of this writing, the latest stable version of ASP .NET Core is version 3.1, which is already available on Azure. If you’re looking for future preview releases, Azure App Service also has an option to install an Extension for preview runtimes.
To find the proper runtime:
- Navigate to your Web App in the Azure Portal.
- Click on Extensions under Development Tools.
- Click + Add to add a new extension.
- Choose an extension to configure required settings.
- Accept the legal terms and complete the installation.

Your options may include both 32-bit (x86) and 64-bit (x64) versions of the ASP .NET Core runtime and any preview versions of future releases. When planning ahead for multiple environments, you also have the option to deploy to Deployments Slots. This feature is available in Standard , Premium or Isolated App Service Plan tiers and will covered in a future blog post in this series.
If you’re interested in Deployment Slots right now, check out the official docs at:
- Set up staging environments for web apps in Azure App Service: https://docs.microsoft.com/en-us/azure/app-service/deploy-staging-slots
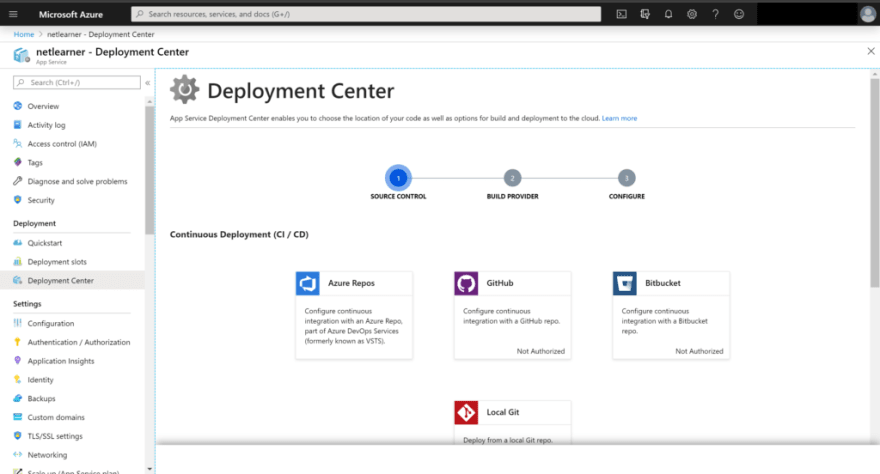
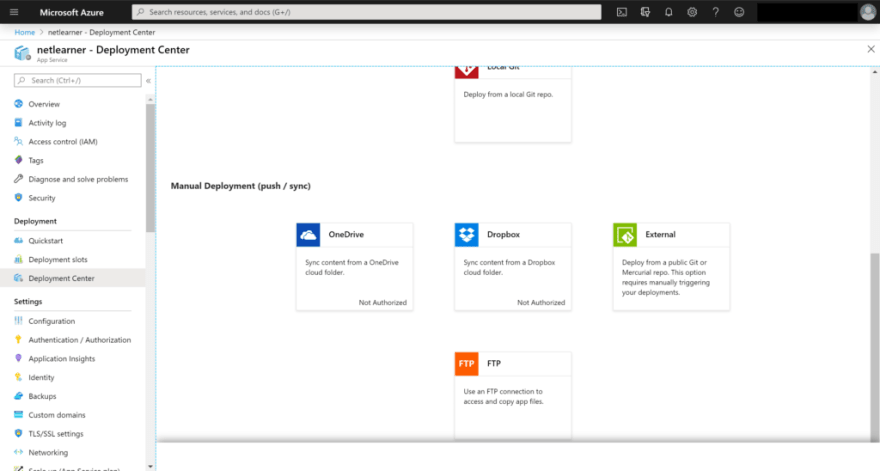
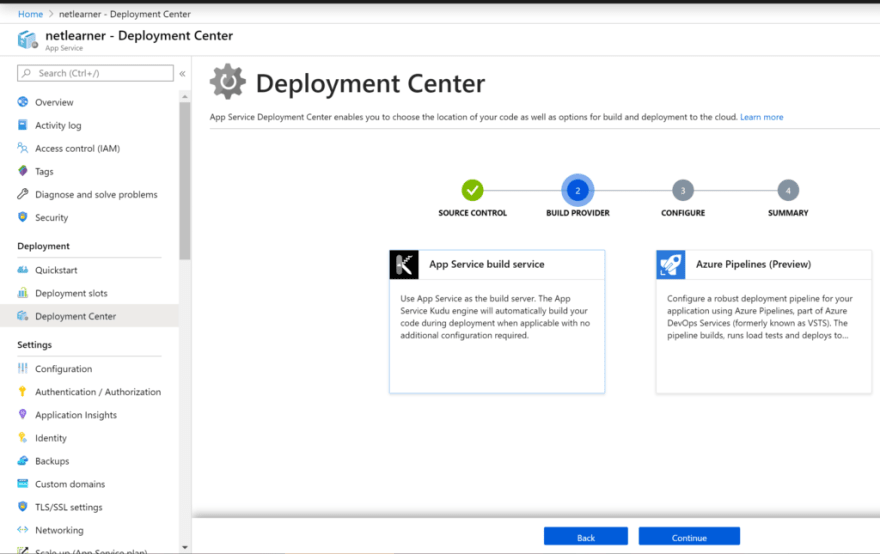
Deployment Center
In the list of features for your Web App, you will find an option to open up the new Deployment Center. Note that this has replaced the old Deployment Options. Let’s go over each of these options:
- Azure Repos
- Github
- Bitbucket
- Local Git
- OneDrive
- Dropbox
- External
- FTP
If you choose Azure Repos , you can set up your web app’s CI (Continuous Integration) system with an Azure Repo, which is part of Microsoft’s Azure DevOps services (formerly known as VSTS, aka Visual Studio Team Services). You will have options for using App Service as a Kudu build server or Azure Pipelines as your CI build system.
If you choose Github ** or ** BitBucket ** or even a **local Git account , you’ll have the ability to authorize that account to publish a specific repo, every time a developer pushes their code.

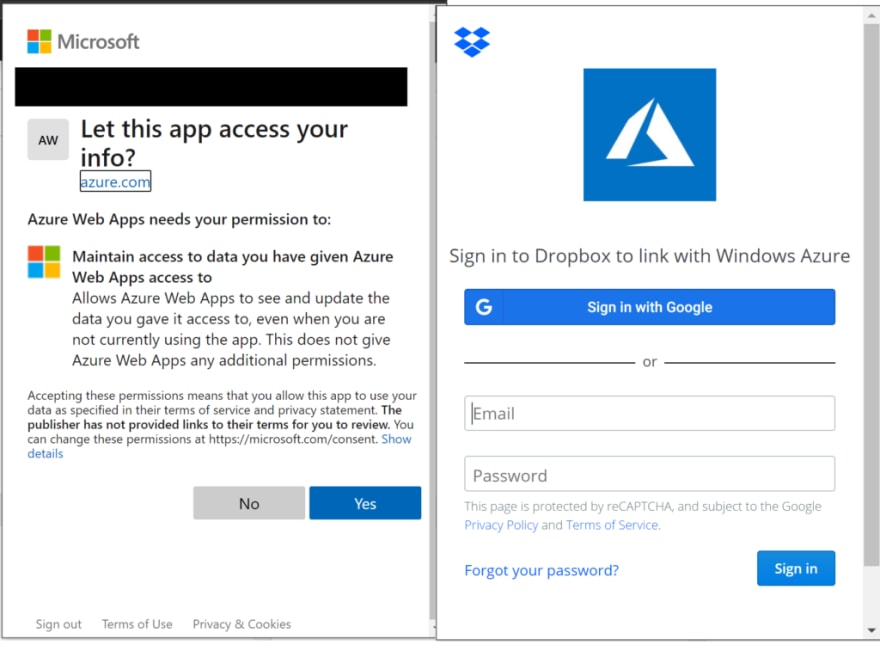
If you choose OneDrive or DropBox , you’ll have ability to authorize your App Service to pick up files deployed to a shared folder in either location.
You may also select an External repo or FTP source. To learn more about Azure Repos and Azure Pipelines , check out the official docs:
- Azure Pipelines: https://docs.microsoft.com/en-us/azure/devops/pipelines
- Overview: https://docs.microsoft.com/en-us/azure/devops/pipelines/get-started
- Get Started: https://docs.microsoft.com/en-us/azure/devops/pipelines/get-started-yaml
- Via Portal: https://docs.microsoft.com/en-us/azure/devops/pipelines/get-started-azure-devops-project
GitHub Repos (includes FREE option!)
If you’ve been using GitHub for public open-source projects or private projects on paid accounts, now is a great to time to create private repositories for free! In 2019, GitHub started offering free unlimited private repos, limited to 3 collaborators. This new free option comes with issue/bug tracking and project management as well.
For more information on GitHub pricing, check out their official pricing page:
- GitHub Pricing: https://github.com/pricing

Now you can easily set up your starter projects in a private GitHub repository and take advantage of the aforementioned CI/CD setup without having to choose between paying a GitHub fee or making all your repos public.
CLI Commands
If you wish to publish to Azure App service using CLI (Command Line Interface) Commands, you may use the following commands, where you can choose a name for your Web App, Resource Group, App Sevice Plan, etc. Single-letter flags are usually preceded by a single hyphen, while flags spelled out with completed words are usually preceded by two hyphens.
First, install the Azure CLI in case you don’t have it already:
- Install the Azure CLI: https://docs.microsoft.com/en-us/cli/azure/install-azure-cli
Authenticate yourself:
> **az** **login**
Create a new resource group:
> **az** **group** create -l <LOCATION> -n <RSG>> **az** **group** create --location <LOCATION> --name <RSG>
Create a new App Service Plan, where sku may be F1 or FREE, etc
> **az** **appservice** **plan** create -g <RSG> -n <ASP> --sku <SKUCODE> > **az** **appservice** **plan** create --resource-group <RSG> --name <ASP> --sku <SKUCODE>
From the documentation, the SKU Codes include: F1(Free), D1(Shared), B1(Basic Small), B2(Basic Medium), B3(Basic Large), S1(Standard Small), P1V2(Premium V2 Small), PC2 (Premium Container Small), PC3 (Premium Container Medium), PC4 (Premium Container Large), I1 (Isolated Small), I2 (Isolated Medium), I3 (Isolated Large).
Create a new Web App within a Resource Group, attached to an App Service Plan:
> **az** **webapp** create -g <RSG> -p <ASP> -n <APP> > **az** **webapp** create --resource-group <RSG> --plan <ASP> --name <APP>
The above command should create a web app available at the following URL:
- http://.azurewebsites.net
To push your commits to a Git Repo and configure for App Service Deployment, use the following CLI commands:
Create a new Git repo or reinitialize an existing one:
> **git** **init**
Add existing files to the index:
> **git** **add**.
Commit your changes with a commit message:
> **git** **commit** -m "<COMMIT MESSAGE>“
Set your FTP credentials and Git deployment credentials for your Web App:
> **az** **webapp** **deployment** **user** **set** --user-name <USER>
Configure an endpoint and add it as a git remote.
> **az**  **webapp**  **deployment**  **source**  **config-local-git** -g <RSG> -n <APP> --out tsv  > **az**  **webapp**  **deployment**  **source**  **config-local-git** --resource-group <RSG> --name <APP> --out tsv

> **git remote add azure** <GIT URL>
The value for GIT URL is the value of the Git remote, e.g.
- https://@.scm.azurewebsites.net/.git
Finally, push to the Azure remote to deploy your Web App:
> **git push azure master**
For more information on CLI Commands for Git and Azure App Service, check out the official docs:
- Sign in with Azure CLI: https://docs.microsoft.com/en-us/cli/azure/authenticate-azure-cli
- az appservice plan: https://docs.microsoft.com/en-us/cli/azure/appservice/plan
- Deploy from local Git repo: https://docs.microsoft.com/en-us/azure/app-service/deploy-local-git
- az webapp deployment user: https://docs.microsoft.com/en-us/cli/azure/webapp/deployment/user
- Create an app with deployment from GitHub: https://docs.microsoft.com/en-us/azure/app-service/scripts/cli-deploy-github
- az webapp deployment source: https://docs.microsoft.com/en-us/cli/azure/webapp/deployment/source?view=azure-cli-latest
Azure DevOps and YAML
Wait, what about Azure DevOps and YAML and Pipelines?
Since this is an A-Z series, you will have to wait for “Y is for YAML” to get more detailed information on constructing your build pipeline using YAML in Azure DevOps. If you can’t wait that long, feel free to check out the following .yml sample I uploaded for use with an ASP .NET Core 3.1:
- YAML for Azure DevOps: https://github.com/shahedc/YamlForAzureDevOps
If you’re reading this after June 2020, simply jump right to the “Y is for YAML” post in the 2020 A-Z series.
BONUS : for Azure SQL Database Deployment, watch the following video on MSDN Channel 9:
- SQL DB Deployment: https://channel9.msdn.com/Shows/Data-Exposed/Deployment-options-for-Azure-SQL-Database
References
- Verify ASP.NET Core on App Service: https://aspnetcoreon.azurewebsites.net/
- Deploy a web app to App Services – Azure Pipelines: https://docs.microsoft.com/en-us/azure/devops/pipelines/apps/cd/deploy-webdeploy-webapps?view=azure-devops
- Continuous deployment – Azure App Service: https://docs.microsoft.com/en-us/azure/devops/pipelines/apps/cd/deploy-webdeploy-webapps?view=azure-devops
- CI/CD for Azure Web Apps: https://azure.microsoft.com/en-us/solutions/architecture/azure-devops-continuous-integration-and-continuous-deployment-for-azure-web-apps/
- Azure Pipelines Overview: https://docs.microsoft.com/en-us/azure/devops/pipelines/?view=azure-devops
- Get started with Azure Pipelines: https://docs.microsoft.com/en-us/azure/devops/pipelines/get-started/index?view=azure-devops
- Continuous deployment: https://docs.microsoft.com/en-us/azure/app-service/deploy-continuous-deployment

Top comments (0)