
Below is step by step of what you need to do:
1. Sign in to Azure
Sign into the Azure portal using this URL: https://portal.azure.com
2. Create Virtual Machine
•Click on create resource, then select Virtual Machine.
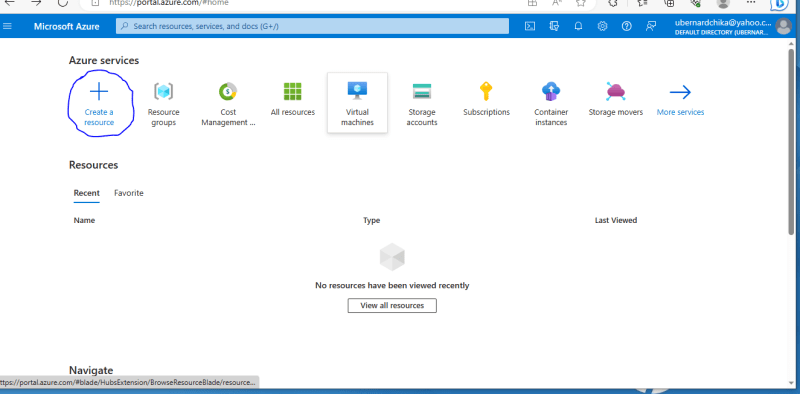
•Select Virtual Machines

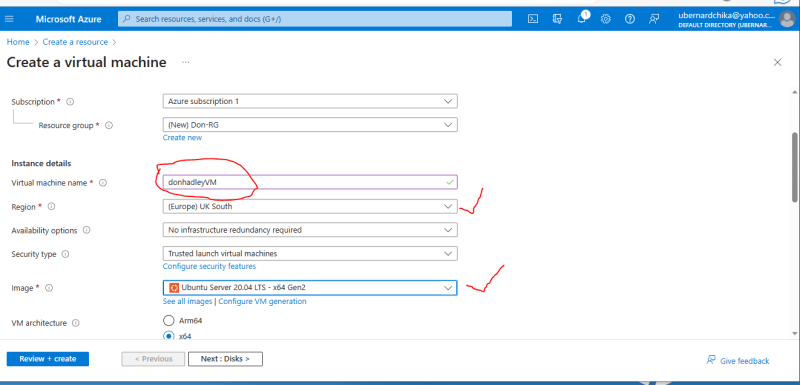
Create Virtual Machine Page
When the create virtual machine page opens, you go ahead under Project details and enter a resource group name, to create a resource group to house your Virtual Machineif you don’t have any yet.

Proceed to enter the following on the same page (Create a Virtual Machine) under Instance details.
Virtual Machine Name
Region
Image
Select your choice Linux distribution in Image, that is your preferred operating system. For this practice, we are using Ubuntu Server 20.04 LTS.
• Under Administrator account on same page, provide a username, such as azureuser and a password. The password must be at least 12 characters long and meet the defined complexity requirements.
• Under Inbound port rules, click Allow selected ports, and choose SSH (22) for select inbound ports

• Leave the remaining defaults setting and then click on the Review + create button at the bottom of the page.

3. Validation and Deployment
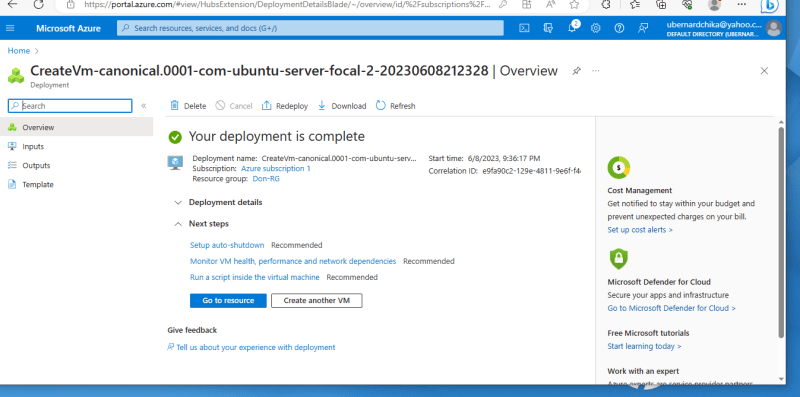
After validation runs, click the Create button at the bottom of the page, and the resource will start deploying.

Deploying in progress

• When deployment is complete, click on Go to resource to view the Virtual Machine you just created.
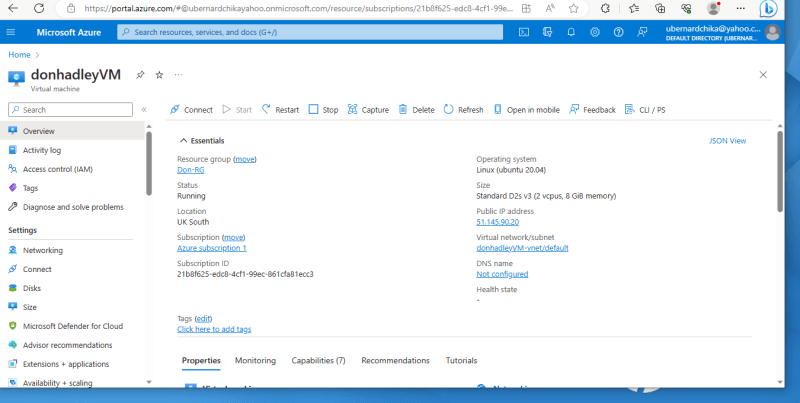
4. The Virtual Machine
The virtual machine overview with details of the deployed machine.
5. Connect to virtual machine
Open your Windows Powershell, wait for the Shell Prompt to display, type the SSH connecting format.
ssh username@IPaddress and click enter.
An authentication notification will popup, type yes and hit the enter key again.

You will subsequently be prompted for password. Go ahead and type in the password you provided while creating the machine. If it is correct, a welcome message Welcome to Ubuntu 20.04.6 will display in the shell with other relevant information about your virtual machine. The welcome message to be displayed depends on the Linux distro you have chosen while creating the machine.
6.Deallocation and Deleting the Virtual Machine.
When you are done practicing or using the machine, is advised you deallocate and delete it to avoid incurring unnecessary costs. To do this successfully, take the following steps:
To Deallocate:
• Go to overview page of the Virtual Machine and click on the stop button.
You will be prompted, select yes as shown below.

•Stopped (Deallocated)

To Delete:
To delete the Virtual Machine, you created and its dependencies, is advised you delete the Resource Group containing them.
Click on the Resource Group displaying in the Virtual Machine Essentials in Overview.
Then click on the Delete resource group button.

Copy and paste the Resource group name.
Click delete button
Thereafter, you receive a notification that the resource group has been deleted.
With this, you have cleared the resource and its dependencies and therefore no additional cost will be incurred.

Top comments (2)
Thank you for the article.
I think it would be better to note Azure in the title of your article. It will help users to find your article when necessary.
Thank you for the observation