
This article makes a review of Azure Compute Gallery, its components, functions, uses, and how to get the best out of it.
WHAT IS AZURE COMPUTE GALLERY?
Azure Compute Gallery is a service that helps you build structure and organization around your Azure resources, like images and applications.
It provides global replication, versioning and grouping of resources for easier management1. You can use Azure Compute Gallery to share custom VM images and application packages with others in your organization, within or across regions, within a tenant.
An Azure Compute Gallery helps you build structure and organization around your Azure resources, like images and applications.
USES OF AZURE COMPUTE GALLERY
An Azure Compute Gallery provides framework for:
Global replication.
Versioning and grouping of resources for easier management.
Highly available resources with Zone Redundant Storage (ZRS) accounts in regions that support Availability Zones. ZRS offers better resilience against zonal failures.
Premium storage support (Premium_LRS).
Sharing to the community, across subscriptions, and between Active Directory (AD) tenants.
Scaling your deployments with resource replicas in each region.
Let take a look at how to create and use Azure Compute Gallery.
HOW TO CREATE AZURE COMPUTE GALLERY
Sign into your Azure portal at https://portal.azure.com
Go to the search bar at the top of the page, type and select Azure compute gallery.

Under Basics and under Project details, select your Subscription and Resource group.
Under Instance details, select your gallery name and region. Then a little description about the gallery if you so wish.
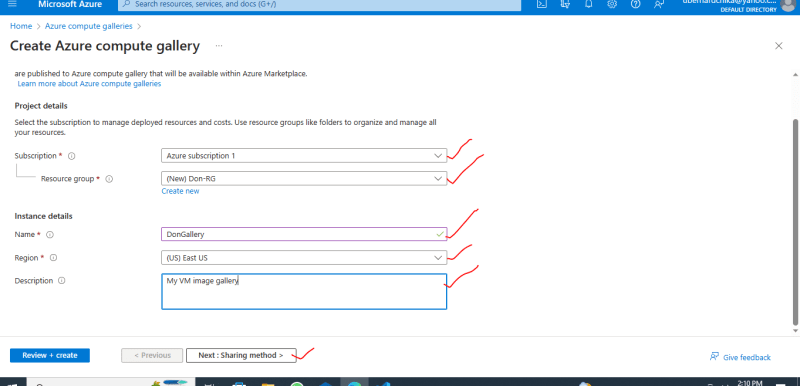
Select the radio button Yes for Share image to Azure compute gallery.

When you get the notification Validation passed click on the Create button.

Overview of the Compute Gallery.

CAPTURING AND SAVING A VM IMAGE IN THE COMPUTE GALLERY
Now that the Compute Gallery is ready for use, let go ahead and capture and image of a virtual machine to save in it.
Go to All recourses and click on the machine you want to capture the image to reveal the overview page.
Click on the Capture button at the top of the page.

This will take you to Create an image page. On this page, your Subscription and Region are already provided from the configuration of the VM. You enter the Resource group if it is different from the one you used for creating the VM.
- Then click on Review + create button.

When you see the notification Validation passed
Click Create button.

This will take you to Create an image page.
Under Gallery details, enter your Compute gallery as the target, select Operating system state. Select Specialized as the operating system state, if you still want the VM to remain functional after capturing the image.
Then click on Create new under Target VM image definition and enter the image specifications and click of in the new tab.
Then enter version number and Number of replicas and Regions to replicate the image.
Then click on the Review + create button.
Leave other configurations as default and click on Review + create button to procced.

The image of the VM is now successfully captured and saved in the Compute gallery. You can go and view the image in the gallery.
- Click on the gallery, then on the image to see the image *overview *.

You can create a VM from this image by clicking on the button Create VM.

Top comments (0)