
This blog is expected to serve as a guide to beginners' who may be interested in learning the basics of how to build and operate a serverless applications on an end-to-end platform.
Do you wish to deliver more value to the core of your business by minimizing the time and resources you spend on infrastructure-related requirements? This may be a perfect starting point for you to learn how to use fully managed, end-to-end Azure serverless solutions to boost developer productivity, optimize resources, and accelerate the pace of innovation in your organization.
We will build and deploy on Azure a function app calculator that uses http trigger to sum-up variables x and y whose values must be integers and returns their sum.
Prerequisites
- Azure Account.
- Download and install Visual Studio.
- GitHub Account.
Roadmap
- Create a Function App using Azure portal.
- Code and build the function using Visual Studio.
- Push Function to Azure from Visual Studio.
- Test the Function App on your browser.
- Push the function file to GitHub and document with README.
Here we go!
Step 1: Create a Function App using Azure portal
Login to Azure Portal using the URL
https://portal.azure.com/Type and select Function App on the search bar at the top of the page.

- On the Function app page, click on Create.

- Under Basic, you can see Project details enter your Subscription, Resource group and Function app name.

- Moving further down the same page, select Code as what you are deploying, chose .NET as the Runtime stack, select Version and Region. Under Operating System, chose Windows. Then click on Review + create button.

- Summary of your configuration, click Create button.

- Deployment is in progress!

- Your deployment is complete! Click on Go to resource.

- An Overview of your Function app

Step 2: Code and build the function using Visual Studio.
- Open your Visual Studio and click on Create a new project

- On Create a new project page, type Azure in the search bar and select Azure Functions from the displayed list.

- On Configure your new project enter Project name and the same name will appear in the Solution name, select Location if you wish of leave it on the default location and click Next.

- On Additional information, select .NET 6.0 under Functions worker, Http trigger ** under **Functions and Authorization level should be Function. Then click Create button.

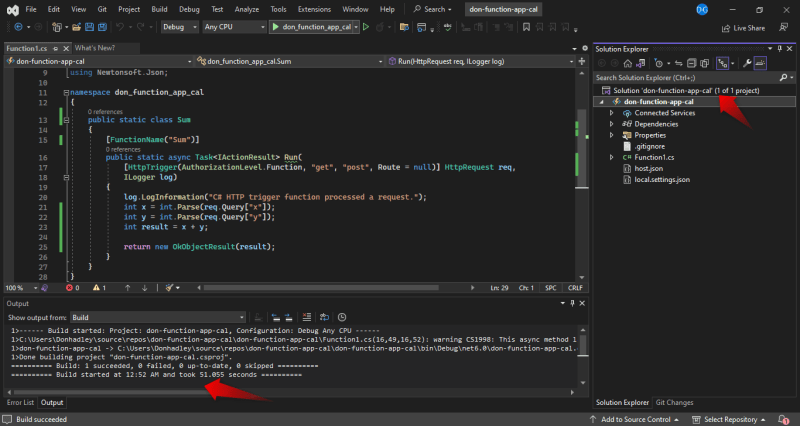
- The Code editor. Here is where we edit the code function template by changing public static class and the function name to Sum. We leave the trigger unchanged since it is already a Http trigger. We also leave the Log Information and delete the others, replacing them with this lines of code
int x =int.Parse(req.Query["x"]);

int y =int.Parse(req.Query["y"]);

int result = x + y;

return new OkobjectResult(result);
from line 21 - 25
We check our notifications and make sure our code is error-free. Then click on Build.

- Building in progress!

- Building Completed and ready for publishing.
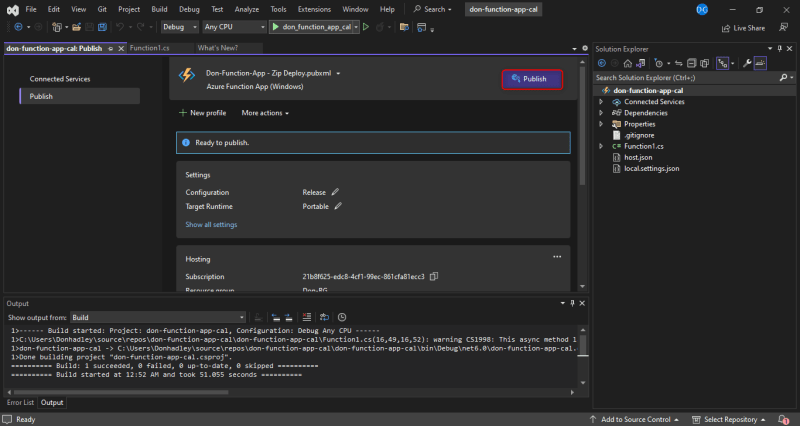
Step 3: Push Function to Azure from Visual Studio.
Click on Build button at the top of the page and select Publish section button on the displayed list.
Under Publish Target select Azure and click Next.

- On Specific target, select Azure Function App (Windows) and click Next.

- On Select existing or create a new Azure Function. Select the Resource Group of the Function app you created earlier in Azure portal by clicking on it.

- Then select the Azure function app that you created earlier and click on Finish button bellow.

- Publish profile creation progress click Close when it is done.

Ready to Publish! Click on Publish
- Published Successfully

Step 4: Test the Function App on your browser.
- Go back to the Azure portal and click on your Function app to open the Overview page. Copy the URL and paste it into your browser.

Your Function App is running!

- To test the Function, click on the function name Sum under Functions on your function app Overview page. This will open the Function page. Then click on Get Function Url and copy the displayed Url.

- Paste the copied Url into your browser and provide values for the Function Variables x and y. To provide the values, at the end of the Url in the browser, where you have this symbol == enter the values in this format &x=500&y=300 hit enter. This will trigger the Function to run and return a result which is the sum of the two values we provided, in this instance, 800.

Step 5: Push the function file to GitHub and document with README.
- Go back to the Visual Studio, at the bottom extreme left of the Successfully published page of the Function, click on Select Repository this will give you options, select Git and the page bellow will be opened Create a Git repository. Complete the page accordingly.
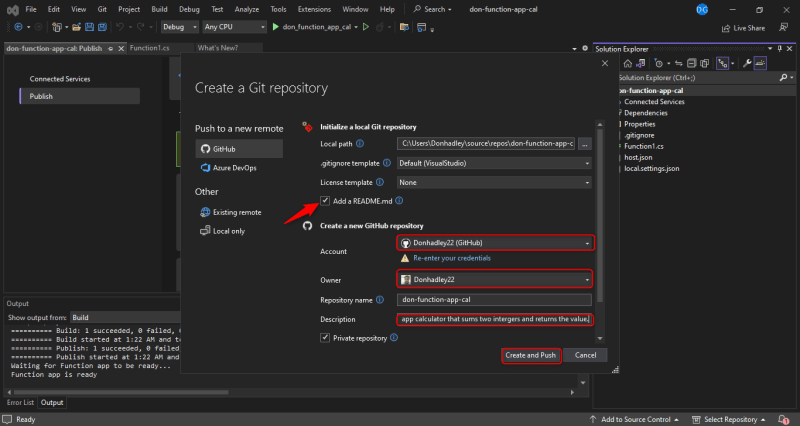
Decide to either make the repository Private or Public by ticking accordingly as shown. Then click Create and Push button. This will create a repository of Github and push the Function files to it.
- Go to your Github account and view the repository.

Inside the repo


Click on the README file and edit. Remember to format your README for readability, use headers and bullet points, and include any relevant code snippets or screenshots to make it easier for users to follow along and understand your Azure serverless application.
The README documentation of our application.


Thank you for reading!

Top comments (0)