
I love the freedom Node and Express give you in creating APIs. Having started my back-end journey in Ruby on Rails, my first impression of Express was not great due to the lack of structure in setup. However, after some tutorials and walkthroughs, I saw the beauty of Node and Express. As for Postman, it is an awesome application that makes creating APIs and testing servers a lot easier, download it here.
The purpose of this blog is to show the set up of a simple Webserver in Node and Express and to show the awesomeness of Postman.

Node and Express Webserver Setup
So first make sure you have Node and Express installed. Once you have these run
npm install --save-dev nodemon
This allows your app to continuously update along with the changes you make in your code. Now with all of your dependencies setup run npm init -y and make sure your JSON file looks like this:
{
  "name": "back_end",
  "version": "1.0.0",
  "description": "",
  "main": "index.js",
  "type": "module",
  "scripts": {
    "start": "nodemon index.js"
  },
  "keywords": [],
  "author": "",
  "license": "ISC",
  "dependencies": {
    "express": "^4.17.1",
    "uuid": "^8.3.0"
  },
  "devDependencies": {
    "nodemon": "^2.0.4"
  }
}
Ok let's actually start now
First, create an index.js file and a folder named routes with a user.js file. In the index.js file, a couple of things need to be set up before we can start the server. First import all of your awesome packages and stuff
import express from 'express';
import bodyParser from 'body-parser';
import usersRoutes from './routes/users.js';
Then you need to create an express app and set up the port you want your server to run on
const app = express();
const PORT = 5000;
Depending on what your server returns this step can vary. If you plan on using something other than JSON refer to the docs here. Otherwise set the app to use JSON with the bodyparser.json() function
app.user(bodyParser.json());
Almost there, all that's left is to set up the listener function and the root route. To set up the listener call app.listen() with the PORT variable as the first parameter and a function to be called on the successful running of the server as the second parameter. The root route requires you to call app.get() as shown below
app.listen(PORT, () => console.log(`Server running on PORT: http://localhost:${PORT}`));

app.get('/', (req, res) => res.send('Hello from Homepage'))
The first argument of the get function sets the routes name; for example, I set up the route / above. The second argument is a function that takes in two arguments the request and response. The request argument, or req, are the parameters sent to the webpage and are how we are going to get the user id and create new users later on. The response argument, or res, sends information to the browser using res.send(). With that all done, the Webserver is setup.
Now On to the Good Stuff
At this point, the webserver does not do much. To remedy this we will create a user index, show, and post route(which I will show in the postman section).
First, go into users.js and import some stuff
import express from 'express';
import { v4 as uuidv4 } from 'uuid';
Then set up an Express router. Router creates a mini-application that performs middleware and routing functions similar to our app in the index file. Router cannot, however, send or receive information.
const router = express.Router();
To get the index and show requests working you must first create two routes in the user.js file
const users = []
//using / because we will set up /users in index.js
router.get('/', (req, res) => {
res.send(users); //displays users in the browser
})
router.get('/:id', (req, res) => {
const { id } = req.params; //gets parameters from browser
//namely the :id
let foundUser = users.find((user) => user.id === id);
//gets user from list of users
if (!foundUser){
foundUser = {"error" : "User not found"} ;
//if user not found return error
}
res.send(foundUser); //send user to browser
})
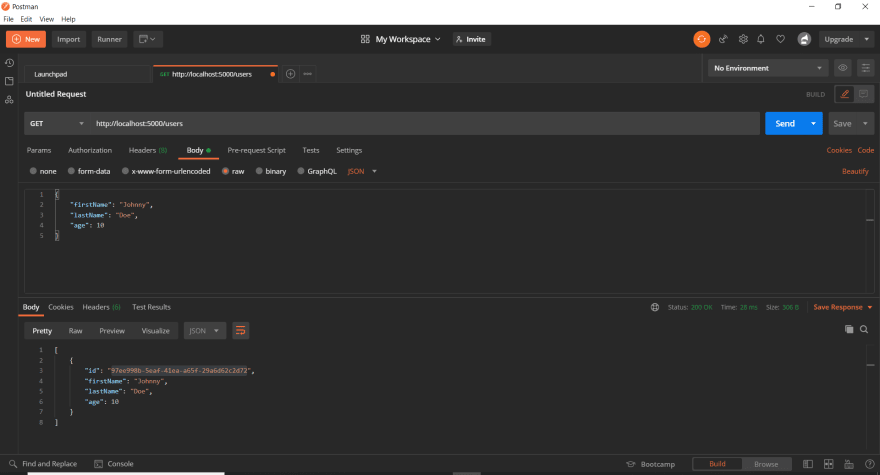
router.post('/', (req, res) =>{
const user = req.body; //get post request content
users.push({ "id": uuidv4(), ...user}); //add an id
res.send(users) //display updated users
})
export default router;
Now the first route might look like it over-rights the root directory, but this is not the case. In index.js we import the user routes exported and set its parent director to /users. This then appends the / or the /:id; depending on which is requested in the browser. At this point, we can look at all of the users, any individual user, and create a new user, so we are done.
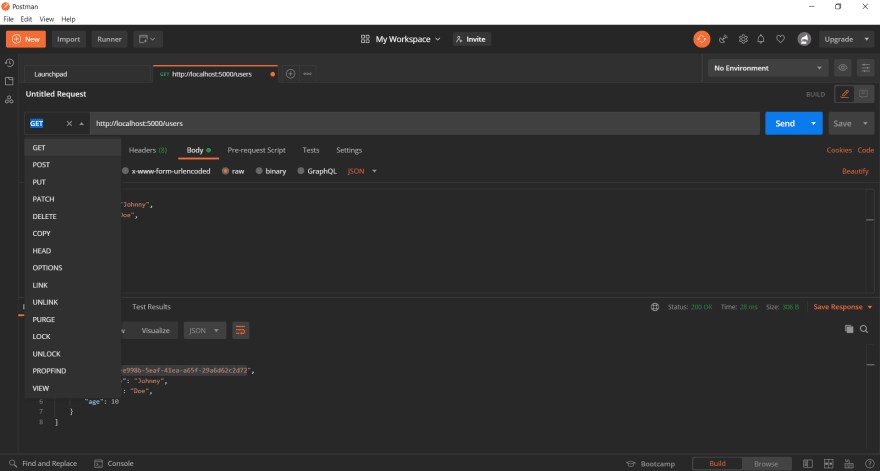
POSTMAN
Most browsers only allow users to implement get requests. Postman is an application that gives developers access to any type of request available. I can think of so many projects that this project would have made so much easier. Below are a few screenshots I took testing out the webserver we created above.

Top comments (0)