In this article I'll show how to instrument with Honeycomb the frontend service we are building in the AWS Free Cloud Bootcamp.
According to the Honeycomb documentation, we can implement frontend instrumentation directly in the frontend, but this mean setting our Honeycomb API access token in the frontend code, which is a bad practice from a security point of view.
An alternative to this, is to implement a custom proxy that will be used to collect traces from the frontend through an endpoint.
In our project, we already have a backend service implemented in flask, so this proxy will be implemented within the same service.
-
First, we need to install the python package requests that will be used to make POST request to the honeycomb traces endpoint, so in the requirements.txt file add this.
requests -
In order to make requests to the Honeycomb traces endpoint, we need the Honeycomp API token and the traces endpoint, those are going to be configured in the backend service in the docker-compose file.
HONEYCOMB_API_KEY: "${HONEYCOMB_API_KEY}" HONEYCOMB_TRACES_API: "https://api.honeycomb.io/v1/traces" -
In the backend-flask service, we will implement an endpoint with the path
/honeycomb/tracesthat will receive spans from the frontend service.-
First we need to import the requests package in our
backend-flask/app.pyfile
import requests -
In the same file, we need to implement the endpoint that receives the spans from the frontend then send it to the Honeycomb traces api.
@app.route("/honeycomb/traces", methods=['POST','OPTIONS'])
@cross_origin(supports_credentials=True)
def collect_traces():
  otlp_json_exported_from_frontend = request.json
  headers = {
    'Content-Type': 'application/json',
    'x-honeycomb-team': os.getenv('HONEYCOMB_API_KEY'),
  }

  response = requests.post(
    url=os.getenv('HONEYCOMB_TRACES_API'),
    json=otlp_json_exported_from_frontend,
    headers=headers
  )

return {'success': True}, 200
-
After implementing, the Honeycomb proxy in the backend, now we need to instrument the frontend and send traces to our proxy.
-
First we need to install these packages
npm install --save \ @opentelemetry/api \ @opentelemetry/sdk-trace-web \ @opentelemetry/exporter-trace-otlp-http \ @opentelemetry/context-zone -
we need to create a file to configure honeycomb so it send traces to the backend proxy. we will create a file named
tracing.jsinsidefrontend-react-js/src/tracing.
import { OTLPTraceExporter } from '@opentelemetry/exporter-trace-otlp-http'; import { WebTracerProvider, BatchSpanProcessor } from '@opentelemetry/sdk-trace-web'; import { ZoneContextManager } from '@opentelemetry/context-zone'; import { Resource } from '@opentelemetry/resources'; import { SemanticResourceAttributes } from '@opentelemetry/semantic-conventions'; import process from 'process'; // Configure the open telemetry trace exporter to send traces to the backend proxy. const exporter = new OTLPTraceExporter({ url: `${process.env.REACT_APP_BACKEND_URL}/honeycomb/traces`, }); // Configure the open telemetry web trace provider, and set the service name to `fronted-react-js` const provider = new WebTracerProvider({ resource: new Resource({ [SemanticResourceAttributes.SERVICE_NAME]: 'fronted-react-js', }), }); provider.addSpanProcessor(new BatchSpanProcessor(exporter)); provider.register({ contextManager: new ZoneContextManager() }); -
The file
tracing.jsneeds to be imported in the frontend app entry point, so we are going to import it infrontend-react-js/src/index.js
import './tracing/tracing' -
Implement a custom trace in the Home feed page
-
First we need to import
trace, contextfrom theopentelemetry/api.
import { trace, context, } from '@opentelemetry/api'; -
We need to instantiate a tracer in the HomeFeedPage function
const dataFetchedRef = React.useRef(false); // only add this line of code const tracer = trace.getTracer(); -
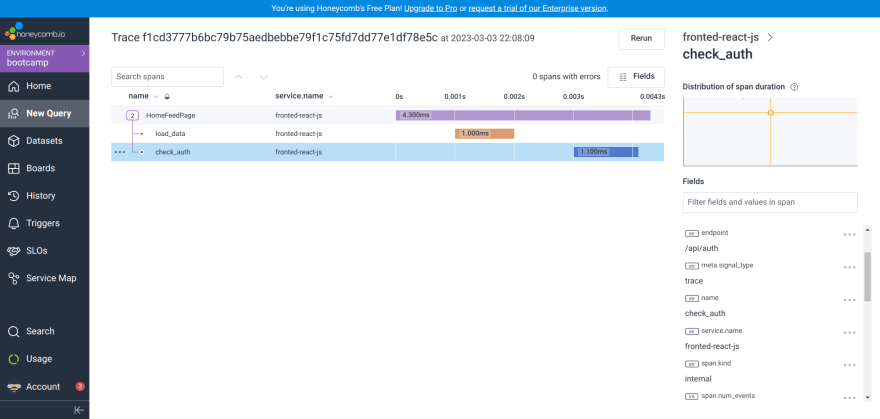
In the function that's initializing the view and fetching the data from the api, we will create multiple spans, a root span named
HomeFeedPagethat represent initializing the Home Feed Page, and two sub spans, one to represent fetching the home activities data from the backend (theload_dataspans), and the other to represent the authentication check (thecheck_authspan).
React.useEffect(()=>{
  //prevents double call
  if (dataFetchedRef.current) return;
  dataFetchedRef.current = true;

  tracer.startActiveSpan('HomeFeedPage', (span) => {
    tracer.startActiveSpan('load_data', (span) => {
      span.setAttribute('endpoint', '/api/activities/home');
      loadData();
      span.end()
    })
    tracer.startActiveSpan('check_auth', (span) => {
      span.setAttribute('endpoint', '/api/auth');
      checkAuth();
      span.end()
    })
    span.end()
  })
}, [])
-
In order to check this, we need to run our services with docker compose up and visit the Home page of our application.
Then we can go to our Honeycomb profile, and we'll find that Honeycomb created a new data for us, named frontend-react-js that contain the traces and spans we implemented
ps: This is the first time I write an article on the internet, if you have any critics, feedback or tips on how to improve please feel free to reach out.


Top comments (0)