
One of our DevRel initiatives at Directus is constantly improving our documentation. As a small team with finite time and resources, we rely a lot on user feedback to help guide our writing efforts. But we were missing the most important bit there – your feedback.
What We’re Building
At the time of this post, the Directus Docs runs on VitePress (which in turn is based on Vue.js and Vite). Vitepress is a nice bit of kit for quickly generating a static documentation site, but sadly there’s no built-in feature for gathering user feedback.
So I decided to build my own so our team could make better decisions on where to spend our precious time and attention.
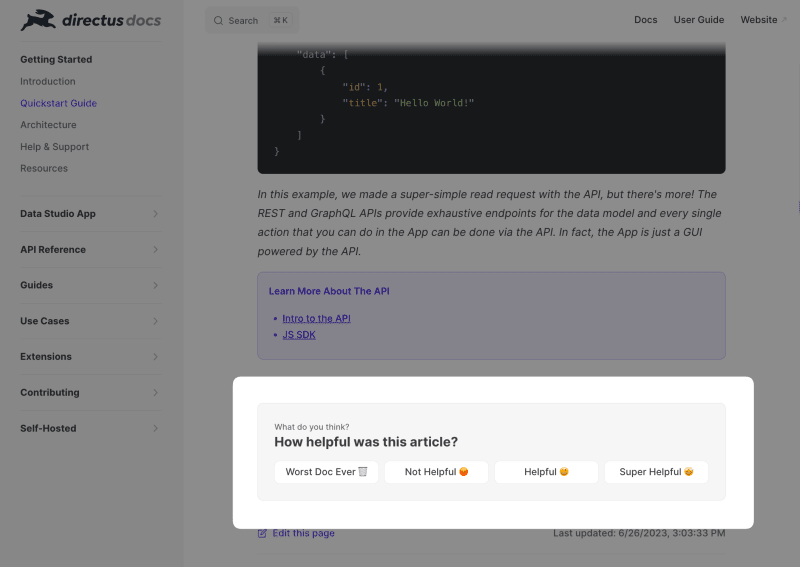
While this project was built in the context of Vitepress, this post will show you how to do it with Vue generally. Here’s what our finished product will look like.
Prerequisites
Before we hop 🐰 in , here’s what you’ll need to follow along:
Knowledge
- Beginner knowledge of Javascript, Typescript, and Vue.js (Composition API)
Tooling
- A Directus instance up and running (either self-hosted or on Directus Cloud)
- A Vue.js project set up (Using Vite is recommended)
Preparing Directus Collection
First off, we're going to need a place to store all this valuable feedback we'll be gathering.
Create a docs_feedback collection with the following data model:
docs_feedback

- id (Type: uuid)
- date_created (Type: Timestamp, Interface: Date/Time)
- url (Type: String, Interface: Input)
- rating (Type: Integer, Interface: Slider)
- title (Type: String, Interface: Input)
- comments (Type: Text, Interface: Textarea)
Creating Vue Component for Article Feedback
Just as if it were the lone dev on a cross-functional team – we’re going to place a lot of different responsibilities on our hard-working little Vue component.
- Rating System: We’ll use a 1 to 4 scale, with each value associated with a different message. These messages will help engage users and guide them through the feedback process.
- Open Ended Feedback: We provide a text area for users to write their thoughts. This is where the gold is. We want users to share their ideas, suggestions, and insights – positive or constructive 😭.
- Posting Data to Directus: The component handles the submission of the feedback to Directus. It constructs the feedback object and makes a POST request to the feedback API endpoint.
Scaffolding the Feedback Component
Create a new file in our components directory named ArticleFeedback.vue . Then copy and paste the following code.
<script setup lang="ts">
</script>

<template>
    <div class="wrapper">
        <div class="step">
            <!-- Step 1. Show Rating Buttons -->
            <div>
                <p class="desc">How can we improve?</p>
                <p class="heading">How helpful was this article?</p>
            </div>
        </div>
        <div class="step">
            <!-- Step 2. Ask for Comments -->
        </div>
        <div class="step">
            <!-- Step 3. Show Success Message -->
        </div>
    </div>
</template>

<style scoped>
</style>
We’ve got three different states (or steps as I’m calling them) we’ll need to build.
- An initial state that shows the feedback prompt and rating buttons.
- Once a rating has been selected, a state which asks for comments and feedback.
- A success state once form submission is complete.
Adding Props and Reactive Logic
Now let’s start adding our logic to control these three steps.
<script setup lang="ts">
+ import { ref, reactive } from 'vue';
+
+ const props = defineProps<{
+   title: string;
+   url: string
+ }>();
+
+ const feedback = reactive<{
+   id?: string;
+   rating?: number;
+   comments?: string;
+ }>({});
+
+ const success = ref(false);
</script>

<template>
    <div class="wrapper">
-       <div class="step">
+       <div v-if="!feedback.rating" class="step">
            <!-- Step 1. Show Rating Buttons -->
            <div>
                <p class="desc">How can we improve?</p>
                <p class="heading">How helpful was this article?</p>
            </div>
        </div>
-       <div class="step">
+       <div v-else-if="feedback.rating && !success" class="step">
            <!-- Step 2. Ask for Comments -->
        </div>
-       <div class="step">
+       <div v-else class="step">
            <!-- Step 3. Show Success Message -->
        </div>
    </div>
</template>

<style scoped>
</style>
- Import the
refandreactivefunctions from Vue. - We’ll pass the
urland pagetitleas props from the parent component that contains this widget. - Create a reactive object
feedbackto manage our form submission data. - Create a reactive
successvariable to hold the success state. - Use
v-if,v-else-if, andv-elseto control what step of the feedback process is shown.
With the logic roughed in, let’s add our rating buttons.
Adding the Rating Options
<script setup lang="ts">
import { ref, reactive } from 'vue';
const props = defineProps<{ title: string; url: string }>();
const feedback = reactive<{
id?: string;
rating?: number;
comments?: string;
}>({});
+ const ratingOptions = [
+ { label: 'Worst Doc Ever 🗑️', value: 1, message: 'Woof! 🤦♂️ Sorry about that. How do we fix it?' },
+ { label: 'Not Helpful 😡', value: 2, message: '🧐 Help us do better. How can we improve this article?' },
+ { label: 'Helpful 😃', value: 3, message: 'Nice! 👍 Anything we can improve upon?' },
+ { label: 'Super Helpful 🤩', value: 4, message: `Awesome! The whole team is rejoicing in celebration! 🥳🎉🎊 Anything you'd like to say to them?` },
+ ];
+
+ function getRatingOption(rating: number) {
+ return ratingOptions.find((option) => option.value === rating);
+ }
</script>
<template>
<div class="wrapper">
<div v-if="!feedback.rating" class="step">
<!-- Step 1. Show Rating Buttons -->
<div>
<p class="desc">How can we improve?</p>
<p class="heading">How helpful was this article?</p>
</div>
+ <div class="button-container">
+ <!-- We'll add a function for handling button clicks while adding our submission logic -->
+ <button v-for="item in ratingOptions" :key="item.value" class="btn">
+ <span>{{ item.label }}</span>
+ </button>
+ </div>
</div>
<div v-else-if="feedback.rating && !success" class="step">
<!-- Step 2. Ask for Comments -->
</div>
<div v-else class="step">
<!-- Step 3. Show Success Message -->
</div>
</div>
</template>
The rating options will be an array of objects that have a visible label, a corresponding value of 1-4, and a dynamicmessage that we’ll display to encourage the user to leave comments after selecting a rating.
We’ll also create a small helper function to return the rating object based when passing a number value. This will come in handy in the second step because we’re going to display the rating the user chose.
Add a new div to Step 1 below the feedback prompt that will contain our rating options. Inside that, we’ll use v-for to loop through the ratingOptions array and render the individual buttons.
Asking for Comments
<template>
    <div class="wrapper">
        <div v-if="!feedback.rating" class="step">
            <!-- Step 1. Show Rating Buttons -->
            <div>
                <p class="desc">How can we improve?</p>
                <p class="heading">How helpful was this article?</p>
            </div>
            <div class="button-container">
                <button v-for="item in ratingOptions" :key="item.value" class="btn">
                    <span>{{ item.label }}</span>
                </button>
            </div>
        </div>
        <div v-else-if="feedback.rating && !success" class="step">
            <!-- Step 2. Ask for Comments -->
+               <div>
+                   <p class="desc">This article is</p>
+                   <div>
+                       <span>{{ getRatingOption(feedback.rating)?.label }}</span>
+                       <button class="btn" @click="feedback.rating = undefined">
+                           ❌
+                       </button>
+                   </div>
+               </div>
+               <p class="heading">{{ getRatingOption(feedback.rating)?.message }}</p>
+               <textarea v-model="feedback.comments" autofocus class="input" />
+               <button class="btn btn-primary" :disabled="!feedback.comments">
+                   Send Us Your Feedback
+               </button>
        </div>
        <div v-else class="step">
            <!-- Step 3. Show Success Message -->
+           <p class="heading">Thanks for your feedback!</p>
        </div>
    </div>
</template>
In Step 2 of the process, we’re showing the user the rating they chose using our getRatingOption helper function we created.
To improve the user experience, we’ll also let users go back and choose a different rating in case they picked the wrong one by mistake. Whenever they click the close button we’ll set the feedback.rating property to undefined which will take the user back to Step 1 based on the v-if logic we created.
Below that, we’ll show the proper message for the option they chose to encourage them to leave helpful comments in short form with a textarea input and a submit button.
We’ll also prevent them from submitting from Step 2 when the comments are empty, so we pass the :disabled="!feedback.comments" prop to the button element.
Adding Styling
Next, let’s add some basic styling.
// ^^ Rest of ArticleFeedback.vue Component ^^
<style scoped>

.wrapper {
    margin: 2rem 0;
    padding: 1.5rem;
    border: 1px solid rgba(60, 60, 67, .12);
    border-radius: 8px;
    background: #f6f6f7;
}

.step > * + * {
    margin-top: 1rem;
}

.desc {
    display: block;
    line-height: 20px;
    font-size: 12px;
    font-weight: 500;
    color: rgba(60, 60, 67, .75);
}

.heading {
    font-size: 1.2rem;
    font-weight: 700;
}

.button-container {
    display: grid;
    grid-gap: 0.5rem;
}

.btn {
    border: 1px solid solid rgba(60, 60, 67, .12);
    background-color: #ffffff;
    border-radius: 8px;
    transition: border-color 0.25s, background-color 0.25s;
    display: inline-block;
    font-size: 14px;
    font-weight: 500;
    line-height: 1.5;
    margin: 0;
    padding: 0.375rem 0.75rem;
    text-align: center;
    vertical-align: middle;
    white-space: nowrap;
}

.btn:disabled {
    opacity: 0.5;
}

.btn:hover {
    border-color: #6644ff;
}

.btn-primary {
    color: #fff;
    background-color: #6644ff;
    border-color: #6644ff;
}

.btn-primary:hover {
    background-color: #4422dd;
    border-color: #4422dd;
}

.input {
    width: 100%;
    height: 100px;
    border: 1px solid #ccc;
    border-radius: 4px;
    padding: 0.375rem 0.75rem;
}

@media screen and (min-width: 768px) {
    .button-container {
        grid-template-columns: repeat(4, 1fr);
    }
}
</style>
Adding Submission Logic Inside The Vue Component
We’re going to write a handler function to actually submit our data to our Directus docs_feedback collection.
At the end of our <script> tag, let’s add our submission handler.
async function handleSubmission(rating?: number) {
    loading.value = true;
    if (rating) feedback.rating = rating;

    const body = {
        id: feedback.id,
        rating: feedback.rating,
        comments: feedback.comments,
        title: props.title,
        url: props.url,
    };

    // Replace this with your own Directus URL
    const directusBaseUrl = 'https://yourdirectusurl.directus.app';

    try {
        let response;

        // If we've already created a feedback record, we'll update it with the new rating or comments.
        if (feedback.id) {
            response = await fetch(`${directusBaseUrl}/items/docs_feedback/${feedback.id}`, {
                method: 'PUT',
                body: JSON.stringify(body),
            });
        } else {
            response = await fetch(`${directusBaseUrl}/items/docs_feedback/${feedback.id}`, {
                method: 'POST',
                body: JSON.stringify(body),
            });
        }

        const data = await response.json();
        feedback.id = data.id;

        // If the reponse has comments, we can assume they've completed the second step. So we'll show the success message.
        if (data.comments) {
            success.value = true;
        }
    } catch (err) {
        error.value = err;
    } finally {
        loading.value = false;
    }
}
This function handleSubmission accepts an optional rating and then conditionally creates a new feedback item or updates depending on which step the user completed.
We also need to update our template to call our handler using the @click directive.
<template>
    <div class="wrapper">
        <Transition name="fade" mode="out-in">
            <div v-if="!feedback.rating" class="step">
                <div>
                    <div>
                        <p class="desc">How can we improve?</p>
                        <p class="heading">How helpful was this article?</p>
                    </div>
                </div>
                <div class="button-container">
                    <button v-for="item in ratingOptions"
                        :key="item.value"
                        class="btn"
+                       @click="handleSubmission(item.value)">
                        <span>{{ item.label }}</span>
                    </button>
                </div>
            </div>
            <div v-else-if="feedback.rating && !success" class="step">
                <div>
                    <p class="desc">This article is</p>
                    <div>
                        <span>{{ getRatingOption(feedback.rating)?.label }}</span>
                        <button style="margin-left: 0.5rem" class="btn" @click="feedback.rating = undefined">
                            <span mi icon>close</span>
                        </button>
                    </div>
                </div>
                <p class="heading">{{ getRatingOption(feedback.rating)?.message }}</p>
                <textarea v-model="feedback.comments" autofocus class="input" />
                <button
                    class="btn btn-primary"
                    :disabled="!feedback.comments"
+                   @click="handleSubmission()">
                    Send Us Your Feedback
                </button>
            </div>
            <div v-else class="step">
                <p class="heading">Thanks for your feedback!</p>
            </div>
        </Transition>
    </div>
</template>
Sweet! Now there’s just one last step before we have a working component.
Updating Permissions inside Directus
Right now, if we try to submit some feedback, we’re probably to going receive an Permission denied error from Directus.
This is because all collections have zero public permissions by default. While this is great for security, it’s not so great if we want to store our feedback data.
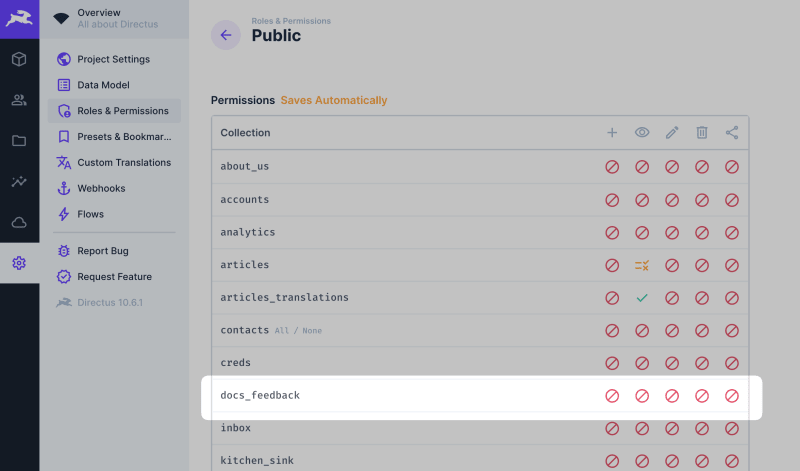
Open up the Public role with the Roles & Permission settings. Then scroll to find the docs_feedback collection.
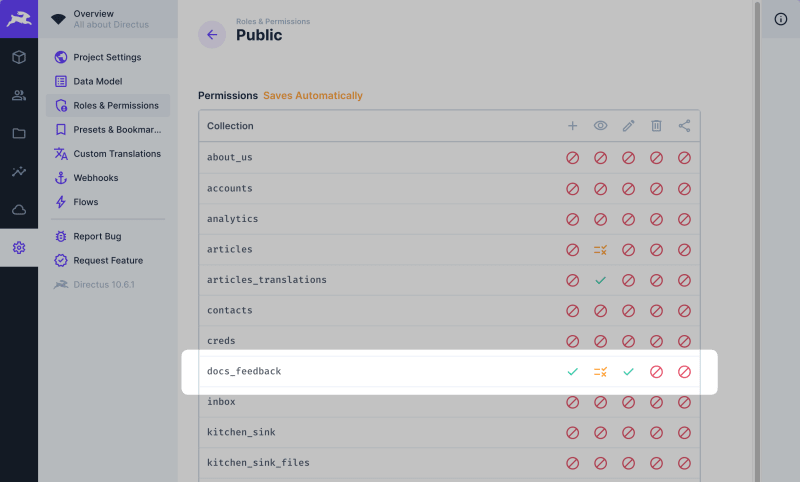
Create and Update Operations
Click the block button inside each column and choose check All Access.
Read Operation
We might not want any prying eyes to be able to read the actual feedback ratings and content, so we’ll use some custom permissions to restrict the fields that anyone can ‘read’.
Click the button for the Read column, and choose Custom Permissions.
On the Field Permissions tab, check only the id field.

When you’re all done, it should look like this screenshot.
Awesome! Now on to testing.
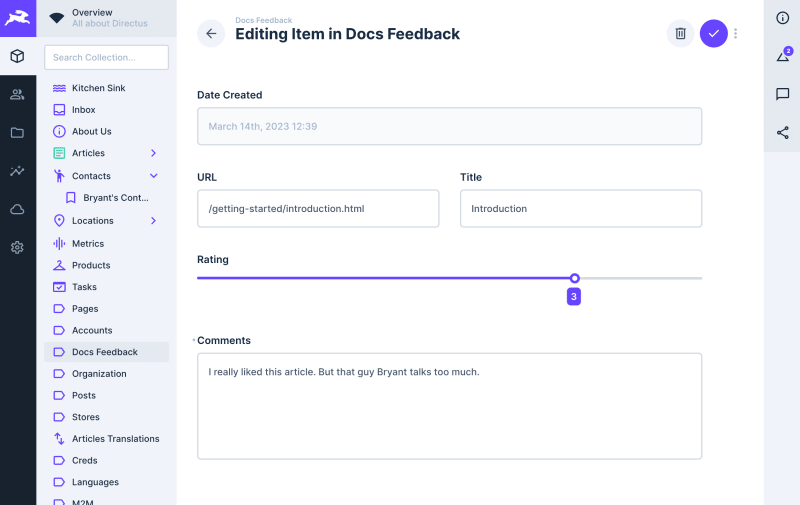
Testing the Feedback Widget
Let’s open this up our Vue app and our Directus instance to test that everything is working as intended.

Make sure you check that the form submissions are correct inside Directus.
Next Steps
Here’s a few of the next steps you may want to explore beyond this tutorial.
Analyze the Data Using Directus Insights
Collecting feedback is just one half of the equation. Analyzing and taking action on the data you receive is the more important part.
Our module for creating no-code dashboards - Directus Insights - can help you understand the data you collect much easier and faster than browsing through a list of feedback.
Secure form submissions
To post our form submissions, we just enabled Public create and update access for the docs_feedback collection inside Directus.
There’s not a lot to gain by spamming documentation feedback submissions but you never know with folks these days.
Security wise - we could do better.
Here’s a few options:
- Create a Flow with using an incoming webhook trigger that processes the incoming requests.
- Obscure our Directus instance URL by using a proxy or serverless function to make the call to the Directus API. Netlify, Vercel, and other hosting static site hosting platforms simplify this process.
Add a session identifier to track feedback from the same user
It could be very handy to know if feedback across different articles is coming from the same user. We don’t really need full blown user sessions stored in the database for this. We could implement it client-side by:
- adding a field to for
session_idorvisitor_idto our collection inside Directus - generating a random ID on a first visit or feedback submission inside the Vue app
- storing the ID within the browser using localStorage or sessionStorage
- grabbing that ID and passing it in the API call to Directus
I hope you find this post useful - if you have any questions feel free to join our Directus Discord server.

Top comments (0)