
In this series of posts I am going to be building out the UI for Airbnb's "Explore" tab from scratch. This is an exercise in figuring out how to achieve the different layouts and effects you find in popular apps and I chose Airbnb because I thought it had several great examples. It is not intended to be used for anything other than for educational purposes and all my code will be available at this repo if you want to follow along and build it yourself. A few disclaimers:
- For all the illustrations in the app I just took screenshots of the actual app and cropped them to size. They are not the full versions of the illustrations and they are not really even formatted correctly for use in an iOS app. I tried to spend as little time as possible on that prep.
- We will get the fonts, colors and icons as close as we can with just using the system versions. I am pretty sure the font and icons that Airbnb actually uses would require a license and I don't care that much about making this exact. With the way we organize it, it would be pretty easy to swap in the real ones if you want to take that step yourself.
- We will not do any business logic. We will hard code all the data and not handle any user actions. Again, this is not meant to be production code, just an exploration of some UI techniques.
- There is a good chance that Airbnb will look different by the time you see this. Honestly, there's a non-zero chance that it will change before I finish writing this, so the live app will probably look different than what you see me build, but the layout/principles should be pretty much the same. (Editorial note: it has already changed before I was able to finish writing this series, but I have a few screenshots of what the app looked like before, and we'll just build up to the spec that I created.)
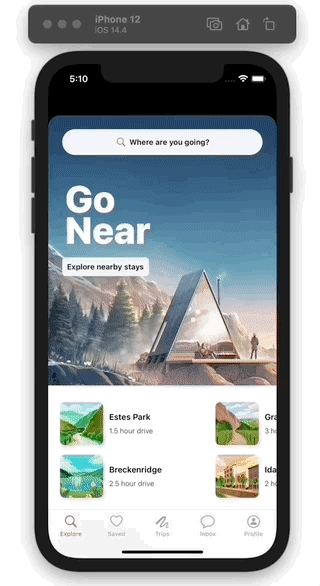
Here's what our final product will look like:
With all that said, let's go.
Backgrounds, Inverted Sections and Dark Mode
Inverted Colors
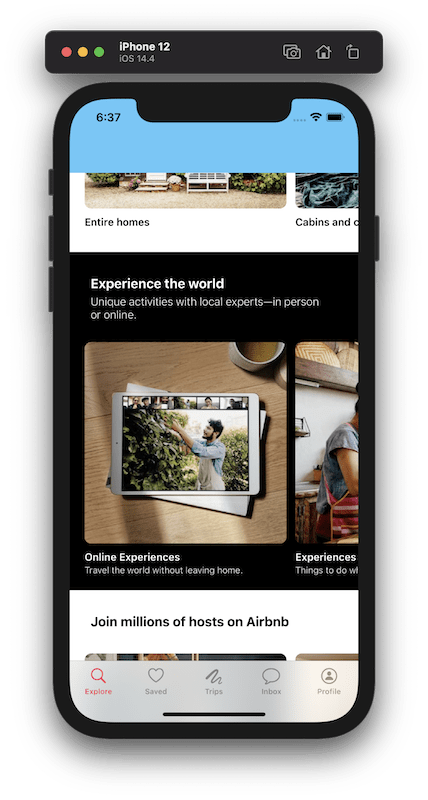
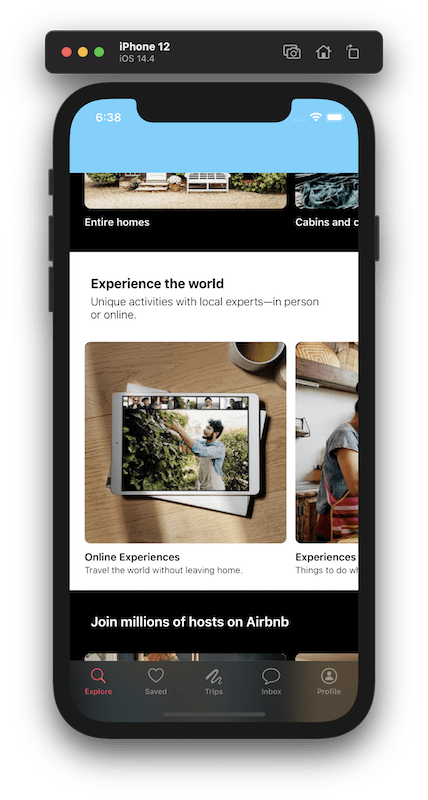
The next thing we're missing from the spec is the dark section. In the pre-dark-mode era we probably would have considered this a "dark" section and the others "light" sections and given them colors accordingly. What I would like to do is consider this an "inverted" section so that it stands out equally whether the user is looking at the app in dark mode or light mode. (Note, the actual Airbnb app does not support dark mode as I write this, so hopefully they'll steal my ideas.) Fortunately, this is pretty easy to do with the API Apple has given us for colors, just by adding a couple of extensions. First we're going to add an extension on UITraitCollection which returns itself, but with just the userInterfaceStyle flipped:
// In Extensions/UITraitCollection+Inverted.swift

extension UITraitCollection {
    private static let lightStyle: UITraitCollection = .init(userInterfaceStyle: .light)
    private static let darkStyle: UITraitCollection = .init(userInterfaceStyle: .dark)

    func invertedStyle() -> UITraitCollection {
        switch userInterfaceStyle {
        case .dark:
            return UITraitCollection.init(traitsFrom: [self, Self.lightStyle])
        case .light, .unspecified:
            return UITraitCollection.init(traitsFrom: [self, Self.darkStyle])
        @unknown default:
            return self
        }
    }
}
Then we'll add a couple of "inverted" versions of the static colors on UIColor:
// In Extensions/UIColor+Inverted.swift

extension UIColor {
    static let invertedBackground: UIColor = .init { traits in
        systemBackground.resolvedColor(with: traits.invertedStyle())
    }

    static let invertedLabel: UIColor = .init { traits in
        label.resolvedColor(with: traits.invertedStyle())
    }
}
And now we have versions of the system provided semantic colors that will render for the opposite user interface style that we are currently in.
Using The Colors
Now, to render the LargeSquareCell with an inverted label color, we'll need a variant of that class which uses the inverted color. To do that, I'm going to use a combination of subclassing and our cell wrapper. First, we'll define a ColorStyle to determine if we should render the view in the standard way or in the inverted way:
// In Extensions/UIColor+Inverted.swift

enum ColorStyle {
    case standard, inverted
}
Next, we'll add a color style property to the LargeSquareCell:
// In Collection View Elements/LargeSquareCell.swift

private lazy var style: ColorStyle = provideStyle()

// in configure
let textColor: UIColor = style == .inverted ? .invertedLabel : .label
titleLabel.font = .custom(style: .headline)
titleLabel.textColor = textColor
subtitleLabel.font = .custom(style: .subheadline)
subtitleLabel.textColor = textColor

// at bottom of class
func provideStyle() -> ColorStyle { .standard }
This may look a little weird, but it gives us everything we need to define an inverted version in just a couple of lines:
// In Collection View Elements/LargeSquareCell.swift

typealias InvertedLargeSquareCell = ContentCell<InvertedLargeSquareView>

class InvertedLargeSquareView: LargeSquareView {
    override func provideStyle() -> ColorStyle { .inverted }
}
Everything about this cell will be exactly the same as LargeSquareCell, with the only difference being this one will use inverted colors. And we'll do the same thing to make an inverted header:
// In Collection View Elements/SectionHeader.swift

private lazy var style: ColorStyle = provideStyle()

// in configure
let textColor: UIColor = style == .inverted ? .invertedLabel : .label

titleLabel.textColor = textColor

subtitleLabel.textColor = textColor

// at bottom of class
func provideStyle() -> ColorStyle { .standard }
And then we'll add the InvertedHeader
// In Collection View Elements/SectionHeader.swift

typealias InvertedHeader = ContentHeader<InvertedHeaderView>

final class InvertedHeaderView: SectionHeaderView {
    override func provideStyle() -> ColorStyle { .inverted }
}
Adding A Background
Now we need a way to change the color of the background of one section. In UICollectionViews this is done with a decorator item, which needs to be a subclass of UICollectionViewReusableView. We're going to do a similar subclassing thing here as well, because it will make it easier when we need to add the background for the footer section. First we'll define a BackgroundView class to be the parent for all of our backgrounds:
// In Collection View Elements/BackgroundView.swift

class BackgroundView: UICollectionReusableView {

    override init(frame: CGRect) {
        super.init(frame: frame)
        backgroundColor = provideBackgroundColor()
    }

    required init?(coder: NSCoder) {
        super.init(coder: coder)
        backgroundColor = provideBackgroundColor()
    }

    func provideBackgroundColor() -> UIColor? {
        return nil
    }
}
And then we'll define the background with inverted colors:
// In Collection View Elements/BackgroundView.swift

final class InvertedBackgroundView: BackgroundView {
    override func provideBackgroundColor() -> UIColor? {
        .invertedBackground
    }
}
And we'll add some helpers which will make things a little more convenient when we're defining sections. We'll add an enum where we define all of our background styles, which will provide a name to use for the "element kind", so we can avoid typing strings when we don't need to, and will map the enum cases to which class of background we should use.
// In Collection View Elements/BackgroundView.swift

enum BackgroundStyle: String, CaseIterable {
    case inverted

    var elementKind: String { "background.\(rawValue)" }

    var viewClass: AnyClass {
        switch self {
        case .inverted: return InvertedBackgroundView.self
        }
    }
}
Then we'll add an extension on UICollectionViewLayout which will register all our backgrounds for us, because as far as I can tell, there is currently no way to use a cell registration for decoration items like you can with cells or headers:
// In Collection View Elements/BackgroundView.swift

extension UICollectionViewLayout {
    func registerBackgrounds() {
        BackgroundStyle.allCases.forEach {
            register($0.viewClass, forDecorationViewOfKind: $0.elementKind)
        }
    }
}
And we'll add an extension on NSCollectionLayoutSection which will let us add a background to that section by just passing it what style we want. Two cheers for auto-complete.
// In Collection View Elements/BackgroundView.swift

extension NSCollectionLayoutSection {
    func addBackground(style: BackgroundStyle) {
        decorationItems.append(.background(elementKind: style.elementKind))
    }
}
Using the Inverted Views
Now we need to update our collection view and data source to actually use all the new views we've defined. First lets add a new section that will use the inverted background.
// In Collection View Elements/NSCollectionLayoutSection+Layouts.swift

static func invertedSideScrollingOneItem() -> NSCollectionLayoutSection {
    let section = sideScrollingOneItem()
    section.addBackground(style: .inverted)
    return section
}
Then lets update the collection view to use it. And don't forget to register the backgrounds or it will crash.
// In HomeView.swift

// in makeCollectionView()
let layout = UICollectionViewCompositionalLayout { sectionIndex, layoutEnvironment in
    let section = Section.allCases[sectionIndex]
    switch section {
    case .experiences:
        return .invertedSideScrollingOneItem()
    // other cases...
    }
}
layout.registerBackgrounds()
return UICollectionView(frame: .zero, collectionViewLayout: layout)
Then we need to update our data source to use the InvertedLargeSquareCell registration for the "experiences" section.
// In HomeView.swift

// in the switch statement in makeDataSource()
case .experiences:
    let registration = InvertedLargeSquareCell.registration()
    return view.dequeueConfiguredReusableCell(using: registration,
                                              for: indexPath,
                                              item: item)
And we'll need to update the supplementaryViewProvider for the data source as well, to get the inverted header:
// In HomeView.swift

// at the bottom of makeDataSource()
let headers = Section.allCases.map { $0.headerContent }
let headerRegistration = SectionHeader.registration(headers: headers)
let invertedHeaderRegistration = InvertedHeader.registration(headers: headers)
dataSource.supplementaryViewProvider = { collectionView, string, indexPath in
    let section = Section.allCases[indexPath.section]
    switch section {
    case .experiences:
        return collectionView
            .dequeueConfiguredReusableSupplementary(using: invertedHeaderRegistration,
                                                    for: indexPath)
    default:
        return collectionView
            .dequeueConfiguredReusableSupplementary(using: headerRegistration,
                                                    for: indexPath)
    }
}
And that gets us a beautiful inverted section that works in both dark mode and light mode!
Wrap Up
In this part we added some convenience extensions for inverting colors, regardless of wether we're in dark mode or light mode. We added support for inverted versions of our cell and section header types. And we added the ability to have background in our sections. In the next part we'll add the footer which will use a new cell, a new layout and a new background.
Check out the code up to this point in this repo.
If this has been helpful buy me a coffee!

Top comments (0)