Introduction
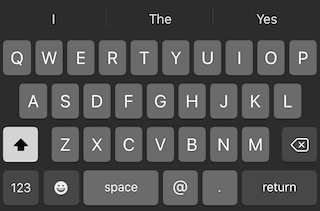
One of the ways to improve the user experience when they fill a form on iOS apps is the use of keyboard types. Keyboard types can be used to show different keyboards based on the context of the field. If it's an email field, for example, you would probably prefer to present a keyboard with easy access to characters like the at (@) and the dot (.).
In this post, we are going to see how different keyboard options work with SwiftUI. First, we will cover the "common" scenarios, which include keyboards for fields like name, email, number, etc. Then, we will take a look at how we can add more custom options like a keyboard with a picker view.
The common cases
For the most common cases, SwiftUI provides the function keyboardType in a View extension. This function has a parameter of type UIKeyboardType, which is an enum with cases like emailAddress, numberPad, URL, etc.
For the full set of cases, you can refer to the documentation page.
You can use this extension from any SwiftUI View in the following way:
TextField("Type the email...", text: $email)
    .keyboardType(.emailAddress)
But what if we want to add a custom view? For example, a picker view, just like we can do using UIKit?
Keyboard with picker view
As you may have guessed, the answer lies exactly there.
We will have to use UIKit's UITextField and make it available to SwiftUI by creating a struct with conformance to the UIViewRepresentable protocol.
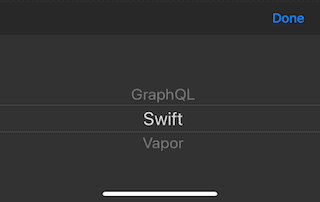
But let's take it step by step and see how we can create PickerField; a field that will show a keyboard with a picker, just like in the following screenshot.
To keep things separated, let's create a subclass of UITextField where we will implement the logic to show a keyboard with a picker.
import SwiftUI

class PickerTextField: UITextField {
    // MARK: - Public properties
    var data: [String]
    @Binding var selectionIndex: Int?

    // MARK: - Initializers
    init(data: [String], selectionIndex: Binding<Int?>) {
        self.data = data
        self._selectionIndex = selectionIndex
        super.init(frame: .zero)

        self.inputView = pickerView
        self.inputAccessoryView = toolbar
        self.tintColor = .clear

        guard let selectionIndex = selectionIndex.wrappedValue else {
            return
        }

        self.pickerView.selectRow(selectionIndex, inComponent: 0, animated: true)
    }

    @available(*, unavailable)
    required init?(coder: NSCoder) {
        fatalError("init(coder:) has not been implemented")
    }

    // MARK: - Private properties
    private lazy var pickerView: UIPickerView = {
        let pickerView = UIPickerView()
        pickerView.delegate = self
        pickerView.dataSource = self
        return pickerView
    }()

    private lazy var toolbar: UIToolbar = {
        let toolbar = UIToolbar()

        let flexibleSpace = UIBarButtonItem(barButtonSystemItem: .flexibleSpace, target: nil, action: nil)

        let doneButton = UIBarButtonItem(
            title: "Done",
            style: .done,
            target: self,
            action: #selector(donePressed)
        )

        toolbar.setItems([flexibleSpace, doneButton], animated: false)
        toolbar.sizeToFit()
        return toolbar
    }()

    // MARK: - Private methods
    @objc
    private func donePressed() {
        self.selectionIndex = self.pickerView.selectedRow(inComponent: 0)
        self.endEditing(true)
    }
}

// MARK: - UIPickerViewDataSource & UIPickerViewDelegate extension
extension PickerTextField: UIPickerViewDataSource, UIPickerViewDelegate {
    func numberOfComponents(in pickerView: UIPickerView) -> Int {
        return 1
    }

    func pickerView(_ pickerView: UIPickerView, numberOfRowsInComponent component: Int) -> Int {
        return self.data.count
    }

    func pickerView(_ pickerView: UIPickerView, titleForRow row: Int, forComponent component: Int) -> String? {
        return self.data[row]
    }

    func pickerView(_ pickerView: UIPickerView, didSelectRow row: Int, inComponent component: Int) {
        self.selectionIndex = row
    }
}
In this snippet, first, we declare two properties; one with the options of the picker and a Binding property which acts both as an input in case the field is pre-filled and as an output for when the user changes the value of the picker.
Then, in the initializer, we are expecting two arguments that we will use to instantiate the two properties. After that, we set the property inputView to the instance of the UIPickerView, and use the inputAccessoryView to set a UIToolbar with a "Done" button to help users dismiss the keyboard.
Finally, if there is a pre-selected value, we select this option from the UIPickerView.
In this file, we also add an extension to provide the implementation for the functions to conform to UIPickerViewDataSource and UIPickerViewDelegate and set the dataSource and the delegate for the UIPickerView to self.
Worth noting is the implementation of didSelectRow, where we set the selected row to the Binding property selectionIndex to pass this info to the parent view.
With that in place, we will create a new struct that we will use to communicate between the UIKit view and the SwiftUI world.
import SwiftUI

struct PickerField: UIViewRepresentable {
    // MARK: - Public properties
    @Binding var selectionIndex: Int?

    // MARK: - Initializers
    init<S>(_ title: S, data: [String], selectionIndex: Binding<Int?>) where S: StringProtocol {
        self.placeholder = String(title)
        self.data = data
        self._selectionIndex = selectionIndex

        textField = PickerTextField(data: data, selectionIndex: selectionIndex)
    }

    // MARK: - Public methods
    func makeUIView(context: UIViewRepresentableContext<PickerField>) -> UITextField {
        textField.placeholder = placeholder
        return textField
    }

    func updateUIView(_ uiView: UITextField, context: UIViewRepresentableContext<PickerField>) {
        if let index = selectionIndex {
            uiView.text = data[index]
        } else {
            uiView.text = ""
        }
    }

    // MARK: - Private properties
    private var placeholder: String
    private var data: [String]
    private let textField: PickerTextField
}
Same as the PickerTextField class, this struct will also have two properties; a list with the options and a binding property for the value of the field.
Once again, we will use the initializer to pass the values of these properties via its arguments. The initializer takes one more argument for the placeholder of the UITextField if the field has no value.
Then, we provide the implementations for the makeUIView and updateUIView requirements of the UIViewRepresentable protocol.
In the first one, we set the initial state for the text field by setting the value for the placeholder. In the second, we update the value of the PickerField with any new information we might get from SwiftUI.
Finally, from any SwiftUI view, we can use this struct in the following way:
@State var selectedIndex: Int? = nil
let options: [String] = ["GraphQL", "Swift", "Vapor"]

var body: some View {
    // ...
    PickerField("Select an option", data: self.options, selectionIndex: self.$selectedIndex)
    // ...
}
You can find the code for this PickerTextField, as well as the rest of the code and an example of how to use it from a SwiftUI View on this Gist.
Conclusion
And that's about it! In this post, we have first seen what is the current level of support for keyboard types on SwiftUI's TextField. Then, we investigated how we can provide support for more options by relying on the UIKit's UITextField, and its property inputView. This way, we can present a keyboard with a UIPickerView, or any other view we may want.
Thanks for reading, I hope you find this post useful and if you have any questions or comments about this post, feel free to contact me on Twitter!
Until next time!


Top comments (0)