
Hi guys, today I will discuss about how easy it is to perform API Testing using vREST NG irrespective of whether you are a developer, non developer or tester. vREST NG provides simple interface so that any body can write API test cases quickly without writing a single line of code. Yet it provides powerful functions to handle any customised organisational needs related to Automated API Testing.
Before starting, I am assuming that you have already installed vREST NG and created a project in it. You may easily follow this tutorial with in few minutes with vREST NG Pro version.
Now, I will guide you with step by step instructions on how you may write an API test case in vREST NG. For that, let's take a sample API which creates a record on the server. The details of the API are as follows:
API Endpoint:
POST http://example.vrest.io/contacts/v2/test/contacts
Request Body:
{
    "name":"Dheeraj Aggarwal",
    "email":"dheeraj.aggarwal@optimizory.com",
    "designation":"Engineering Manager",
    "organization":"Optimizory Technologies",
    "country":"India",
    "aboutMe":"Passionate to make vREST NG - World's #1 API Testing Tool",
    "twitterId":"dheerajaggarwal",
    "facebookId":"dheeraj.aggarwal",
    "githubId":"dheerajaggarwal"
}
So, these are the API details. With these details in hand, let's quickly try to create a test case in vREST NG.
In vREST NG, just click on plus icon as shown in the following screenshot to create your API Test Case.

A dialog window will appear to create the test case. Just provide the Test Suite Name, Request Method, API Endpoint and meaningful summary for your test case like this.

Now click on Confirm button to create the test case. The created test case will look like this:

Now, let's provide the request body for this test case. Just click on the Request Tab in the application for the test case and then select Body sub-tab and provide the request body like this:

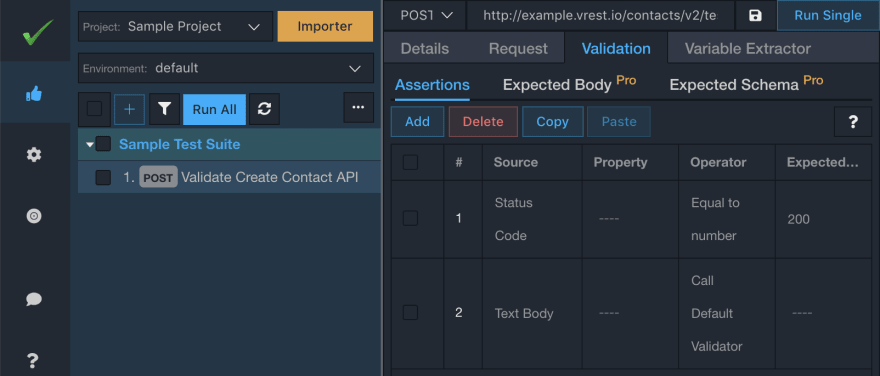
Now, let's try to validate our sample API Test Case. To write assertions, simply click on the Validation tab. When you create a test case, the application automatically creates a Status Code assertion for you which checks whether the status code is equal to 200 or not.

Let's execute this test case by clicking on button "Run Single" available in the middle pane. Or you may click on button "Run All" available in the left pane which will execute all the test cases available in the left pane.
When you run the test case, you can see the results in the rightmost pane.

So far, we have validated only the status code of our API response. Now, let's try to validate the response content as well. To validate the response content, simply click on the "Generate Expected Body" button available in the right most pane as shown in the above image.
This operation will automatically adds a Text Body assertion that will compare the expected response body with actual response body received.
It also automatically sets the expected response body in the Expected Body sub-tab in middle pane.

Now, let's try to execute the test again. This time the test has failed. You will be able to quickly analyse the failure by looking at the diff report as shown in the below image.
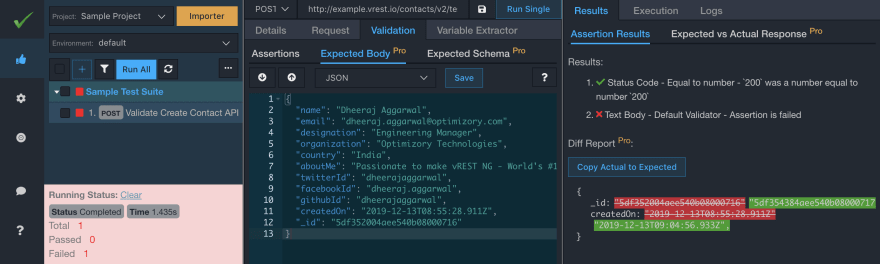
Our test case failed because there are some dynamic values in the response which always changes when you create a record on the server using our sample API.
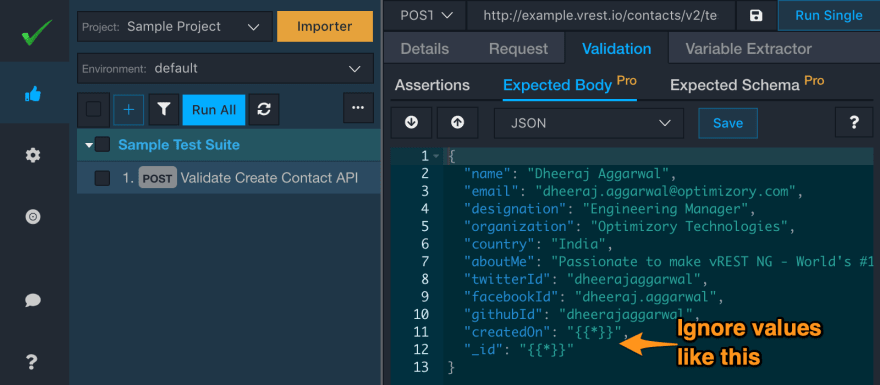
To handle this issue, you may ignore these values by using our wildcard or star variable in the expected body like this:
Now if you run the test case, you can see that the test case is now passing by looking at the Results tab.

You can also validate your API response structure by specifying the JSON schema in the Expected Schema tab. vREST NG provides very powerful response validation capabilities. In 99% of the cases you will not need to write a single line of code to validate your API response. With vREST NG, you may write your complex test scenarios with in few minutes. So, it increases your productivity drastically.

Finally, I would like to say, that it is very easy to write test cases in vREST NG. Anybody who is having a basic understanding of HTTP protocol and who is having the API specification, can easily write test cases in vREST NG irrespective of his/her programming skills. In the above post, we have not written a single line of code.
You may even generate the tests through swagger file in vREST NG and feed test data via excel sheets. For more information, please read my another post on Swagger + Excel Sheets, a wonderful way of validating REST APIs.
If you find this post helpful, do like or share with your colleagues and friends. And try out vREST NG and let us know your feedback. Feel free to contact me in case if you need any help or if you want to use the vREST NG Pro version for free.

Top comments (0)