This fifth iteration of the cloud-native project, https://github.com/dfberry/cloud-native-todo, added the changes to deploy from the GitHub repository:
- Add
azure-dev.ymlGitHub action to deploy from source code - Run
azd pipeline config- push action to repo
- create Azure service principal with appropriate cloud permissions
- create GitHub variables to connect to Azure service principal
Setup
In the fourth iteration, the project added the infrastructure as code (IaC), created with Azure Developer CLI with azd init. This created the ./azure.yml file and the ./infra folder. Using the infrastructure, the project was deployed with azd up from the local development environment (my local computer). That isn't sustainable or desirable. Let's change that so deployment happens from the source code repository.
Add azure-dev.yml GitHub action to deploy from source repository
The easiest way to find the correct azure-dev.yml is to use the official documentation to find the template closest to your deployed resources and sample.
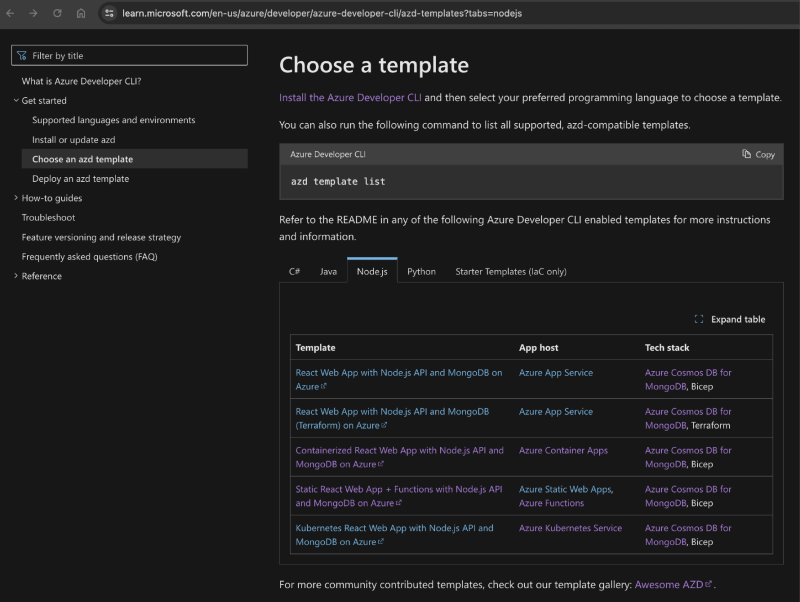
-
Copy the contents of the template's
azure-dev.ymlfile from the sample repository into your own source control in the./github/workflows/azure-dev.ymlfile.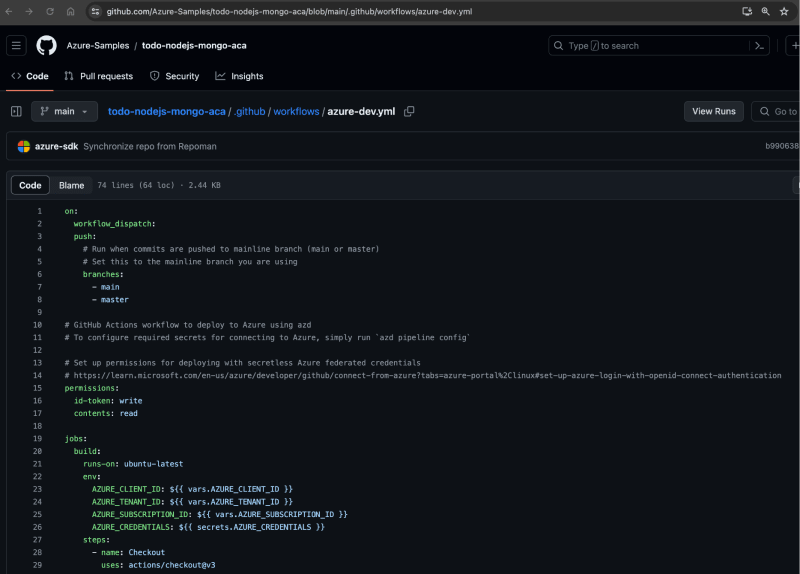
-
Add the name to the top of the file if one isn't there, such as
name: AZD Deploy. This helps distinguish between other actions you have the in repository.
name: AZD Deploy

on:
  workflow_dispatch:
  push:
    # Run when commits are pushed to mainline branch (main or master)
    # Set this to the mainline branch you are using
    branches:
      - main
      - master
Make sure the
azure-dev.ymlalso has theworkflow_dispatchas one of theonsettings. This allows you to deploy manually from GitHub.
Run azd pipeline config to create deployment from source repository
Switch to a branch you intend to be used for deployment such as
mainordev. The current branch name is used to create the federated credentials.Run
azd pipeline configIf asked, log into your source control.
-
When the process is complete, copy the service principal name and id. Mine looked something like:
az-dev-12-04-2023-18-11-29 (abc2c40c-b547-4dca-b591-1a4590963066)
When you need to add new configurations, you'll need to know either the name or ID to find it in the Microsoft Entra ID in the Azure portal.
Service principal for secure identity
The process created your service principal which is the identity used to deploy securely from GitHub to Azure. If you search for service principal in the Azure portal, it takes you Enterprise app. Don't go there. An Enterprise app is meant for other people, like customers, to log in. That's a different kind of thing. When you want to find your deployment service principal, search for Microsoft Entra ID.
Go ahead ... find your service principal in the Azure portal by searching for Microsoft Entra ID. The service principals are listed under the Manage -> App registrations -> All applications.
Select your service principal. This takes you to the Default Directory | App registrations.
-
On the Manage -> Certificates & secrets , view the federated credentials.

On the Manage -> Roles and Administrators , view the Cloud Application Administrator.
When you want to remove this service principal, you can come back to the portal, or use Azure CLI's az ad sp delete --id <service-principal-id>
GitHub action variables to use service principal
The process added the service principal information to your GitHub repository as action variables.
Open your GitHub repository in a browser and go to Settings.
Select Security -> Secrets and variable -> Actions.
Select variables to see the service principal variables.
-
Take a look at the actions run as part of the push from the process. The Build/Test action ran successfully when AZD pushed the new pipeline file in commit 24f78f4. Look for the actions that run based on that commit.

Verify that the action ran successfully. Since this was the only change, the application should still have the 1.0.1 version number in the response from a root request.
When you want to remove these, you can come back to your repo's settings.
Test a deployment from source repository to Azure with Azure Developer CLI
To test the deployment, make a change and push to the repository. This can be in a branch you merge back into the default branch, or you can stay on the default branch to make the change and push. The important thing is that a push is made to the default branch to run the GitHub action.
In this project, a simple change to the API version in the ./api-todo/package.json's version property is enough of a change. And this change is reflected in the home route and the returned headers from an API call.
- Change the version from
1.0.1to1.0.2. - Push the change to main.
Verify deployment from source repository to Azure with Azure Developer CLI
-
Open the repository's actions panel to see the action to deploy complete.

-
Select the AZD Deploy for that commit to understand it is the same deployment as the local deployment. Continue to drill into the action until you see the individual steps.
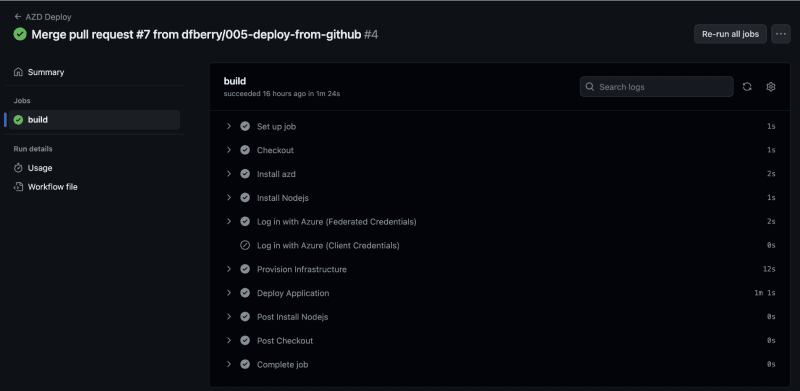
-
Select the Deploy Application step and scroll to the bottom of that step. It shows the same deployed endpoint for the api-todo as the deployment from my local computer.

-
Open the endpoint in a browser to see the updated version.

Deployment from source code works
This application can now deploy the API app from source code with Azure Developer CLI.
Tips
After some trial and error, here are the tips I would suggest for this process:
- Add a meaningful name to the
azure-dev.yml. You will have several actions eventually, make sure the name of the deployment action is short and distinct. - Run
azd pipeline configwith the--principal-nameswitch in order to have a meaningful name.
Summary
This was an easy process for such an easy project. I'm interested to see how the infrastructure as code experience changes and the project changes.

Top comments (1)
Excellent article, Dina!!!