
React Bootstrap forms are input-based components which are designed to collect user data. Used as login, subscribe or contact form, all can be easily customized.
While creating CDB, we were aware of their importance in almost every project, so we have put a lot of effort to get them right.
Such constructions like predefined Form logins, Form registers, Form subscriptions or Form contacts and other layout forms varying in their design are all at your disposal. Each of them offers a different type of functionality.
We are going to look at how to create this multi-select drop-down with search today using a react library known as contrast.
Contrast also known as CDBReact is a react library which is an Elegant UI kit with full bootstrap support that has reusable components for building mobile-first, responsive websites, and web apps.
To use the contact forms you need to download the pro version here.
Prerequisites
The contact forms would be built using React, Bootstrap, and CDBReact. You don’t need to have any previous knowledge of CDBReact but the following are necessary:
- Basic React Knowledge
- JavaScript knowledge
- Basic Bootstrap knowledge
- NPM installed
The page will look like the image below
Setup
First Check that you have node installed. To do this, run the following command in your terminal.
Code
node-v
This should show you the current version of node you have installed on your machine.
If you don’t have nodejs installed, download it here.
Installing node also installs npm on your PC but you can still confirm using npm-v. Now that we have node installed, we can start up our React project by going to the directory of our choice and running
Code:
npx create-react-app signin-app
I named the project signin-app but you can use any name of your choice.
Install CDBReact
Now, we have to install CDBReact in our project
Run the following command to install CBDReact using NPM
npm install --save ./path-to-the-cdbreact-pro-tgz-file
Or using Yarn
yarn add ./path-to-the-cdbreact-pro-tgz-file
Note that we don’t need to install bootstrap or add it anywhere in our project as CDBReact does that for us upon installation.
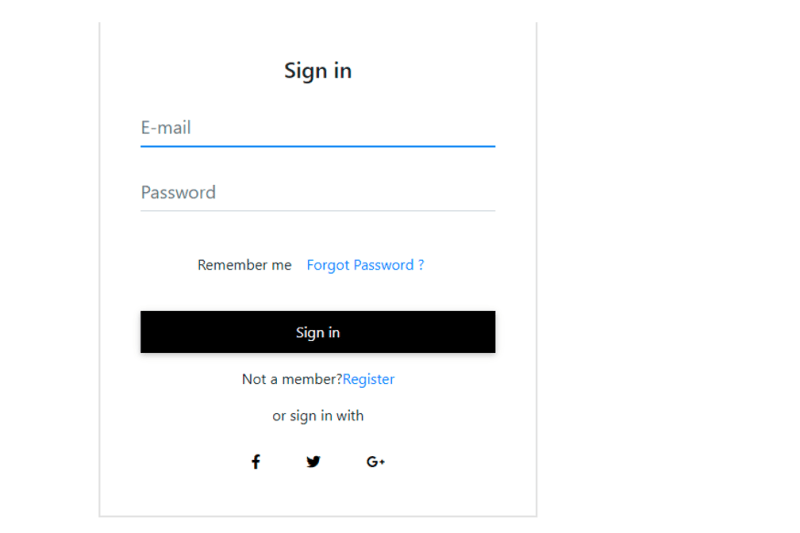
Sign in
Let us go ahead to create a file named signin.js which would contain our signin component. We will be writing our code here. Import the various signin components that we’ll be using.
Code:
import React from "react";
import {
  CDBInput,
  CDBCard,
  CDBCardBody,
  CDBIcon,
  CDBBtn,
  CDBLink,
  CDBContainer } from "cdbreact-pro";
In the code above, we imported the react from react and we also imported
- CDBInput is used to build the input component
- CDBCard is used to build the card structure of the sign in
- CDBCardBody used to build the body of the sign in
- CDBIcon is component allows you to add icons to the sign in
- CDBBtn is the component that is used to build buttons in the sign in
- CDBLink is the component that is used to build links for the sign in
- CDBContainer is component holds the entire components used in building the sign in components from contrast.
Code:
const Forms = () => {
  return (
    <CDBContainer>
      <CDBCard style={{ width: "30rem" }}>
        <CDBCardBody className="mx-4">
          <div className="text-center mt-4 mb-2">
              <p className="h4"> Sign in </p>
          </div>
          <CDBInput material hint="E-mail" type="email" />
          <CDBInput material hint="Password" type="password" />
          <div
              className="d-flex flex-wrap justify-content-center align-items-center"
          >
              <CDBInput type="Checkbox" />
              <p className="m-0">Remember me</p>
              <CDBLink to="#">Forgot Password ?</CDBLink>
          </div>
          <CDBBtn
              color="dark"
              className="btn-block my-3 mx-0" >
              Sign in
          </CDBBtn>
          <p className="text-center">Not a member?
            <CDBLink className="d-inline p-0" to="#">
              Register
            </CDBLink>
          </p>
          <p className="text-center"> or sign in with</p>
          <div className="row my-3 d-flex justify-content-center">
            <CDBBtn
                color="white"
                style={{ boxShadow: "none" }}
            >
                <CDBIcon fab icon="facebook-f" />
            </CDBBtn>
            <CDBBtn
                color="white"
                className="m-0"
                style={{ boxShadow: "none" }}
            >
                <CDBIcon fab icon="twitter" />
            </CDBBtn>
            <CDBBtn
                color="white"
                style={{ boxShadow: "none" }}
            >
                <CDBIcon fab icon="google-plus-g" />
            </CDBBtn>
          </div>
        </CDBCardBody>
      </CDBCard>
    </CDBContainer>
  );
};

export default Forms;
In the code above, we created the sign in form and included some styling in the different components in order to make them more appealing.
However, we must first render our component before we can see it display on our screen.
Code:
import './App.css';
import Forms from './signin';
import Reactdom from "react-dom";
import { BrowserRouter as Router } from 'react-router-dom';

function App() {
  return (
    <Router>
      <div className="App">
        <Forms />
      </div>
    </Router>
  );
}

export default App;
The final page should look like the image below
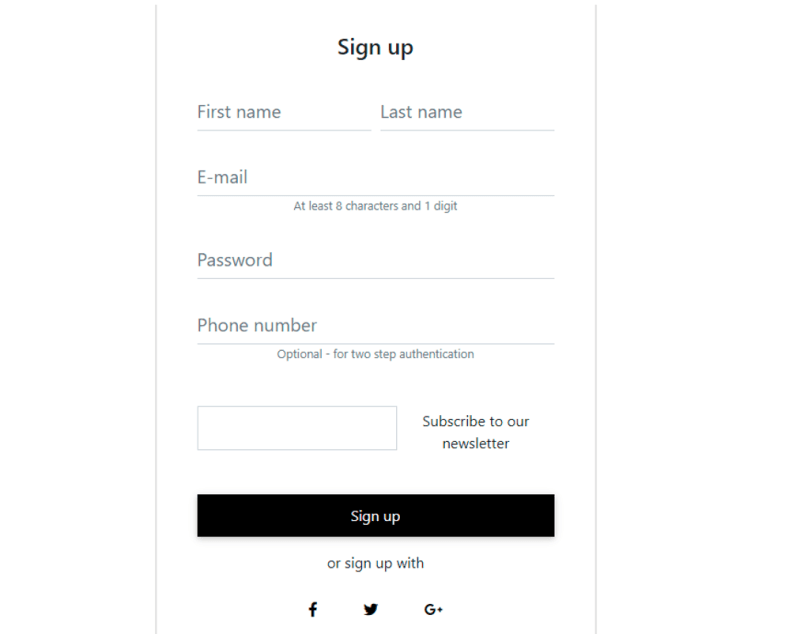
Sign up form
The sign up form is used in several web apps to register for anything or even to recognize users on a platform.
Let's go ahead to create a file named signup.js which would contain our signup component. We will be writing our code here. Import the various signup components that we’ll be using.
Code:
import React from "react";
import {
  CDBInput,
  CDBCard,
  CDBCardBody,
  CDBIcon,
  CDBBtn,
  CDBLink,
  CDBContainer } from "cdbreact-pro";
In the code above, we imported the react from react and we also imported
- CDBInput
- CDBCard
- CDBCardBody
- CDBIcon
- CDBBtn
- CDBLink
- CDBContainer components from contrast
Code:
const Forms = () => {
  return (
    <CDBContainer>
      <CDBCard style={{ width: "30rem" }}>
        <CDBCardBody className="mx-4">
          <div className="text-center mt-4 mb-2">
            <p className="h4"> Sign up </p>
          </div>
          <div className="form-row mb-n4">
            <div className="col">
              <CDBInput material hint="First name" type="text" />
            </div>
            <div className="col">
              <CDBInput material hint="Last name" type="text" />
            </div>
          </div>
          <CDBInput material hint="E-mail" type="email" />
          <p className="text-muted text-center small mt-n4">
            At least 8 characters and 1 digit
          </p>
          <CDBInput material hint="Password" type="password" />
          <CDBInput material hint="Phone number" type="text" />
          <p className="text-muted text-center small mt-n4">
            Optional - for two step authentication
          </p>
          <div
            className="d-flex justify-content-center align-items-center mt-4"
          >
            <CDBInput type="Forms" />
            <p className="m-0">Subscribe to our newsletter</p>
          </div>
          <CDBBtn
            color="dark"
            className="btn-block my-3 mx-0"
          >
              Sign up
          </CDBBtn>
          <p className="text-center"> or sign up with</p>
          <div className="row mb-3 d-flex justify-content-center">
            <CDBBtn
              color="white"
              className="m-0"
              style={{boxShadow:"none"}}
            >
              <CDBIcon fab icon="facebook-f" />
            </CDBBtn>
            <CDBBtn
              color="white"
              className="m-0"
              style={{boxShadow:"none"}}
            >
              <CDBIcon fab icon="twitter" />
            </CDBBtn>
            <CDBBtn
              color="white"
              className="m-0"
              style={{boxShadow:"none"}}
            >
              <CDBIcon fab icon="google-plus-g"/>
            </CDBBtn>
          </div>
            <p className="text-center m-0">
              Already have an account?
              <CDBLink className="d-inline p-0" to="#">
                Sign In
              </CDBLink>
            </p>
          <hr/>
          <p className="text-center">
            By clicking <em>Sign up</em> you agree to our
            <CDBLink className="d-inline p-0" to="#">
              terms of service
            </CDBLink>
          </p>
        </CDBCardBody>
      </CDBCard>
    </CDBContainer>
  );
};

export default Forms;
In the code above, the different components are used to create the body of the sign up contact form. We also included some styling and added social media contact in the sign up page.
The next step is to render the signup form in our app.js file.
Code:
import './App.css';
import Forms from './signup';
import Reactdom from "react-dom";
import { BrowserRouter as Router } from 'react-router-dom';

function App() {
  return (
    <Router>
      <div className="App">
       <Forms  />
      </div>
    </Router>
  );
}

export default App;
The signup page should look like the image below.
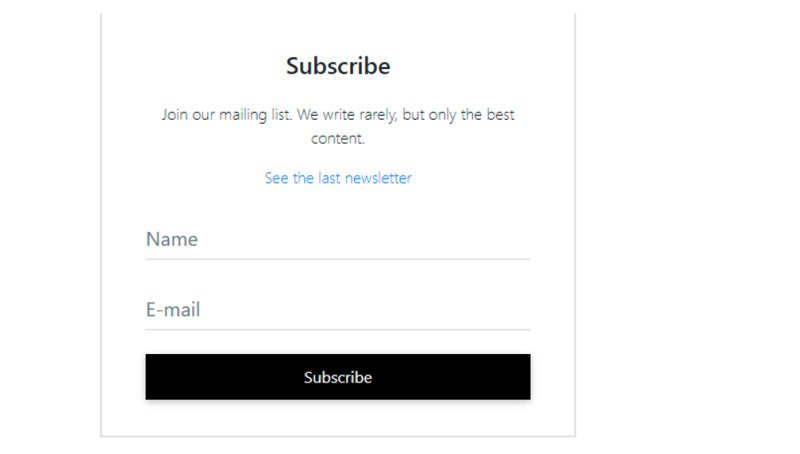
Newsletter subscription
The newsletter subscription page will house your contact information to help business owners reach their customers and subscribers easily. The page we are going to create will look like the image below
Install CDBReact
Now, we have to install CDBReact in our project. Run the following command to install CBDReact
npm install --save cdbreact
Or using Yarn
yarn add cdbreact
Let's go ahead to create a file named newsletter.js which would contain our signup component. We will be writing our code here. First we will Import the various components that we’ll be using.
Code:
import React from "react";
import {
  CDBInput,
  CDBCard,
  CDBCardBody,
  CDBIcon,
  CDBBtn,
  CDBLink,
  CDBContainer } from "cdbreact";
In the code above, we imported the react from react and we also imported
- CDBInput
- CDBCard
- CDBCardBody
- CDBIcon
- CDBBtn
- CDBLink
- CDBContainer components from contrast
Now, we are going to write the function that will display the newsletter subscription form.
Code:
const Forms = () => {
  return (
    <CDBContainer>
      <CDBCard style={{ width: "30rem" }}>
        <CDBCardBody className="mx-4">
          <div className="text-center mt-4 mb-2">
            <p className="h4">Subscribe</p>
          </div>
          <p className="text-center mt-4 font-weight-light">
            Join our mailing list. We write rarely, but only the best content.
          </p>
          <CDBLink className="text-center p-0 font-weight-light" to="#">
            See the last newsletter
          </CDBLink>
          <CDBInput material hint="Name" type="text" />
          <CDBInput material hint="E-mail" type="email" />
          <CDBBtn
            color="dark"
            className="btn-block my-3 mx-0" >
              Subscribe
          </CDBBtn>
        </CDBCardBody>
      </CDBCard>
    </CDBContainer>
  );
};

export default Forms;
We added some styling to the components of the newsletter contact form and links to the social media contact.
Code:
import './App.css';
import Forms from './newsletter';
import Reactdom from "react-dom";
import { BrowserRouter as Router } from 'react-router-dom';


function App() {
  return (
    <Router>
      <div className="App">
       <Forms  />
      </div>
    </Router>
  );
}

Reactdom.render(<App />, document.getElementById('root'));
In the code above, we rendered the newsletter file in the app.js. This doesn’t require a pro version.
The final page will look like this
Conclusion
Contact forms are known to be used in creating sign in forms, sign up forms and newsletter which you can see is easier and much faster to create using contrast and gives you a lot of options to include bootstrap features without having to install it.
Resources
Create Stunning Websites and Web Apps
Building different custom components in react for your web apps or websites can get very stressful. Thats why we decided to build contrast. We have put together a UI kit with over 10000+ components, 5 admin dashboards and 23 additional different pages template for building almost any type of web app or webpage into a single product called Contrast Pro. Try contrast pro!

Contrast React Bootstrap PRO is a Multipurpose pro template, UI kit to build your next landing, admin, SAAS, prelaunch, etc. project with a clean, well documented, well crafted template and UI components. Learn more about Contrast Pro
Resources
Tailwind grid-How to use tailwind CSS grid templates in your project
How to create a Beautiful Responsive Navigation bar Using Tailwind CSS
Tailwind form-How to create and style a Responsive Form using Tailwind CSS
How to use tailwind CSS padding, margin and border in your project
How to create a beautiful React Bootstrap select with icons.
How to create a Beautiful Responsive Navigation bar Using Tailwind CSS
Tailwind Modal-How to create a React Modal using Tailwind CSS.
How to Implement a React Step Progress Bar Using Tailwind CSS


Top comments (0)