
If there's one thing in front-end development that I hate the most, that would be forms. Forms are the worst! Form validation is a very important part of gathering user data as we want to make sure we get the data in the format we expect. Otherwise, bad things often happen!
I chose Next.JS as our framework for this demo because I use it for just about everything. Next.JS is a layer on top of ReactJS, a full-stack framework created by Facebook that uses Javascript for both front- and back-end code.
This tutorial will be a two-part series. The first will deal with the front end development. The second will deal with the back-end.
We will be using the following libraries for this project:
| Package Name | Description |
|---|---|
| React-Bootstrap | The most popular front-end framework created by Twitter |
| React-Hook-Form | Performant, flexible and extensible forms with easy-to-use validation |
| Yup | A schema builder for runtime value parsing and validation |
Step 1 - Create a Next.JS Project
First let's initialize a new basic Next.JS project using create-next-app.
npx create-next-app@latest your-project-name
Now let's install our dependencies:
cd your-project-name
npm install @hookform/resolvers react-hook-form yup react-bootstrap bootstrap sass
Step 2 - Define Our Styles
Delete the default styles in /styles and create a file called App.scss:
@import "~bootstrap/scss/bootstrap";

.navbar {
    padding: 1em;
    margin-bottom: 1em;

    &-brand {
        color: white;
        cursor: pointer;
        &:hover {
            color: yellow;
        }
    }

    a {
        color: white;
        text-decoration: none;
        &:hover {
            color: rgb(124, 124, 232);
        }
    }
}
Now in /pages/_app.js, modify it to look like this:
import '../styles/App.scss';

function MyApp({ Component, pageProps }) {
  return <Component {...pageProps} />
}

export default MyApp
If you're unfamiliar with SASS, I highly recommend you study up and begin using it. Check out this tutorial.
Step 3 - Create Our Form
Let's modify the default /pages/index.js for our example to look like this:
import React from 'react';
import Link from 'next/link';
import { Col, Container, Row, Navbar, Form, Button } from 'react-bootstrap';
import { useForm } from 'react-hook-form';
import * as yup from "yup";
import { yupResolver } from "@hookform/resolvers/yup";

export default function Home() {
  // Yup error message overrides
  const errMess = {
    req: "Please fill this out"
  };

  // Our Yup Schema for this form
  const ContactSchema = yup.object().shape({
    name: yup.string()
      .label('Full Name')
      .required(errMess.req)
      .min(3)
      .max(20),
    email: yup.string()
      .label('Email Address')
      .required(errMess.req)
      .email('Invalid Email Address'),
    message: yup.string()
      .label('Message')
      .required(errMess.req)
      .min(10)
      .max(1000),
  });

  // Destruct useForm() and set our Yup schema as the validation resolver
  const {
    register,
    handleSubmit,
    formState: { errors },
  } = useForm({
    resolver: yupResolver(ContactSchema)
  });

  // Our function for handling valid form data
  const submitForm = (data) => {
    alert(JSON.stringify(data));
  }

  return (
    <>
      <Navbar bg="dark" expand="lg">
        <Navbar.Brand>
          <Link href="/">
            Home
          </Link>
        </Navbar.Brand>
      </Navbar>
      <Container>
        <h1 className='mb-5'>Next.JS Form to Email Example</h1>
        <Form onSubmit={handleSubmit((data) => submitForm(data))}>
          <Row>
            <Col>
              <Form.Group className="mb-3" controlId="nameField">
                <Form.Label>Full Name</Form.Label>
                <Form.Control
                  type="text"
                  placeholder="e.g. John Doe"
                  isInvalid={errors.name}
                  {...register('name')}
                />
                <Form.Control.Feedback type='invalid'>
                  {errors.name?.message}
                </Form.Control.Feedback>
              </Form.Group>
            </Col>
            <Col>
              <Form.Group className="mb-3" controlId="emailField">
                <Form.Label>Email Address</Form.Label>
                <Form.Control
                  type="email"
                  placeholder="e.g. john@example.com"
                  isInvalid={errors.email}
                  {...register('email')}
                />
                <Form.Control.Feedback type='invalid'>
                  {errors.email?.message}
                </Form.Control.Feedback>
              </Form.Group>
            </Col>
            <Col lg={12}>
              <Form.Group className="mb-3" controlId="messageField">
                <Form.Label>Message</Form.Label>
                <Form.Control
                  as="textarea"
                  rows={5}
                  placeholder="Please type your message..."
                  isInvalid={errors.message}
                  {...register('message')}
                />
                <Form.Control.Feedback type='invalid'>
                  {errors.message?.message}
                </Form.Control.Feedback>
              </Form.Group>
            </Col>
          </Row>
          <Row>
            <Col>
              <Button variant="primary" type="submit">
                Submit
              </Button>
            </Col>
          </Row>
        </Form>

      </Container>
    </>
  )
}
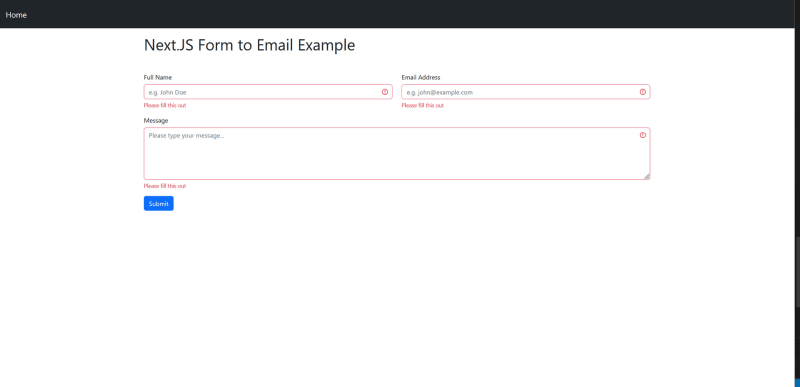
Now run npm run dev and navigate to http://localhost:3000 to test our form. Should get something like this:
That's it. It's so easy! Yup in conjunction with React-Hook-Form makes creating forms with validation a breeze! Don't forget, though, you always want to validate on the back-end as well.
If you want the full code base for this project, you can clone my repository here.
If you'd like to proceed to the next tutorial on how to handle the back-end, check out my next article: Simple Next.JS Form to Email Using React-Hook-Form and Gmail.

Top comments (0)