
It’s prudent in today’s mobile-dominated world to serve images sized accordingly to the client device’s screen size. In the days of yore, this required a lot of Javascript code.
Thankfully, most modern browsers accept the srcset property in tags. This property allows you to specify multiple image sources depending on the client's screen size.
Here’s a quick example:
<img srcset="/images/image-768 768w,
             /images/image-1024.jpg 1024w,
             /images/image-1600.jpg 1600w,
             /images/image-1920.jpg 1920w"
     src="/images/image.jpg"
/>
The problem with this is that you’ll have to pre-render these images for each screen size you intend to serve. This is no only tedious, but also requires a lot of storage on your web server.
There are several image resizing CDNs out there, like imagekit.io and kraken.com, but they are costly. Cloudflare offers a pay-as-you-go image resizing service that allows you to resize images from any source. Cloudflare also caches the resized images for lightening-fast delivery.
In this tutorial, I will be using an AWS Cloudfront distribution as the origin source for our Cloudflare images CDN, but you can use any publicly-accessible origin for this to work. For more information on how to set this up, please refer to my articles, How to Use AWS CloudFront to Create Your Own Free CDN and How to Get a Custom Domain For Your Free CloudFront CDN.
Step 1: Set Up Cloudflare Images
Assuming you already have a registered Cloudflare account and your DNS hosted there. Create a subdomain like cdn.example.com and turn proxy on.
Next, in the sidebar click Speed > Optimization and turn on Image Resizing, and make sure Resize images from any origin is unchecked. If you leave it checked, anyone will be able to use your CDN url to resize images from any origin!

You’ll need to have a billing account set up with CloudFlare to use the image resizer API. The billable usage is extremely cheap and you’ll probably be charged very small amounts of money, unless you have a website with extremely high volume.
Step 2: Create a Service Worker API Endpoint
You can use the cdn_cgi url method to resize images, but that exposes your source origin and you have to enable Resize images from any origin for it to work, so we’re not going to do that. Instead, we’re going to create a CloudFlare worker to handle our image resizing requests.
In the sidebar of your CloudFlare dashboard, click Workers and then click Create Service.
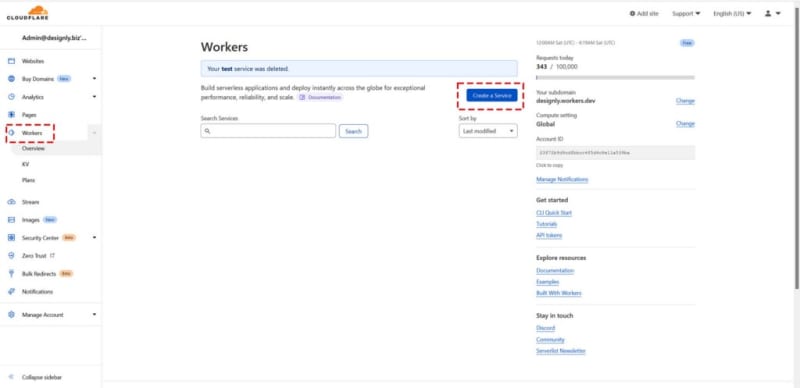
Enter a Service Name. I chose “resizer”, but you can name it whatever you want, then click Create Service.

On the worker settings screen, click the Quick Edit button and delete the default code in the left-hand pane. Enter the following code and customize it for your environment:
addEventListener("fetch", event => {
    event.respondWith(handleRequest(event.request))
})

/** GLOBALS */
// URL prefix for origin requests
const cdnUrl = "[https://cdn.example.com](https://cdn.example.com)";
const defaultImage = cdnUrl + "/images/image-placeholder.webp";

/**
 * Fetch and log a request
 * [@param](http://twitter.com/param) {Request} request
 */
async function handleRequest(request) {
    // Parse request URL to get access to query string
    let url = new URL(request.url)

// validate URL pathname
    if (!url.pathname || !url.pathname.length) {
        return new ErrorDefault("Missing image path!");
    }

imageURL = cdnUrl + url.pathname.replace("/resize", ""); // prefix image path with CDN url

// Validation options
    const whRange = [50, 3000]; // width and height range limit
    const formats = ['webp', 'avif', 'json'];
    const fitVals = ['scale-down', 'contain', 'cover', 'crop', 'pad'];
    const gravityVals = ['left', 'right', 'top', 'bottom', 'center', 'auto']; // also can be object int {x, y}
    const qualityRange = [60, 90]; // actually 0-100 but 60-90 is usable range
    const rotateVals = [90, 180, 270]; // Only multiples of 90 allowed
    const sharpenRange = [0, 10]; // float: 1.0 recommended for down-scaled images
    const blurRange = [0, 250]

// Cloudflare-specific options are in the cf object.
    let options = { cf: { image: {} } }

// Copy parameters from query string to request options.
    if (url.searchParams.has("fit")) options.cf.image.fit = url.searchParams.get("fit")
    // fit accepted value: object: {top, right, bottom, left}
    if (url.searchParams.has("w")) options.cf.image.width = url.searchParams.get("w")
    // width accepted value 50-3000
    if (url.searchParams.has("h")) options.cf.image.height = url.searchParams.get("h")
    // height accepted value: 50-3000
    if (url.searchParams.has("q")) options.cf.image.quality = url.searchParams.get("q")
    if (url.searchParams.has("r")) options.cf.image.rotate = url.searchParams.get("r")
    if (url.searchParams.has("sharpen")) options.cf.image.sharpen = url.searchParams.get("sharpen")
    if (url.searchParams.has("blur")) options.cf.image.blur = url.searchParams.get("blur")
    if (url.searchParams.has("t")) options.cf.image.trim = url.searchParams.get("t")
    if (url.searchParams.has("g")) options.cf.image.gravity = url.searchParams.get("g")

// Validate parameters
    if (options.cf.image.fit && !fitVals.includes(options.cf.image.fit)) {
        return new ErrorDefault("Invalid value for fit!");
    }
    if (options.cf.image.width && !inRange(options.cf.image.width, whRange)) {
        return new ErrorDefault(`Invalid width range [${whRange.join("-")}]`);
    }
    if (options.cf.image.height && !inRange(options.cf.image.height, whRange)) {
        return new ErrorDefault(`Invalid height range [${whRange.join("-")}]`);
    }
    if (options.cf.image.quality && !inRange(options.cf.image.quality, qualityRange)) {
        return new ErrorDefault(`Invalid quality range [${qualityRange.join("-")}]`);
    }
    if (options.cf.image.rotate && !rotateVals.includes(options.cf.image.rotate)) {
        return new ErrorDefault(`Invalid rotate value [${rotateVals.join("|")}]`);
    }
    if (options.cf.image.sharpen && !inRange(options.cf.image.sharpen, sharpenRange)) {
        return new ErrorDefault(`Invalid sharpen range [${sharpenRange.join("-")}]`);
    }
    if (options.cf.image.blur && !inRange(options.cf.image.blur, blurRange)) {
        return new ErrorDefault(`Invalid blur range [${blurRange.join("-")}]`);
    }

// Your Worker is responsible for automatic format negotiation. Check the Accept header.
    // Try webp first, then avif
    const accept = request.headers.get("Accept");
    if (/image\/webp/.test(accept)) {
        options.cf.image.format = 'webp';
    } else if (/image\/avif/.test(accept)) {
        options.cf.image.format = 'avif';
    }

try {
        const { hostname, pathname } = new URL(imageURL)

// only allow URLs with JPEG, PNG, GIF, or WebP file extensions
        // [@see](http://twitter.com/see) [https://developers.cloudflare.com/images/url-format#supported-formats-and-limitations](https://developers.cloudflare.com/images/url-format#supported-formats-and-limitations)
        if (!/\.(jpe?g|png|gif|webp)$/i.test(pathname)) {
            return new Response('Disallowed file extension', { status: 400 })
        }

} catch (err) {
        return new Response('Invalid "image" value', { status: 400 })
    }

// Build a request that passes through request headers
    const imageRequest = new Request(imageURL, {
        headers: request.headers
    })
    console.log(options);

// Returning fetch() with resizing options will pass through response with the resized image.
    return fetch(imageRequest, options)
}

class ErrorDefault extends Response {
    constructor(message, props) {
        super(props);
        console.log("Image resize error: " + message);
        return fetch(defaultImage, { status: 200 });
    }
}

// Helper functions
const inRange = (v, [x, y]) => {
    return (v >= x && v <= y);
}
Change the cdnUrl constant to your CDN base URL. Make any other modifications you'd like and then click Save and Deploy.

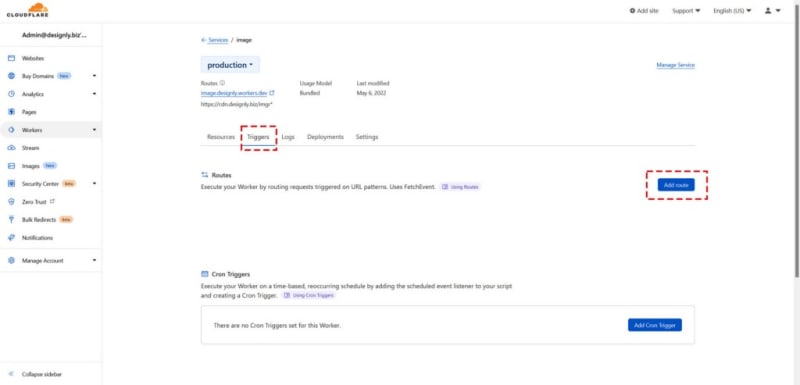
Go back to your service screen and click Triggers and click Add Route.
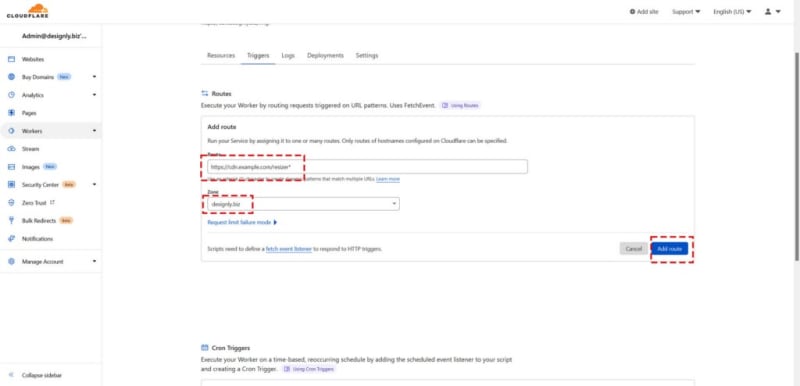
Under Route you’ll enter something like https://cdn.example.com/resizer\*. What this does is intercept any URL with this prefix and runs it through the service worker. Any pathname after this prefix is extracted and your cdnUrl constant value is prepended to it. Any resizing options are configured via query parameters.
Ok! Let’s try it out. Try requesting an image from your new service worker like this: https://cdn.example.com/resizer/images/some-image.jpg?w=760, where /images/some-image.jpg is the relative path to your CDN url.
I’ve coded several of the available resizing options into this script, but there are more to choose from. For more information about using CloudFlare’s image resizing API, please click here.
Now, you could stop here and use this service however you please, but if you’re a React/NextJS developer, read on!
Step 3: Create a React Custom Component
The title of this article indicates that we’re going to automate this process, and that’s exactly what we’re going to do now.
Consider the following code:
const resizeUrl = "https://cdn.example.com/resizer%SRC%?w=%WIDTH%&q=%QUALITY%";

const imageResizerConfig = {
    resizeUrl: resizeUrl,
    cfSrcSetUrl: resizeUrl + " %WIDTH%w",
    srcSetWidths: [640, 768, 1024, 1366, 1600, 1920],
    srcSetDefaultWidth: 1024,
    placeholderImage: "/images/pixel-black.png",
    defaultQuality: 90,
    blogThumbQuality: 60
};

export default function CfImage({
    defaultWidth = imageResizerConfig.srcSetDefaultWidth,
    maxWidth = null,
    src,
    className,
    alt,
    onClick,
    quality = imageResizerConfig.defaultQuality
}) {
    const srcSet = [];

imageResizerConfig.srcSetWidths.forEach((w) => {
        if (!maxWidth || w <= maxWidth) {
            srcSet.push(imageResizerConfig.cfSrcSetUrl.replace(/%WIDTH%/g, w).replace("%SRC%", src).replace("%QUALITY%", quality));
        }
    });

if (defaultWidth > maxWidth) {
        defaultWidth = maxImageWidth(maxWidth);
    }

const srcMain = imageResizerConfig.resizeUrl.replace(/%WIDTH%/g, defaultWidth).replace("%SRC%", src).replace("%QUALITY%", quality);

return (
        <img className={className} src={srcMain} srcset={srcSet.join(',')} alt={alt} onClick={onClick} />
    );
}

function maxImageWidth(maxWidth) {
    const useWidths = [];

imageResizerConfig.srcSetWidths.forEach((w) => {
        if (!maxWidth || w <= maxWidth) {
            useWidths.push(w);
        }
    });

useWidths.sort(function (a, b) {
        return a - b;
    });

return useWidths.pop();
}
What this component does is render an tag with preset srcset URLs for sizes [640, 768, 1024, 1366, 1600, 1920]. These are arbitrary sizes I chose based on common mobile and desktop screen sizes. The largest size you'd likely need is 1920 for HD desktop screens, so your original source image need not be a higher resolution than that.
You can then import this component into your React pages and call it like this:
This code should render something like this:
<CfImage
    {...this.props}
    className="pop-image"
    src="/images/path/to/image.jpg"
    onClick={handleClick}
    alt="My image description"
    maxWidth={this.state.winWidth}
    quality=60
  />
That’s it. Now you have a fully-automated image resizer. All you need to do is publish your images at 1920w in JPG or PNG format and CloudFlare will optimize the image based on the HTTP Accept header, whether it’s webp or avif.
Feel free to play around with this code and customize it to suit your needs.
Thanks for reading! For more great information, please visit our Blog.
Originally published at https://designly.biz on May 5, 2022.

Top comments (0)