In the 1.9.9 release of Voyager, some exciting new capabilities were added. Most notably are Voyagers new support for cloud deployments and AWS S3. Many organizations, including a lot of our customers, are increasingly deploying applications, services and data in public clouds, which is one of the reasons why they have asked us to deploy Voyager in the cloud and index data stored in cloud repositories.
For general users, Voyagers easy-to-use interface and its ability to find any piece of data within their organizations are key benefits. System administrators like Voyager for its enterprise integration and data management features; while developers like Voyager because of its REST APIs and extensibility for creating custom locations, extractors and pipeline steps.
This blog post will highlight a new way for developers to build on top of Voyager and use some elasticity features that public cloud providers offer and focus on how AWS Batch can help developers horizontally scale out processes that will push data into Voyager.
AWS and NAIP Content
As part of our recent VoyagerODN release, we are including NAIP content from the NAIP on AWS hosted dataset. NAIP on AWS contains leaf-on imagery for the continental United States for the prior two collection years and is hosted in Amazon S3 in a Requester Pay bucket in us-east-1 (Northern Virginia) with over 1.3 million images accumulated between 2012 and 2015.
With VoyagerODN, we wanted to index NAIP content while providing users with visually appealing thumbnails in the search results. Adding the new S3 capabilities enables us to easily index NAIP content, but in order to generate thumbnails, we needed a solution to scale out beyond a single server so it could be completed quickly. Given the NAIP imagery was over 90TB in volume, processing would take weeks to build thumbnails. We needed to build the thumbnails faster.
Enter AWS Batch. AWS Batch was announced at AWS re:Invent 2016. AWS Batch can run hundreds of thousands of batch computing jobs by dynamically provisioning compute resources based on the volume and specific resource requirements of the batch jobs.
The key components of AWS Batch are jobs, job definitions, job queues and compute environments. Jobs are executed as commands in a Docker container, and the job definitions define the Docker container to use, the command to execute, the resource requirements, and other configurations for a job. Jobs are then submitted to a job queue. Compute environments define the cluster of servers to execute the jobs, pulling them from one or more job queues and executing them. AWS Batch manages the execution, provides up-to-date status, and writes console output to CloudWatch for monitoring. The only real work is developing the scripts for actually processing the data.
For VoyagerODN, the plan for building thumbnails is:
Develop a script to build thumbnails for a set of NAIP images. In this case, well use State Name and Year combination prefix to define a set. Use GDAL in the script to build the thumbnails After building thumbnails for the set, push the thumbnails to S3 In Voyager, when indexing NAIP data, turn off thumbnail generation, and add a Pipeline step to set the external thumbnail URL.
Step 1: Build Docker image
In this step, I need to build a Docker image based on Ubuntu with GDAL and Python installed and configured.
The full Docker file shows how the Docker image is built. The aws-cli, python, and gdal software packages will be installed via apt. Additionally, Python libraries will be installed via pip. The script to build thumbnails will be copied into the image as well.
FROM ubuntu:trusty

# Define Python required libraries in requirements.txt
# Copy requirements file into the Docker image
COPY requirements.txt /tmp/requirements.txt

# Install required software via apt and pip
RUN sudo apt-get -y update && \
      apt-get install -y \
    awscli \
    python \
    python-pip \
    software-properties-common \
 && add-apt-repository ppa:ubuntugis/ppa \
 && apt-get -y update \
 && apt-get install -y \
      gdal-bin \
 && pip install --requirement /tmp/requirements.txt

# Copy Build Thumbnail script to Docker image and add execute permissions
COPY build-thumbnails.py build-thumbnails.py

RUN chmod +x build-thumbnails.py
The Docker image is built and tagged (vg-gdal) with the following command:
$docker build -t vg-gdal .
The benefit of using Docker is the same image can be used in development, test, and production environments. No more works on my machine. Lets test this new Docker image on a developer machine by running the script in a Docker container with the Docker image:
$docker run -e AWS_ACCESS_KEY_ID=<ACCESSKEY> -e

AWS_SECRET_KEY=<SECRETKEY> -it vg-gdal /usr/bin/python build-thumbnails.py

aws-naip al/2013/ voyager-aws-naip
This command does the following:
- Runs the build-thumbnails script in a container running the previously built Docker image named vg-gdal
- Specifies environment variables for AWS credentials (this wont be needed when running in AWS Batch, more on that later)
- Build thumbnails from images in the aws-naip bucket with key that begin with al/2013/ (All images collected over Alabama in 2013)
- Stores the thumbnails in the voyager-aws-naip bucket (key names will be in sync between aws-naip and voyager-aws-naip)
After successful execution, thumbnails will be built and stored in the voyager-aws-naip S3 bucket. From here, the Docker image needs to be pushed to an image repository, either Docker Hub or Amazon ECR. In this case, Ill use a Docker Hub repository. The following commands will login to Docker Hub, re-tag the Docker image appropriately and push the Docker image to the repository:
$docker login
$docker tag vg-gdal dsedlmyervg/vg-gdal:latest
$docker push dsedlmyervg/vg-gdal:latest
Step 2: Configure AWS Batch
Now that I have a working script to build thumbnails running inside a Docker container and with the Docker image pushed to an image repository, lets configure AWS Batch to run batch jobs.
First step is to configure the Compute Environment. This will configure the instance type, security groups, networking, scaling policies and provisioning model.


To build NAIP thumbnails, Im going to configure the compute environment with:
- Managed Compute Environment. AWS will scale and configure the cluster instances for me.
- On-demand provisioning model. If I wanted to run this on SPOT that is another option, but I prefer to run this on-demand for now.
- M4 instance family. M4 instances are good general purpose instance types and will fit fine for building NAIP thumbnails.
- 96 Maximum vCPUs. I chose 96 because there are 48 states with NAIP imagery and 2 years of data for each year, so I can process the entire dataset in parallel.
- I also assigned an Instance Role to the instances. This will give the instances access to only write thumbnails to a specific S3 bucket. The instance profile will not grant access for the instances to access any other AWS service. Now I dont have to specify an AWS_ACCESS_KEY_ID or AWS_SECRET_ACCESS_KEY in my scripts, credential files or environment variables.
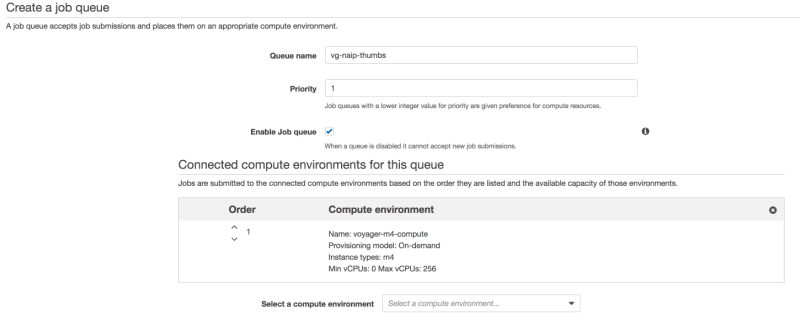
The next step is to create the job queue and connect it to the previously created Compute Environment. Ill assign a priority of 1 to the job queue so its jobs are given higher priority for compute resources.
Finally, its time to create a job definition to build thumbnails using the Docker image built in Step 1.

I created this job definition with:
- Name is set to vg-aws-naip-thumbs
- Using my previously created Docker image, dsedlmyervg/vg-gdal, as the Container Image
- The command is defined as:
This is a similar command that I used when testing the Docker image in Step 1. The difference is Im specifying the input_prefix a Parameter in the Job Definition. Because its a Parameter, I can pass the actual input prefix when submitting Jobs.
- vCPUs is set to 1. The job doesnt need multiple vCPUs
- Memory (MiB) is set to 512. 512MiB of RAM will be enough for the OS and the Job to run.
- Job Attempts is set to 2. In case of failure, the entire job will automatically be restarted. The build-thumbnails script will look to see if a thumbnail already exists before building it. This saves processing time.
The Compute Environment, Job Queue and Job Definition are configured. Next, its time to submit jobs to be executed.
Step 3: Submit Jobs
With AWS Batch configured to build thumbnails, I can now submit jobs to the job queue. AWS Batch will handle the execution and status updates for the jobs.
I decided to define a job using a State and Year. For example, Alabama has data for 2013 and 2015, so Ill submit two jobs for Alabama, one for 2013, and a second for 2015. I wrote a simple Python script to submit the jobs:
import json
import boto3

batch = boto3.client('batch')
s3 = boto3.client('s3')

states = s3.list_objects(Bucket='aws-naip',
      Delimiter="/",
      RequestPayer="requester")

for state_prefix in states['CommonPrefixes']:
  if state_prefix['Prefix'] == ".misc/":
    continue

  years = s3.list_objects(Bucket='aws-naip',
      Prefix="{0}".format(state_prefix['Prefix']),
      Delimiter="/",
      RequestPayer="requester")

  if 'CommonPrefixes' not in years:
    continue

  for year_prefix in years['CommonPrefixes']:
    input_prefix = year_prefix['Prefix']
    jobName = "NAIP_{0}".format(input_prefix.replace("/", "_"))
    print(jobName)

    try:
      response = batch.submit_job(jobQueue='vg-naip-thumbs',
        jobName=jobName,
        jobDefinition='vg-aws-naip-thumbs',
        parameters={"input_prefix":input_prefix })

      print ("Response: " + json.dumps(response, indent=2))
    except Exception as e:
      print ("Error submitting Batch Job")
      print (e)
I can run this script from my developer machine and will need to set the AWS credentials before running the script:
$export AWS_ACCESS_KEY_ID=<ACCESSKEY>
$export AWS_SECRET_ACCESS_KEY=<SECRETKEY>
$python submit-aws-naip-thumb-jobs.py
After all jobs are submitted, I my submitted jobs in the AWS Batch console:

I can monitor these jobs move through the Pending, Runnable, Startable, Running, and ultimately Succeeded states.
Step 4: Index NAIP
The final step is to configure Voyager to index NAIP and set the thumbnail appropriately. To index the NAIP data, create a new Cloud Storage location and set the Thumbnails Strategy to Do Not Build Images. Since I built thumbnails externally, I dont want Voyager to build the thumbnails.

Now I can use a Pipeline step to set the external URL for NAIP thumbs. Voyager's Indexing Pipeline provides functions to transform and manipulate the properties (metadata) of data records as it adds them to the Index. Pipeline steps can easily be developed using Python.

The Python code for the external_naip_thumbs step is:
import sys
import json

def run(entry):
    """
    Python step to compute the Thumb URL for a NAIP on AWS record. Thumbs are located in a
    publicly accessible AWS bucket. Thumbs have the same key as the full resolution image only
    ending in .thumb.jpg instead of .tif
    :param entry: a JSON file containing a voyager entry.
    """
    new_entry = json.load(open(entry, "rb"))
    key = new_entry['entry']['fields']['fs_key']
    thumb_key = key.replace(".tif", ".thumb.jpg")
    thumb_url = "https://voyager-aws-naip.s3.amazonaws.com/{0}".format(thumb_key)
    new_entry['entry']['fields']['image_url'] = thumb_url

    sys.stdout.write(json.dumps(new_entry))
    sys.stdout.flush()
The external_naip_thumbs.py script should be copied to the /app/py/pipeline/steps directory.
The external_naip_thumbs script does the following:
- Defines a run method that accepts an entry parameter. The run method is required for a pipeline step. The entry parameter is a file path that contains the documents JSON representation.
- The file path is opened and parsed as JSON into new_entry. new_entry is a Python dict that represents the indexed document.
- The key (fs_key) field is retrieved. The key field was populated as a result of indexing S3 content. It contains the key name of the NAIP image in S3.
- Using the key value, a URL to the Thumbnail is computed. The thumbnail is stored in S3 from running the jobs through AWS Batch.
- The Thumbnail URL is stored in a separate field in the indexed document named image_url. Voyager will interpret image_url as an absolute URL to a thumbnail for the document.
- As the final action in the pipeline step, the indexed document is serialized to JSON to stdout. The Voyager Pipeline process will read the indexed document from stdout and continue the indexing process.
Results
Using AWS Batch, I was able to build thumbnails for over 1.3 million NAIP images with data volume over 90TB over a weekend. That is a far better improvement compared to running on a single server and taking weeks to execute.
Below is the indexed content in Voyager. You will notice the thumbnails generated in AWS and hosted in S3.

Conclusion
This is a simple example of how developers can integrate a custom solution to push content into Voyager and still leverage Voyager Searchs capabilities within their organization. Future blog posts will build on this sample and show more advanced custom solutions.
For those interested in viewing source code, visit: https://github.com/voyagersearch/voyager-samples/tree/master/aws-batch-naip-thumbs

Top comments (0)