
A few weeks ago, I found myself looking for a continuous integration platform to self-host on my own servers. I have a few smaller projects (which software developer doesn't?) that I don't update frequently but want to ensure they still work whenever they get updated.
Typically, my continuous integration service of choice is CircleCI. I'm very familiar with how to use it effectively with all sorts of projects. However, I wanted to look for a self-hosted solution for these smaller projects because I had some spare computing power to spin up a CI solution. And while CircleCI has a free plan, I didn't want to rely on having enough build time whenever I focused on these projects in the future.
The most popular self-hosted CI server out there is Jenkins, and with good reason. It's been around for a long time - I've used its previous incarnation, Hudson, back in 2007 - and it generally works. But I didn't want to use Jenkins for a couple of reasons. The system feels exceptionally dated, as they haven't had any visual changes for a long time. Also, it relies on a plugin system that leads to issues whenever they're updated. I remember Jenkins not being the most comfortable system to maintain.
Last year I stumbled upon a relatively new continuous integration system called Drone CI. It looked interesting, but I didn't have any use for it, so I never got a chance to try it. Now that I wanted to spin up my own CI instance, I gave Drone CI another shot. The service was straightforward to set up and works excellent. I'm pretty happy with the results.
This week, I wanted to write about the process of setting up an instance of Drone CI using Docker. To show the CI service in use and how easy it is to run your automated tests with it, I set it up to run a TestCafe test suite every time the code repository - hosted on GitHub - gets updated.
Overview of Drone CI's architecture
You can configure Drone CI in many different ways, depending on your code environment and preferred architecture. Regardless of your setup, the typical Drone CI setup consists of two main components:
- The Drone CI server: The server is responsible for configuring your code repositories, handling communication with the repo, and dealing with users for logging into the CI service.
- The Drone CI runner: The runner polls the Drone CI server frequently to check if there are any new jobs to process. Once the server has a job, the runner handles the execution of your pipeline.
You'll need to run an instance of both the server and the runner for your builds to execute. You'll only need to spin up one instance of the Drone CI server and connect it to your preferred source code management provider. The server will need at least one runner to process the jobs as it receives them. You can also configure multiple runners if you need to run your pipeline in different ways, but this article won't cover that scenario.
Both the server and runner use Docker images to start their respective instances. As far as I can tell, there's no alternative form of installation for Drone CI. I consider this a benefit since it makes setting up and updating both the server and the runners a breeze.
Setting up the Drone CI server with GitHub
For this article, I'll set up Drone CI to connect to GitHub, since it's where most of my code repositories live. Drone CI also supports most major source code management providers like GitLab and Bitbucket, as well as some smaller self-hosted Git solutions like Gitea and Gogs. Check out the Drone CI documentation to learn how to use these other providers.
Before setting up the server, you need to first create an oAuth application on the GitHub account containing the repositories you want Drone CI to access. The oAuth application will allow you to sign in using your GitHub account and access your code for your Drone CI instance. Follow the instructions on GitHub's Developer documentation to create a new oAuth application.
Setting up the oAuth application on GitHub is simple. However, you need to set up the proper URLs to point at your Drone CI server:
-
Homepage URL: This URL lets you access the main Drone CI interface after setting up the server and the runner. You can set it to any fully qualified domain name you'll use for your instance of Drone CI. In the example image below, the Drone CI instance is set up
https://ci.dev-tester.com/. -
Authorization Callback URL: This URL is where GitHub redirects you after authorizing your account to share data with your Drone CI instance. This URL must be the same domain as the Homepage URL with the
/loginendpoint appended. In the example below, you can see the Authorization Callback URL ishttps://ci.dev-tester.com/login.
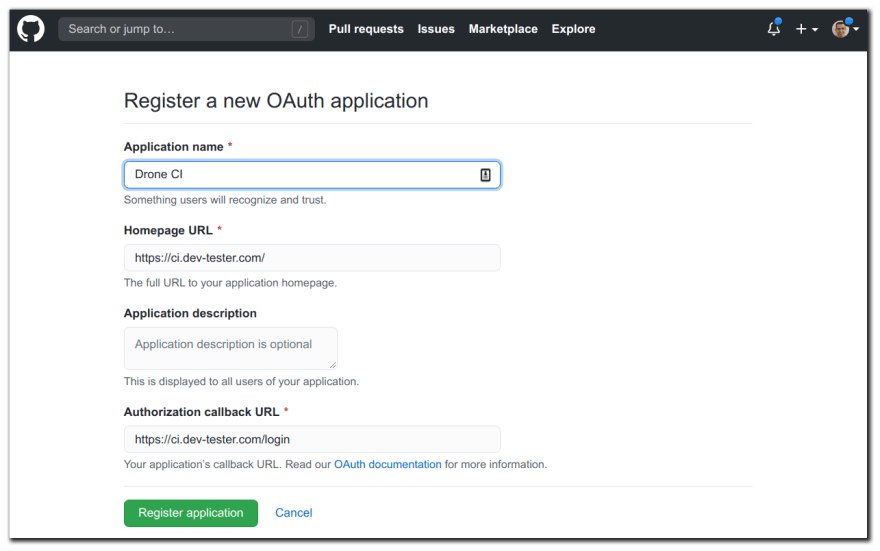
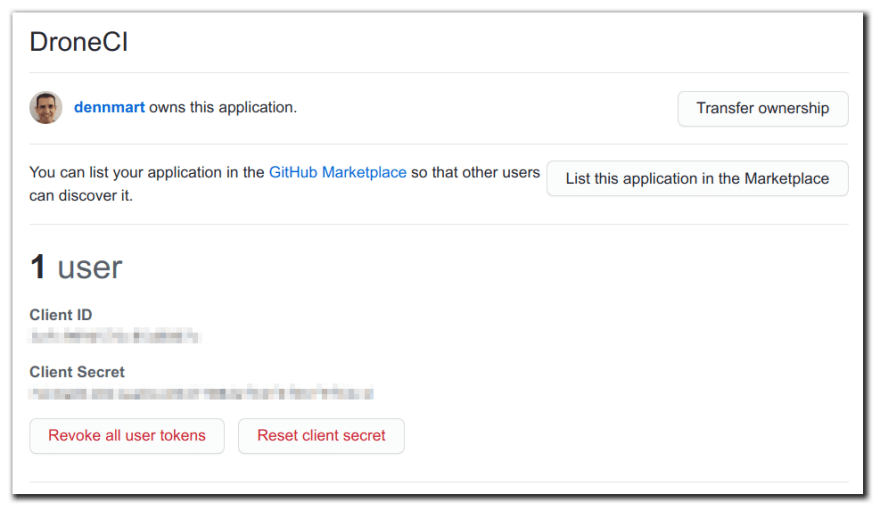
After your oAuth application gets created, you'll land on the app's settings page on GitHub. Here, you'll see two special keys: Client ID and Client Secret. These keys are used when running the Drone CI server, so make sure you copy them since you'll use them soon.
There's one more step needed before running the Drone CI server. For any Drone CI runner to communicate with your server, you need to generate a secret string to serve as authentication between the server and runners. This string essentially tells the Drone CI server that any runner attempting to poll it must have the same secret set up to avoid rogue runners in other networks trying to gain access to your repositories.
The secret can be any string you want to use, as long as it's randomized and not easy to guess. A quick way to generate a secure string on the command line is with the following command:
openssl rand -hex 16
Finally, it's time to get your instance of the Drone CI server up and running in your system. As mentioned earlier, Drone CI uses Docker, so all you need is to run the Drone CI server image with a volume to store the server data locally and a few environment variables for configuration.
The environment variables used to configure your instance of Drone CI vary, depending on your needs. An excellent place to begin is with this example command I used to start my Drone CI server configured with GitHub:
docker run -d \
  -v /var/lib/drone:/data \
  -e DRONE_GITHUB_CLIENT_ID={{GITHUB OAUTH CLIENT ID}} \
  -e DRONE_GITHUB_CLIENT_SECRET={{GITHUB OAUTH CLIENT SECRET}} \
  -e DRONE_RPC_SECRET={{GENERATED SECRET}} \
  -e DRONE_SERVER_HOST=ci.dev-tester.com\
  -e DRONE_SERVER_PROTO=https \
  -e DRONE_TLS_AUTOCERT=true \
  -e DRONE_USER_FILTER=dennmart \
  -p 80:80 \
  -p 443:443 \
  --restart always \
  --name drone \
  drone/drone:1
This Docker command uses the latest 1.x version (1.9.0, as if this writing) of the official Drone CI server images. The command sets up a volume using the /var/lib/drone directory on your system and maps it to the /data directory inside of the Drone CI container. It also publishes both port 80 and 443 for accessing the interface through your web browser. The environment variables in the command are used for configuring Drone. I'll go through the ones used in this example command:
-
DRONE_GITHUB_CLIENT_ID: The value of this variable is the Client ID from the GitHub oAuth application you set up earlier. -
DRONE_GITHUB_CLIENT_SECRET: The value of this variable is the Client Secret from the GitHub oAuth application. -
DRONE_RPC_SECRET: The value of this variable is the generated secret string mentioned earlier in this article, to allow communication between the server and the runner you'll set later. -
DRONE_SERVER_HOST: Here, you'll set up the domain of your Drone CI server instance, as established in the GitHub oAuth application. Note that you don't need to specify the protocol; you only need the domain. -
DRONE_SERVER_PROTO: In this environment variable, you can set whether you want your public-facing instance of Drone CI to use standard HTTP or secure HTTPS connections. Here, I'm using HTTPS to keep the communication secure. -
DRONE_TLS_AUTOCERT: One useful feature provided by Drone CI is its ability to generate an SSL certificate using Lets Encrypt automatically. Setting this environment variable totruehandles this step for you and configures the Drone CI server to accept secure requests. The certificate generation doesn't occur by default, so it won't do anything unless you use this setting. -
DRONE_USER_FILTER: By default, Drone CI sets up a public-facing interface that anyone with a GitHub account can access. While a logged-in user can only see their GitHub repos, you might not want others running builds on your systems. This environment variable limits the GitHub users or organizations that can log in to your Drone CI instance. In this example, I'm only granting access to my personal GitHub account.
That's all you need to get a running instance of the Drone CI server. The first time you visit the URL for the server (as set up with the GitHub oAuth application), you'll be redirected to GitHub to give your instance of Drone CI permission for accessing your repos. If you don't get redirected or Drone CI doesn't load in the browser, check the Docker logs in your system by running the command docker logs drone and verify if any errors occurred during the setup process.
Once GitHub has permission, you'll get redirected back to your Drone CI server, and you'll get logged in to the main interface. The first time you arrive at this interface, Drone CI spends a couple of minutes synchronizing with your GitHub account to pull the information for your code repositories.
Setting up the Drone CI runner with Docker
After syncing your GitHub information, you'll see all of your repos and configure the ones you want to run your builds. However, the Drone CI server won't do anything by itself. You'll need to run a Drone CI runner instance. As mentioned earlier in this article, the runner is what does the heavy lifting of executing your builds. Without it, the Drone CI server won't have a place to send jobs for execution.
Drone CI has different kinds of runners for executing your builds. Each runner has its pros and cons, depending on the workload you need to use. The Drone CI documentation contains advice for when to use or avoid each runner for your projects, so it's well worth exploring which one suits you the best.
For this article, the simplest runner to use is the Docker runner, since it'll get set up on the same server. Like setting up the Drone CI server, getting the runner set up consists of a Docker command and environment variables for configuration. Here's the command I used to set up my runner:
docker run -d \
  -v /var/run/docker.sock:/var/run/docker.sock \
  -e DRONE_RPC_PROTO=https \
  -e DRONE_RPC_HOST=ci.dev-tester.com \
  -e DRONE_RPC_SECRET={{GENERATED SECRET}} \
  -e DRONE_RUNNER_CAPACITY=2 \
  -e DRONE_RUNNER_NAME=${HOSTNAME} \
  -p 3000:3000 \
  --restart always \
  --name runner \
  drone/drone-runner-docker:1
The command to set up the Docker runner uses the latest 1.x version (1.4.0, as if this writing) of the official Drone CI Docker Runner image. The command mounts the Docker daemon socket from your system to the container. This volume mount is essential to allow the runner to spin up Docker instances from within the container when running your builds. It also publishes port 3000 for communication between the server and the runner. The environment variables used in this command are the following:
-
DRONE_RPC_PROTO: This environment variable sets up the protocol used between the Drone CI server and the runner, either secure (https) or insecure (http). It's recommended to usehttps, especially if setting up the runner on a different server. -
DRONE_RPC_HOST: The value of this variable is the hostname of the Drone CI server to allow the runner to poll and receive jobs to execute. -
DRONE_RPC_SECRET: This value is the secret string you generated earlier. It needs to be the same value as the string used when setting up the Drone CI server. Otherwise, the runner can't connect to the server to receive jobs. -
DRONE_RUNNER_CAPACITY: With this value, you can specify how many concurrent jobs you want the runner to process. This value depends on your server's capacity and the resources used to run your jobs, so you may need to experiment to find a number that works well for you. -
DRONE_RUNNER_NAME: This variable is an optional setting to give the runner a unique name. The Drone CI server stores this information when it sends a job for processing to know which runner executed the build. Here, it's using the hostname from the system'sHOSTNAMEenvironment variable.
With that command, you have the Drone CI runner set up, ready to process any jobs it fetches from the server. To make sure the runner is configured correctly, check the logs using the docker logs runner command. If you set everything correctly, you'll see the runner start and ping the Drone CI server successfully:
time="2020-07-10T06:33:08Z" level=info msg="starting the server" addr=":3000"
time="2020-07-10T06:33:08Z" level=info msg="successfully pinged the remote server"
If the runner can't connect to the server, make sure the server is running, and the DRONE_RPC_SECRET environment variable used to start up both the server and runner are the same. Those issues were the main problems I encountered when first setting up Drone CI.
With the Drone CI server and runner set up, the last step is to connect a code repository and set it up to run your builds after every commit.
Setting up your repository for Drone CI
For this article, I created a repository containing a TestCafe test suite based on the code samples used in my book End-to-End Testing with TestCafe. This test suite includes 11 end-to-end tests covering an application called TeamYap, built to complement the book. I'll use this repository to demonstrate how to connect Drone CI to a GitHub repo and configure the build process to run the tests.
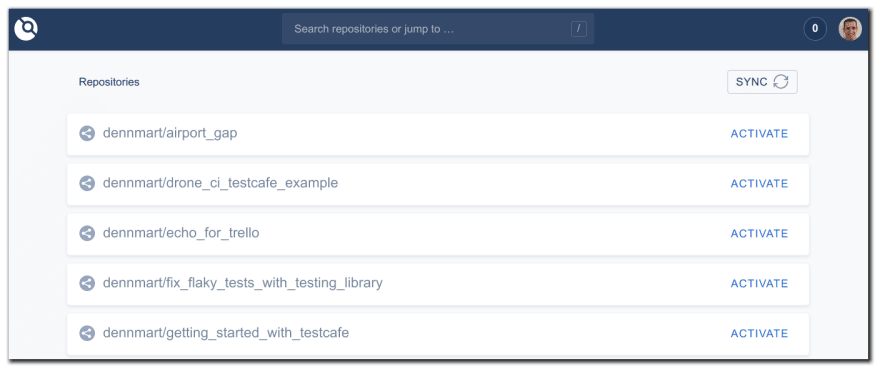
First, log in to the Drone CI server interface. Once Drone CI pulls in your GitHub repositories, find the repo you want to use and click the "Activate" link. This link takes you to the settings page for the repo where you can connect it with GitHub.
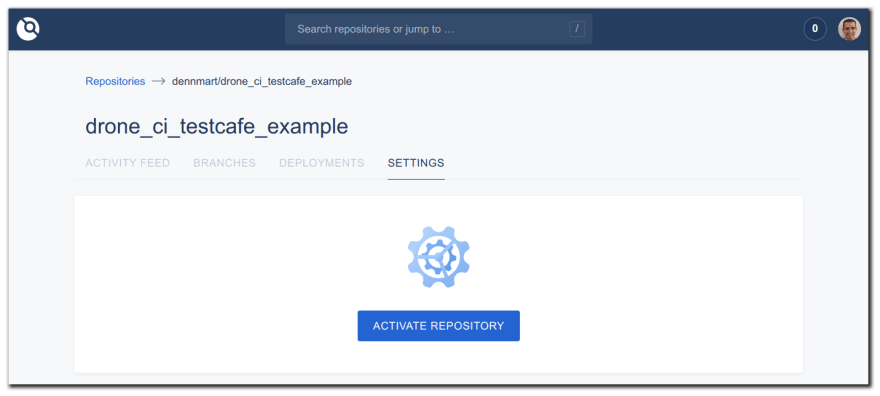
Activating the repo sets up a webhook in the GitHub repo that will send information to Drone CI every time new code gets committed. When Drone CI receives this data, it creates a job for a build and waits for a runner to pick it up.
After activating the repo, you can spend some time configuring how it will interact with Drone CI. You can set up cron jobs to automatically run builds at predetermined times, or prevent pull requests or forked repos to trigger new builds, among other settings.
For the TestCafe test suite used in this article, I had to set up a few secrets. Some of the tests use environment variables to avoid putting plain-text passwords in the repository. You can set these secrets through the Drone CI interface, which I can then configure as environment variables when running the build. In this example, I set up two secrets, called admin_password and regular_password. You'll see these secrets in use later in this article.
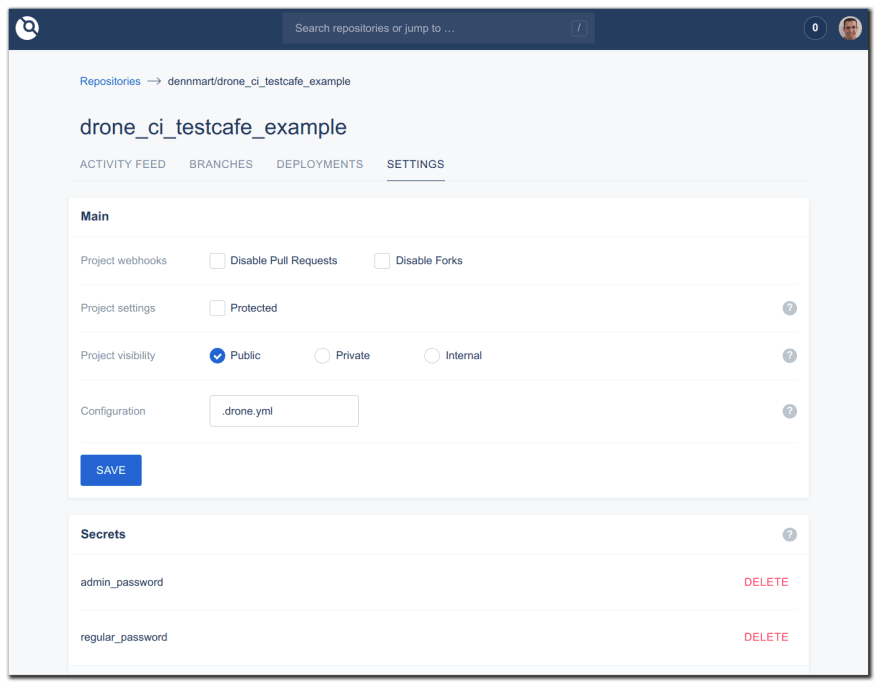
The last step needed to run your builds on Drone CI is to set up a configuration file inside the code repository to set up a pipeline. A pipeline is the series of steps you want the runner to execute, like running tests or deploying your code to a staging environment. These steps are defined in a YAML file placed in the root of your code repository. By default, these steps should be in a file called .drone.yml, but you can change this in the settings page on Drone CI.
Inside the .drone.yml file, you can begin to set up the steps needed to trigger a build successfully. A high-level overview of the steps used to run TestCafe tests for this example are:
- Pull in the TestCafe Docker image to use as the base for running the tests.
- Set up environment variables from the configured secrets inside Drone CI.
- Execute the tests.
Here's the .drone.yml file used in this repository for running these steps:
kind: pipeline
type: docker
name: default

steps:
- name: testcafe
  image: testcafe/testcafe
  commands:
  - /opt/testcafe/docker/testcafe-docker.sh chromium *_test.js
  environment:
    ADMIN_PASSWORD:
      from_secret: admin_password
    REGULAR_PASSWORD:
      from_secret: regular_password
Here's a brief explanation of each key and value in this file:
-
kind: Defines the kind of process Drone CI uses to process the remainder of the YAML in this file. In this case, it tells Drone CI that these instructions are to execute a pipeline of instructions using thepipelinevalue. -
type: Defines what pipeline to use for running the steps defined later in the file. Since we're using a Docker runner, it uses thedockervalue. -
name: Defines the name of the pipeline for identifying when running builds. This example usesdefault, but it can be anything. -
steps: Defines a series of steps for execution in the runner. Inside of this key, you'll have an array of pipeline steps that run serially. This configuration file only has a series of pipeline steps with their configuration settings.
Within the steps key, you'll find additional configuration settings:
-
name: Defines the name of the pipeline step, which is useful for seeing each step of the process in the Drone CI interface. You can set any identifiable name in this setting. -
image: Since this is a Docker pipeline, this defines the Docker image you want to use to execute the commands for the step. Drone CI pulls this image automatically and clones your code inside of the container. -
commands: Defines an array of shell commands that get executed inside of the Docker container. If any command returns a non-zero status after execution, the pipeline step will fail. -
environment: Allows you to set up any environment variables inside of the Docker container. In this example, the file sets up an environment variable by using thefrom_secretkey. This key tells Drone CI to fetch the value from the Secrets section in the project's settings.
This YAML file is all that's needed to run the TestCafe tests in Drone CI. Commit this file to the root of your code repository and push it to GitHub. Your Drone CI instance will receive a webhook from GitHub and kick off the build.
Before wrapping up, I wanted to explain a few issues I had to deal with before getting the test suite to execute successfully.
Pitfalls encountered when running TestCafe tests on Drone CI using Docker
For these tests, I opted to use the official TestCafe Docker image, which I have written about before. This Docker image has everything needed to execute a TestCafe test suite, so you don't have to spend time setting up dependencies using a different image.
When you use the Docker image outside of Drone CI, you simply need to specify a browser (either Chromium or Firefox, which are already set up in the image) and the test files. However, you can't run your tests like this in Drone CI. That's because any commands specified in the commands section of the .drone.yml file will override the ENTRYPOINT command specified in the Docker image.
The TestCafe image contains an entry point that's important for getting tests to run. The entry point executes a script that sets up a display server to allow the browsers to work inside the container and runs the TestCafe executable with a few arguments. Initially, I attempted to execute the test suite using the command testcafe chromium *_test.js in .drone.yml, but this overrode the entry point, and the tests couldn't run.
To get around this, I'm specifying the same script used as the entry point defined in the image's Dockerfile, along with the commands to execute the tests. Using the script sets up the Docker container correctly, allowing the tests to run successfully.

Using the script for the entry point isn't ideal since its purpose is not immediately apparent. Any developer or tester looking at this file would have to find the script in TestCafe's repository to figure out what it does. Also, if the maintainers of the TestCafe Docker image change this entry point, your builds will begin to fail, and you'll have to update the Drone CI configuration. But for now, this keeps our builds working.
Summary
This article barely scratched the surface of what Drone CI can do. You can run multiple pipelines in your project, like setting up different steps for unit and integration tests in the same build. You can also configure it to automatically deploy your code upon a successful build. The Drone CI documentation goes into more detail about all of its functionality.
In this article, I showed how simple it is to get an instance of Drone CI set up. You learned how to connect your GitHub account to the Drone CI server, and set up a runner to poll and fetch new jobs for execution. It also has a simple example of running end-to-end tests using TestCafe and some tricky areas you may need to navigate to get your builds working.
Besides how well Drone CI worked for my use case, I was surprised at how quickly I managed to get this system working. Between setting up the server and runner and getting my tests to run, the entire process took me about an hour starting from scratch.
If you're looking for a self-hosted continuous integration solution, I recommend taking Drone CI for a spin. It covers almost all continuous integration and continuous delivery needs your organization may have, regardless of which source code management provider or server architecture you use.

Top comments (0)