If your team has built an end-to-end test suite using TestCafe, it's beneficial for you to run those tests consistently while performing your work, whether you're a developer or tester. However, if this is your first time running TestCafe locally, you have to install a few dependencies to get things up and running.
You can go through the process of installing each dependency required by TestCafe, but it takes time to find the dependencies you need, download them, and install everything. You also need to make sure to keep these dependencies up to date. If you run into problems along the way, it can turn into a rabbit hole where you can waste lots of time.
You don't have to waste your valuable time dealing with this dependency cycle. You can leverage the power of Docker to handle it for you. TestCafe offers an official Docker image with all required dependencies installed and ready to go. This article covers the basics of using the TestCafe Docker image to run your tests.
Why use TestCafe's Docker image?
Docker helps you get up and running quickly by having all dependencies set up in one consistent place. Instead of downloading and installing things one by one, all you need to do is pull a single image containing everything you need to get your test suite running.
TestCafe's installation process is straightforward, but you may have issues getting things up and running locally. For example, TestCafe relies on Node.js to work, and you also need at least one supported browser set up in your system. In some cases, you may not have the ability to easily perform these installations for different reasons, such as having limited permissions on your work computer's user account.
There's also the scenario of running your end-to-end tests on different environments, such as a continuous integration system. Chances are these systems won't contain all the required dependencies you need to get your tests to execute. Also, you'll need to ensure these systems remain up to date for each dependency.
One of the main benefits of using Docker is that you can use the same image on multiple operating systems and not have to worry about something working differently on each tester's system. It ensures a consistent image with all you need across all environments, provided you're using the same image version.
Well, there is one dependency...
When I said there's no need to install dependencies, that's a bit of a lie. Docker needs to be up and running in your system. This article assumes you have an idea about what Docker can do, is so we won't go through that topic. If you're new to Docker and want to learn more about what it is and what it can help you with, this Docker for Beginners tutorial is an excellent starting point.
We also won't go through the installation process of Docker in this article. The official Docker documentation contains the latest installation instructions for Windows, Mac, and Linux.
If you have any questions about Docker or any issues getting Docker installed on your system, leave a comment below, and I'll give you a hand.
Getting TestCafe's Docker image
Once Docker is set up on your local environment, you need to pull the official TestCafe Docker image with a straightforward command:
docker pull testcafe/testcafe
This command pulls in the latest image of the TestCafe Docker image, which uses the stable version of TestCafe. As of this writing, the latest stable version of TestCafe is 1.8.2.
TestCafe also provides other tagged Docker images, although you might want to stick with the latest stable version to avoid any issues:
- The
alphatagged image (docker pull testcafe/testcafe:alpha) contains the latest alpha release of TestCafe (currently version 1.8.3-alpha.3 as I type this). This version of the Docker image is useful if you want to check out an upcoming version of TestCafe, but I would not recommend using this in your real testing pipeline. - The
rctagged image (docker pull testcafe/testcafe:rc) contains the latest release candidate of TestCafe for the upcoming stable version. Currently, there's no release candidate for TestCafe 1.8.3, so the current image uses the previous release candidate, version 1.8.2-rc.1.
The latest Docker image contains all the dependencies you need to run TestCafe. The image includes the TestCafe executable for running your tests, and it also includes recent versions of the Firefox and Chromium browsers to run your tests. You can run your tests in headless mode or normal mode since the image sets up the Xvfb display server. This display server allows you to use functionality like taking screenshots during your test runs.
Note that when you run the tests using the Docker image, you won't see the browser open up and run your tests even in normal mode. Running graphical interfaces using Docker on your desktop - such as a web browser - requires additional configuration to allow Docker to use your desktop's display server. It's not a simple solution and varies by system. If you want to see the browser run your tests, you'll need to set up TestCafe in your local system.
Another note is that while the included browsers are recent versions, they're still a few releases behind the latest stable releases. The included browsers are still recent enough - released a little over a month ago - that it won't cause any problems running your tests. If you need to use a different browser version on the Docker image, like a recent stable or beta version, you can use the TestCafe Docker image as a parent image and create your custom Docker image to fit your needs.
Running your tests on TestCafe's Docker image
To run your TestCafe test suite on the Docker image, you need to use the docker run command along with a few additional parameters for setting up your test directory inside the container and the command to execute your tests.
First, let's start with the structure of the command, then we'll break it down into each parameter and command to explain what each does:
docker run --rm -v ${TEST_FOLDER}:/tests -it testcafe/testcafe ${BROWSER} ${TEST_FILES}
The docker run command tells Docker to run the specified image in its separate container. For more information on how this works, check out Docker's documentation.
The next parameter, --rm, is an optional parameter to tell Docker to remove the container once it finishes executing its commands. By default, Docker keeps the container's file system when the container's commands finish. Keeping the file system is useful for debugging or getting any data from the container after running. But for short-lived processes like running end-to-end tests, it's best to remove them to avoid cluttering your disk space.
The -v parameter tells Docker to mount a directory from your computer to a directory inside the container. This way, the container can access your local test files. In this case, ${TEST_FOLDER} is the location of your TestCafe tests in your local environment, and /tests is the directory inside the container. Don't for the colon (:) separator between the local and container directories.
We're using /tests in this example, but it can be anything you want. But keep in mind where you mount the directory as you'll need it when running your TestCafe command later.
Next, the -it parameter tells Docker to run the specified image in interactive mode. In short, it sets up an interactive shell to pipe in what the container is doing to our terminal window. If you run this command without the -it parameter, it still executes the command but won't display its execution correctly on your terminal.
After setting up the parameters we need for Docker, we need to define the image we want to use for our virtualized container. For us, it's the testcafe/testcafe image. You can also use testcafe/testcafe:alpha or testcafe/testcafe:rc to use the alpha or release candidate images, respectively.
Finally, we get to the commands that we want to run inside the container. For the ${BROWSER} parameter, you can use either firefox or chromium as those are the pre-installed browsers in the Docker image. Then you can define which test files you want to execute in the ${TEST_FILES} parameter.
Keep in mind that you need to use the path where the files are located inside the container , not in your local system. Here's where the mounted directory command comes into play as defined with the -v ${TEST_FOLDER}:/tests parameter in the command. Using this example, if you want to execute a test file called my_test_file.js in your test directory, the ${TEST_FILES} parameter should be /tests/my_test_file.js.
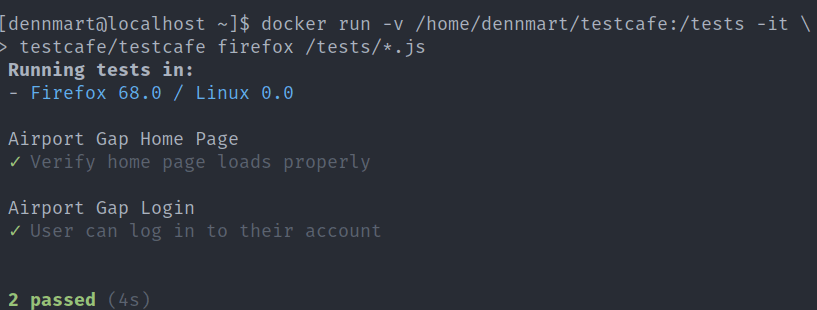
Let's use an example to see how the TestCafe Docker image works in practice. Let's say we have a copy of the tests used in the Getting Started with TestCafe article, which you can find on GitHub. The test files are in the /home/dennmart/testcafe directory on the local development system. To execute these tests using Firefox on the Docker image, we can use this command:
docker run -v /home/dennmart/testcafe:/tests -it testcafe/testcafe firefox /tests/*.js
This command tells the Docker to spin up an isolated container using the TestCafe Docker image, mounts the tests from my development system to the /tests directory inside the container, and executes TestCafe using Firefox and the tests inside the container's mounted directory. We can then see the test execution completes successfully.
One thing to point out is that you may have noticed we're not explicitly the testcafe command to execute the tests. We don't need to because the TestCafe Docker image automatically runs a script as its entry point, which sets up a few things like the Xvfb display server before executing TestCafe with the commands and arguments defined in our docker run command. This initial setup helps run our tests smoothly and consistently with the Docker image.
There are a few additional things you can do with the TestCafe Docker image, such as running your tests on a remote browser. If you're interested in other ways to use the image, check out TestCafe's documentation.
Caveat: You can't use it as-is if you have additional dependencies
The examples above show how you can run basic TestCafe tests using TestCafe's supported Docker image. However, the TestCafe Docker image only works as-is if you don't have any additional dependencies.
For example, let's say you want to use the Testing Library set of utilities for these same tests, as described in a previous article on Dev Tester. Testing Library is an extra dependency that you need to install to get it working for your tests. The TestCafe Docker image does not handle this automatically for you, so you can't run your tests.
As mentioned earlier, you can create a custom Docker image using the TestCafe Docker image as your parent image. For instance, you can add an extra step when creating your custom Docker image that installs these additional dependencies. That way, your tests can run without issues.
This step adds complexity and overhead to your testing pipeline since you'll need to keep your custom image up to date. If you're experienced enough with Docker, this solution works well enough while keeping the benefits of using the TestCafe Docker image.
Summary
This article demonstrates how beneficial using a virtualized service like Docker to run your end-to-end tests with little effort. There's nothing to install (besides Docker itself), so you don't have to waste time downloading and setting up TestCafe's dependencies.
TestCafe keeps the Docker image up to date every time there's a new release. You can also use the images to test out future stable releases by trying out Docker images of the Release Candidate and Alpha versions of TestCafe. These images are handy to check for bug fixes in future releases of TestCafe if you encounter any issues with the current stable release.
There is a caveat, however. If you require additional dependencies to execute your tests, the TestCafe Docker image alone won't work. You'll need to create a custom Docker image that fits your needs, which is extra work for your testing process.
However, if you have a suite of TestCafe tests with no additional dependencies, try out the TestCafe Docker image. It gets you up and running promptly, and saves you time and effort on getting TestCafe installed on your system.
How have you or your team leveraged Docker to help with your end-to-end testing? Let me know in the comments below, and I'll add them in a future Dev Tester article!
P.S. Was this article helpful to you? I'm currently writing a book that will cover much more about about the TestCafe testing framework.
With the End-to-End Testing with TestCafe book, you will learn how to use TestCafe to write robust end-to-end tests on a real web app and improve the quality of your code, boost your confidence in your work, and deliver faster with less bugs.
For more information, go to https://testingwithtestcafe.com. Sign up and stay up to date!

Top comments (0)