- Introduction
-
Deep dive into the
curlcommand - Create a deployable Shell script to minimize and upload images
- Generate a WordPress application username and password
- Conclusion
- What To Do Next
- Troubleshooting
Introduction
There are several limitations when using a shared WordPress (WP) hosting. If you have used wp-cli, you would have known that you can perform most of the WP functions, such as publishing a new post, uploading media, etc from your local terminal, which saves a lot of time.
However, wp-cli requires you to have administrator access on the host computer, which is not usually granted to shared hosting users. This means that you have to perform most of the WP functions from the WordPress web UI, which usually takes longer to navigate and process due to the graphical load.
What is a better solution for web administrators of a shared WordPress hosting?
The answer is to deploy a pipeline that can perform a single WP function, such as creating a new post, or a combination, such as minimizing and uploading images, using shell scripts and the WordPress RESTful APIs.
In this tutorial, you will use a Shell function to minimize multiple images and upload them to your shared WordPress account. You’ll use the id of each image to perform further processing.
Deep dive into the curl command
Before diving into deploying the pipeline, let’s take a peek at how the WordPress RESTful API works, in particular the REST API Media base route /wp-json/wp/v2/media, with the curl command.
See below to take a deep dive into curl command.
To upload an image to WordPress with curl, we have to specify:
- RESTful API method
-X - RESTful API endpoint URL
--url - path of image file
--data-binary - multiple headers each with
-H - parameter
--location
Let’s look at an example:
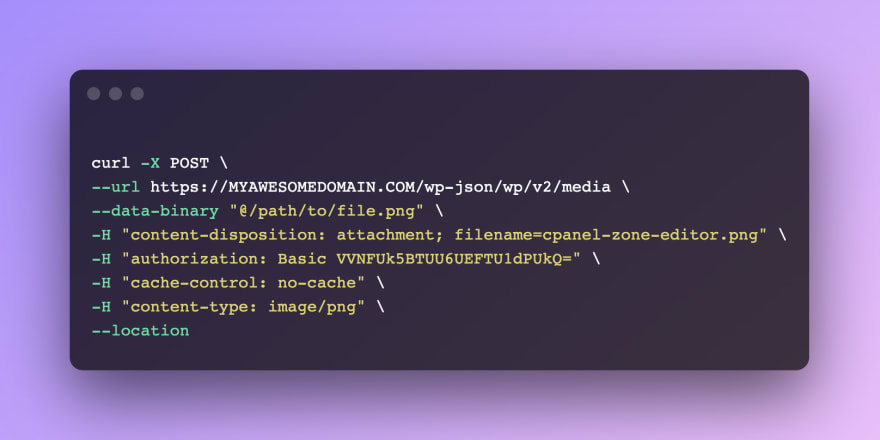
We use the RESTful API method -X POST because we are updating the image to the WordPress database.
The RESTful API endpoint --url is your domain name, e.g MYAWESOMEDOMAIN.COM followed by /wp-json/wp/v2/media.
The path of image file --data-binary has to be prefixed by @, e.g. "@/path/to/file.png".
The header -H for content-disposition requires a filename=file.png
The header -H for authorization requires a string token from your Wordpress application USERNAME:PASSWORD string combination. Execute the command echo -n "USERNAME:PASSWORD" | base64 to generate an output string token, e.g. VVNFUk5BTUU6UEFTU1dPUkQ=.
The header -H for cache-control disables cache, while the header -H for content-type specifies the image type, e.g. image/png.
And finally, the parameter --location will make curl redo the request if the requested page has moved to a new location.
Limitation of curl
The limitation of using curl command when uploading an image file is that it only allows one file per request. Ideally, we want to be able to specify multiple files using wildcards within a single command.
Create a deployable Shell script to minimize and upload images
In this section, let’s create a Shell script in any text editor, and name the file wprc.sh.
This section requires both the WordPress application USERNAME and PASSWORD. If you don’t have these, you can generate them in the next section Generate a WordPress application username and password.
Requirement
- WordPress application
USERNAMEandPASSWORD - Shell terminal, e.g.
bash - Shell commands
curlandbase64 - Any text editor
Understand function wp-upload
Open the Shell file wprc.sh, and let’s write a function to encapsulate the curl command, such as wp-upload(). This function loops through all files found within a given path, and executes the curl command for each file.
wp-upload: Minimizes and uploads image(s) to WordPress
Usage: [WP_DEBUG=false] wp-upload [WP_PATH]
The function accepts one parameter, which is the given path the the image files, e.g. /path/to. We should assert that at least one valid file in the path before running the loop.
The onus is on the user to ensure that all files in the given path are image files, e.g. jpeg or png, that are supported by the HTTP application/type. For example image/jpeg is supported, but not jpg.
Some common image types are:
image/apngimage/avifimage/gifimage/jpegimage/pngimage/svg+xmlimage/webp
The Shell method extracts and sets the image/TYPE from the extension of each file, e.g. filename.jpeg. If the image type is invalid, then the curl command will fail. Hence, the user has to ensure that the extension of each file corresponds to a valid image type, e.g. filename.svg+xml.
Execute command wp-upload
The environment variables WP_USERNAME and WP_PASSWORD are required for WordPress authentication. You can save these variables in a separate file, one variable per line, such as env.sh and load the variables with source env.sh before running the function.
Alternatively, you can set these variables at each command as follows:
$ WP_USERNAME=USERNAME WP_PASSWORD=PASSWORD wp-upload
The function prompts for a user confirmation before executing the curl command.
  WP_PATH=/Users/dennislwm/fx-git-pull/MYAWESOMEDOMAIN.COM/minify
Upload 2 image(s) to WordPress?
Enter yes to confirm; OR BLANK to quit: yes
The only accepted value is yes, as all other values will terminate the function. For each file upload that succeeds, the media id is returned, e.g. 5873.
Uploading BlessingsInHarmony.jpeg
  % Total % Received % Xferd Average Speed Time Time Time Current
                                 Dload Upload Total Spent Left Speed
100 275k 0 4243 100 271k 1731 110k 0:00:02 0:00:02 --:--:-- 112k
5873
Uploading Order_Xmas T-Shirt.png
  % Total % Received % Xferd Average Speed Time Time Time Current
                                 Dload Upload Total Spent Left Speed
100 760k 0 4213 100 756k 974 175k 0:00:04 0:00:04 --:--:-- 176k
5874
done
Debug function wp-upload
The function has a debug mode WP_DEBUG=true that prints the curl command for each file without executing it.
See below to debug function wp-upload.
$ WP_DEBUG=true wp-upload
The result is as follows:
Uploading BlessingsInHarmony.jpeg
curl -X POST --url https://MYAWESOMEDOMAIN.COM/wp-json/wp/v2/media --data-binary "@/Users/dennislwm/fx-git-pull/MYAWESOMEDOMAIN.COM/minify/BlessingsInHarmony.jpeg" -H "content-disposition: attachment; filename=BlessingsInHarmony.jpeg" -H "authorization: Basic VVNFUk5BTUU6UEFTU1dPUkQ=" -H "cache-control: no-cache" -H "content-type: image/jpeg" --location
Uploading Order_Xmas T-Shirt.png
curl -X POST --url https://MYAWESOMEDOMAIN.COM/wp-json/wp/v2/media --data-binary "@/Users/dennislwm/fx-git-pull/MYAWESOMEDOMAIN.COM/minify/Order_Xmas T-Shirt.png" -H "content-disposition: attachment; filename=Order_Xmas T-Shirt.png" -H "authorization: Basic VVNFUk5BTUU6UEFTU1dPUkQ=" -H "cache-control: no-cache" -H "content-type: image/png" --location
done
Source code wprc.sh
The source code of wprc.sh contains both the functions wp-upload and inp-confirm. Before running these commands, you have to load the file with source wprc.sh.
See below for the source code wprc.sh.
wp-upload() {
    cancel=true
    echo "wp-upload: Minimizes and uploads image(s) to WordPress"
    echo "Usage: [WP_DEBUG=$WP_DEBUG] wp-upload [WP_PATH]"
    echo "Input:"
    echo " [WP_PATH]: /path/to/image (default: /Users/dennislwm/fx-git-pull/MYAWESOMEDOMAIN.COM/minify)"

    WP_PATH="/Users/dennislwm/fx-git-pull/MYAWESOMEDOMAIN.COM/minify"
    if [! -z "$1"]; then
        WP_PATH=$1
    fi
    WP_TOTAL=$( ls -lAd "$WP_PATH"/* | wc -l | xargs )
    echo " WP_PATH=$WP_PATH"
    echo "Upload $WP_TOTAL image(s) to WordPress? "

    confirm=$( inp-confirm )
    if ["$confirm" = "yes"]; then
        cancel=false
        for file in "$WP_PATH"/*; do
            wp_name=$( basename "$file" )
            wp_ext="${wp_name##*.}"
            echo "Uploading $wp_name"

            wp_data=$( printf '"@%s"' "$file" )
            wp_token=$( echo -n "$WP_USERNAME:$WP_PASSWORD" | base64 )
            wp_header1="$( printf '"content-disposition: attachment; filename=%s"' "$( basename "$wp_name" )" )"
            wp_header2="$( printf '"authorization: Basic %s"' "$wp_token" )"
            wp_header3="$( printf '"cache-control: no-cache"' )"
            wp_header4="$( printf '"content-type: image/%s"' "$wp_ext" )"
            if ["$WP_DEBUG" = "true"]; then
                echo curl -X POST --url https://MYAWESOMEDOMAIN.COM/wp-json/wp/v2/media --data-binary "$wp_data" -H "$wp_header1" -H "$wp_header2" -H "$wp_header3" -H "$wp_header4" --location
            else
                eval curl -X POST --url https://MYAWESOMEDOMAIN.COM/wp-json/wp/v2/media --data-binary "$wp_data" -H "$wp_header1" -H "$wp_header2" -H "$wp_header3" -H "$wp_header4" --location | jq ".id"
            fi
        done
    fi
    if $cancel; then
        echo "user cancel"
    else
        echo "done"
    fi
}

inp-confirm() {
    read -p "Enter yes to confirm; OR BLANK to quit: " name
    if [-z $name]; then
        echo ""
    else
        echo $name
    fi
}
Generate a WordPress application username and password
Requirement
- WordPress GUI admin access
- WordPress iThemes Security plugin
- WordPress Application Passwords plugin
WordPress REST API
The iThemes Security plugin offers a setting to Restrict Access to most REST API data.
To activate the setting, navigate to
Security>Settings>WordPress Tweaks>Configure SettingsScroll to the REST API section, and select the
Restricted Accesssetting.
The plugin can only enable/disable access to everyone at once, however, it’s not possible to allow specific users to access the REST API.
Allow Specific Users to the WP REST API
Install Application Passwords Plugin
In order to allow a specific user (or application) to access the REST API, you must install the Application Passwords plugin.
See below to install Application Passwords plugin.
Navigate to
Plugins>Add New> TypeApplication Passwordsin the Search box > PressEnterkey > ClickInstall Nowon the plugin.To allow a specific user, navigate to
Users>All Users> ClickEditfor theUSERNAMEthat you want to enable access.Scroll to the Application Passwords section, and type a new Application Name and Click
Add New.Copy down the generated password, e.g.
S5hd Tp3K GdhU GFXd zJhQ Wtwa

Test Specific User Access to the WP REST API
The WP REST API Media base route is /wp-json/wp/v2/media. This API Reference provides information about the specific endpoints available through the API, their parameters, and their response data format.
For example, if the host is MYAWESOMEDOMAIN.COM, then the URL is https://MYAWESOMEDOMAIN.COM/wp-json/wp/v2/media.
See below to test specific user access to the WP REST API.
- Open a terminal and type the following command. Replace
USERNAME:PASSWORDwith your username and application password.

- If successfully connected, you should get a
JSONresponse. For example:
   {
      "id":5831,
      "date":"2021-10-15T22:41:47",
      "date_gmt":"2021-10-15T14:41:47",
      "guid":{
         "rendered":"https:\/\/MYAWESOMEDOMAIN.COM\/wp-content\/uploads\/2021\/10\/26-September-2021-Infant-Baptism.jpg"
      },
      "modified":"2021-10-15T22:41:47",
      "modified_gmt":"2021-10-15T14:41:47",
      "slug":"26-september-2021-infant-baptism-2",
      "status":"inherit",
      "type":"attachment",
      "link":"https:\/\/MYAWESOMEDOMAIN.COM\/26-september-2021-infant-baptism\/26-september-2021-infant-baptism-2\/",
      "title":{
         "rendered":"26 September 2021 – Infant Baptism"
      },
      "author":3,
      "comment_status":"closed",
      "ping_status":"closed",
      "template":"",
      "meta":{
         "ngg_post_thumbnail":0
      },
      "description":{
         "rendered":"<p class=\"attachment\"><a href='https:\/\/MYAWESOMEDOMAIN.COM\/wp-content\/uploads\/2021\/10\/26-September-2021-Infant-Baptism.jpg'><img width=\"300\" height=\"200\" src=\"https:\/\/MYAWESOMEDOMAIN.COM\/wp-content\/uploads\/2021\/10\/26-September-2021-Infant-Baptism-300x200.jpg\" class=\"attachment-medium size-medium\" alt=\"\" srcset=\"https:\/\/MYAWESOMEDOMAIN.COM\/wp-content\/uploads\/2021\/10\/26-September-2021-Infant-Baptism-300x200.jpg 300w, https:\/\/MYAWESOMEDOMAIN.COM\/wp-content\/uploads\/2021\/10\/26-September-2021-Infant-Baptism-1024x683.jpg 1024w, https:\/\/MYAWESOMEDOMAIN.COM\/wp-content\/uploads\/2021\/10\/26-September-2021-Infant-Baptism-768x512.jpg 768w, https:\/\/MYAWESOMEDOMAIN.COM\/wp-content\/uploads\/2021\/10\/26-September-2021-Infant-Baptism.jpg 1405w\" sizes=\"(max-width: 300px) 100vw, 300px\" \/><\/a><\/p>\n"
      },
      "caption":{
         "rendered":""
      },
      "alt_text":"",
      "media_type":"image",
      "mime_type":"image\/jpeg",
      "media_details":{
         "width":1405,
         "height":937,
         "file":"2021\/10\/26-September-2021-Infant-Baptism.jpg",
         "sizes":{
            "medium":{
               "file":"26-September-2021-Infant-Baptism-300x200.jpg",
               "width":300,
               "height":200,
               "mime_type":"image\/jpeg",

      }
   }
Conclusion
In this tutorial, you used a Shell function to minimize multiple images and upload them to your shared WordPress account. You then used the id of each image to perform further processing.
What To Do Next
- Implement Compression - This is to minimize each image before uploading, e.g. package the Node.js script that uses
gulp-imagemininto an executable. - Implement Assertions - This is to check for valid extensions of each image file to ensure that the
curlcommand doesn’t fail, e.g.jpgis not a valid extension. - Implement Pipeline - This is to trigger the Shell function from a pipeline, e.g. execute
wp-uploadon agit push. - Add Processing - This is to process each image file uploaded given their unique IDs.
Troubleshooting
Error Access to REST API requests is restricted by iThemes Security settings.
You need to install Application Passwords plugin, and allow a specific user to access WP REST API.
Ensure that your username and application password is correct, when passed as a base64 string to WP REST API Basic Authentication.

Top comments (1)
Wow, this is very in-depth, I love it!