
Hey,
DeepCode provides plugins and extensions for Visual Studio Code and Atom. But what about including it into your CI pipeline? Well, there comes the CLI quite handy.
System: Ubuntu 18.04.4 LTS
Preparations:
There are a few steps I would suggest to do before installing the CLI.
(1) Make sure you have Python 3 and Pip3 installed.
~$ python3 --version
Python 3.6.9
~$ python3 -m pip --version
pip 9.0.1 from /usr/lib/python3/dist-packages (python 3.6)
If it is not installed, do so by calling:
sudo apt install python3.8
sudo apt install python3-pip
Note: You might want to use a separate environment (see pyenv) to separate it and keep things organized. With this, you can easily switch between environments - one of the great strengths of Python.
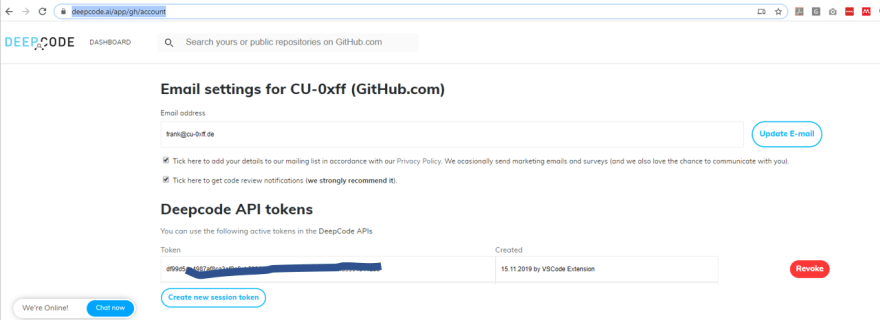
(2) Get an API key. On your DeepCode Account Dashboard you can generate new access tokens (scroll to the bottom).
(3) You can store the API key in the config file so you do not have to handle it again. You can also provide the API key using the -a parameter when calling the CLI. To store it in the config file, use the editor of your choice and generate a text file with the following content:
{"api_key": "[Your key goes here]"}
Per default, the name .deepcode.json is used.
Note: The CLI also supports the command config that records this file for you.
Installing DeepCode CLI:
(1) Installation is rather simple
pip3 install deepcode
You might have to restart the shell so that the path is set correctly and the deepcode command is found.
First Look Around:
Note: The parameter --help is always there for you.
In essence, the CLI supports three main commands: analyze, config, login.
With deepcode login, the command starts a browser and guides you through the login process. As we have an API key already, we do not need this for now.
deepcode config asks you two main questions (the service URL and the API code) and writes them to the default config file .deepcode.json. The service URL (default is DeepCode's internet-facing service) enables you to point towards your internal DeepCode server. The API key is the key you gathered as described above.
deepcode analyze provides the interface to send your code for analysis. There are three main things to be aware of:
Sources: You can provide a local path using the -p option or a remote, GIT repository using the -r option.
Linters: Providing the -l option asks DeepCode to run the optional linters. One word of warning: The speed of DeepCode analysis is way(!!) faster than the linters. Sending big chunks of source code may slow the answer down significantly when enabling the linters.
Output Format: Per default DeepCode returns a JSON format described here: REST API Bundles (see GetAnalysis Results). It has the following structure:
{ "id": string,
  "results": {
  "suggestions": {
    suggestionIndex: {
      "id": string,
      "message": string,
      "severity": 1 | 2 | 3
    },
    ...
  },
  "files": {
    filePath: {
      suggestionIndex: [
        {
          "cols": [number, number],
          "rows": [number, number],
          "markers": [marker, ...]
        },
        ...
      ],
      ...
    },
    ...
  }
 }
 "url", url
}
To map the many-to-many relationship between suggestions and files, each suggestion is identified by a short suggestionIndex string (e.g. "0", "1", etc). Every suggestion object contains the respective id, the description message, and a numeric severity (1 for Info suggestions, 2 for Warnings, or 3 for Critical issues). Each file is identified by its path and maps all the matching suggestions with the respective array of positions in the files. A position uses two ranges [ from , to ], one for the rows and one for the columns (cols), to describe an area of the file included between two characters. Each position also has an array of markers with the following structure:
{
  "msg": [number, number],
  "pos": [
    {
      "cols": [number, number],
      "rows": [number, number]
    },
    ...
  ]
}
Each marker object maps a substring of the suggestion's message, identified by the msg property as a [ from , to ] range between two characters, to an array of positions in the code (pos) where that substring has a meaningful match.
Additionally, you can find a unique identifier (id) and the URL (url) under which you can find the DeepCode dashboard for your request. The URL is valid for a day from the time you ran the analysis.
On top, the CLI provides exit codes:
0 - no issues found
1 - some issues found
2 - Execution was interrupted by the user
3 - Some error happened while executing
Example:
When running this command, you request a public demo repo from GitHub to run which results in three suggestions:
deepcode analyze -r https://github.com/CU-0xff/deepcode-vuln-logviewer.git@cu-0xff

Top comments (0)