
Red Hat permet l’accès à un bac à sable dans OpenShift Dedicated aux développeurs enregistrés sur sa plateforme :
Developer Sandbox for Red Hat OpenShift | Red Hat Developer
Le bac à sable est parfait pour accéder immédiatement à OpenShift et comprend notamment :
- CockroachDB, une base de données SQL distribuée.
- gitops-primer pour exporter vos fichiers YAML pour GitOps
- Red Hat OpenShift Serverless pour créer des fonctions en tant que service (FaaS)
- Red Hat Data OpenShift Science pour l’apprentissage machine (AI/ML)
Accès donc à mon bac à sable avec le dashboard d’OpenShift :


avec un terminal web comprenant les clients OpenShift et Kubectl :

Utilisation du client Odo comme dans un précédent article :
- odo - Developer CLI for OpenShift and Kubernetes | Red Hat Developer
- Améliorer l’expérience des développeurs avec OpenShift via OpenShift Do (Odo)
bash-4.4 ~ $ odo
odo is a CLI tool for running OpenShift applications in a fast and automated manner.
Reducing the complexity of deployment, odo adds iterative development without the worry of deploying your source code.

Find more information at https://github.com/redhat-developer/odo

Get started by creating a new application:

 git clone https://github.com/openshift/nodejs-ex && cd nodejs-ex
 odo create nodejs
 odo push

Your nodejs application has now been deployed. odo has pushed the source code, built the application and deployed it on OpenShift.
You can now edit your code in real time and watch as odo automatically deploys your application.

 odo watch

To access your application, create a URL:

 odo url create myurl
 odo push

More information such as logs or what components you've deployed can be accessed with these commands:

 odo describe
 odo list
 odo log

To see a full list of commands, run 'odo --help'
pour notre sempiternelle application en Node.js :
bash-4.4 ~ $ git clone https://github.com/deep75/fcdemo3
Cloning into 'fcdemo3'...
bash-4.4 ~ $ cd fcdemo3/
bash-4.4 ~/fcdemo3 $ odo catalog list components
Odo Devfile Components:
NAME DESCRIPTION REGISTRY
dotnet50 Stack with .NET 5.0 DefaultDevfileRegistry
dotnet60 Stack with .NET 6.0 DefaultDevfileRegistry
dotnetcore31 Stack with .NET Core 3.1 DefaultDevfileRegistry
go Go is an open source programming language that makes it easy... DefaultDevfileRegistry
java-maven Upstream Maven and OpenJDK 11 DefaultDevfileRegistry
java-openliberty Java application Maven-built stack using the Open Liberty ru... DefaultDevfileRegistry
java-openliberty-gradle Java application Gradle-built stack using the Open Liberty r... DefaultDevfileRegistry
java-quarkus Quarkus with Java DefaultDevfileRegistry
java-springboot Spring Boot using Java DefaultDevfileRegistry
java-vertx Upstream Vert.x using Java DefaultDevfileRegistry
java-websphereliberty Java application Maven-built stack using the WebSphere Liber... DefaultDevfileRegistry
java-websphereliberty-gradle Java application Gradle-built stack using the WebSphere Libe... DefaultDevfileRegistry
java-wildfly Upstream WildFly DefaultDevfileRegistry
java-wildfly-bootable-jar Java stack with WildFly in bootable Jar mode, OpenJDK 11 and... DefaultDevfileRegistry
nodejs Stack with Node.js 16 DefaultDevfileRegistry
nodejs-angular Angular is a development platform, built on TypeScript. As a... DefaultDevfileRegistry
nodejs-nextjs Next.js gives you the best developer experience with all the... DefaultDevfileRegistry
nodejs-nuxtjs Nuxt is the backbone of your Vue.js project, giving structur... DefaultDevfileRegistry
nodejs-react React is a free and open-source front-end JavaScript library... DefaultDevfileRegistry
nodejs-svelte Svelte is a radical new approach to building user interfaces... DefaultDevfileRegistry
nodejs-vue Vue is a JavaScript framework for building user interfaces. ... DefaultDevfileRegistry
php-laravel Laravel is an open-source PHP framework, which is robust and... DefaultDevfileRegistry
python Python is an interpreted, object-oriented, high-level progra... DefaultDevfileRegistry
python-django Django is a high-level Python web framework that enables rap... DefaultDevfileRegistry

bash-4.4 ~/fcdemo3 $ odo create nodejs

Devfile Object Creation
 ✓ Checking if the devfile for "nodejs" exists on available registries [52847ns]
 ✓ Creating a devfile component from registry "DefaultDevfileRegistry" [13s]
Validation
 ✓ Validating if devfile name is correct [57138ns]
 ✓ Validating the devfile for odo [26ms]
 ✓ Updating the devfile with component name "nodejs-fcdemo3-ofgj" [109ms]

Please use `odo push` command to create the component with source deployed
bash-4.4 ~/fcdemo3 $ odo push

Validation
 ✓ Validating the devfile [70599ns]

Creating Services for component nodejs-fcdemo3-ofgj
W1225 20:57:56.803635 567 warnings.go:70] org.eclipse.che/v1 CheCluster is deprecated and will be removed in future releases
W1225 20:57:57.407057 567 warnings.go:70] workspace.devfile.io/v1alpha1 DevWorkspace is deprecated; use workspace.devfile.io/v1alpha2 DevWorkspace
W1225 20:57:57.803839 567 warnings.go:70] workspace.devfile.io/v1alpha1 DevWorkspaceTemplate is deprecated; use workspace.devfile.io/v1alpha2 DevWorkspaceTemplate
W1225 20:58:06.003677 567 warnings.go:70] servicebinding.io/v1alpha3 ServiceBinding is deprecated; use servicebinding.io/v1beta1 ServiceBinding
 ✓ Services are in sync with the cluster, no changes are required

Creating Kubernetes resources for component nodejs-fcdemo3-ofgj
 ✓ Waiting for component to start [35s]
W1225 20:58:45.780113 567 warnings.go:70] org.eclipse.che/v1 CheCluster is deprecated and will be removed in future releases
W1225 20:58:46.381810 567 warnings.go:70] workspace.devfile.io/v1alpha1 DevWorkspace is deprecated; use workspace.devfile.io/v1alpha2 DevWorkspace
W1225 20:58:46.780100 567 warnings.go:70] workspace.devfile.io/v1alpha1 DevWorkspaceTemplate is deprecated; use workspace.devfile.io/v1alpha2 DevWorkspaceTemplate
W1225 20:58:54.980261 567 warnings.go:70] servicebinding.io/v1alpha3 ServiceBinding is deprecated; use servicebinding.io/v1beta1 ServiceBinding
 ✓ Links are in sync with the cluster, no changes are required
 ✓ Waiting for component to start [3ms]

Applying URL changes
 ✓ URL http-node: http://http-node-c40b0bf9-karim-dev.apps.sandbox.x8i5.p1.openshiftapps.com/ created

Syncing to component nodejs-fcdemo3-ofgj
 ✓ Checking files for pushing [2s]
 ✓ Syncing files to the component [20s]

Executing devfile commands for component nodejs-fcdemo3-ofgj
 ✓ Executing install command "npm install" [11s]
 ✓ Executing run command "npm start" [1s]

Pushing devfile component "nodejs-fcdemo3-ofgj"
 ✓ Changes successfully pushed to component
Le Pod est créé avec sa route dans OpenShift :
bash-4.4 ~/fcdemo3 $ kubectl get po -o wide
NAME READY STATUS RESTARTS AGE IP NODE NOMINATED NODE READINESS GATES
nodejs-fcdemo3-ofgj-app-759fb5f8d5-zqlbw 1/1 Running 0 4m7s 10.129.3.139 ip-10-0-202-251.ec2.internal <none> <none>
workspace68a36b9a46ba459a-6d89bbb69f-s7jw7 2/2 Running 0 41m 10.129.3.30 ip-10-0-202-251.ec2.internal <none> <none>

bash-4.4 ~/fcdemo3 $ kubectl logs po/nodejs-fcdemo3-ofgj-app-759fb5f8d5-zqlbw

Defaulted container "runtime" out of: runtime, copy-supervisord (init)
time="2022-12-25T20:58:40Z" level=info msg="create process:devrun"
time="2022-12-25T20:58:40Z" level=info msg="create process:debugrun"
time="2022-12-25T20:58:40Z" level=info msg="try to start program" program=devrun
time="2022-12-25T20:58:40Z" level=info msg="success to start program" program=devrun
time="2022-12-25T20:58:41Z" level=debug msg="wait program exit" program=devrun
time="2022-12-25T20:58:41Z" level=info msg="program stopped with status:exit status 0" program=devrun
time="2022-12-25T20:58:41Z" level=info msg="Don't start the stopped program because its autorestart flag is false" program=devrun
time="2022-12-25T20:59:17Z" level=debug msg="no auth required"
time="2022-12-25T20:59:28Z" level=debug msg="no auth required"
time="2022-12-25T20:59:28Z" level=debug msg="succeed to find process:devrun"
time="2022-12-25T20:59:28Z" level=info msg="try to start program" program=devrun
time="2022-12-25T20:59:28Z" level=info msg="success to start program" program=devrun
ODO_COMMAND_RUN is npm start
Changing directory to ${PROJECT_SOURCE}
Executing command cd ${PROJECT_SOURCE} && npm start

> service-provider-mock@0.0.0 start
> node ./bin/www

time="2022-12-25T20:59:29Z" level=debug msg="wait program exit" program=devrun
Server listening on http://0.0.0.0:3000
time="2022-12-25T20:59:30Z" level=debug msg="no auth required"
J’entre dans le shell du Pod :

bash-4.4 ~/fcdemo3 $ kubectl exec -it po/nodejs-fcdemo3-ofgj-app-759fb5f8d5-zqlbw -- /bin/bash

Defaulted container "runtime" out of: runtime, copy-supervisord (init)

bash-4.4$ cat /etc/os-release

NAME="Red Hat Enterprise Linux"
VERSION="8.7 (Ootpa)"
ID="rhel"
ID_LIKE="fedora"
VERSION_ID="8.7"
PLATFORM_ID="platform:el8"
PRETTY_NAME="Red Hat Enterprise Linux 8.7 (Ootpa)"
ANSI_COLOR="0;31"
CPE_NAME="cpe:/o:redhat:enterprise_linux:8::baseos"
HOME_URL="https://www.redhat.com/"
DOCUMENTATION_URL="https://access.redhat.com/documentation/red_hat_enterprise_linux/8/"
BUG_REPORT_URL="https://bugzilla.redhat.com/"

REDHAT_BUGZILLA_PRODUCT="Red Hat Enterprise Linux 8"
REDHAT_BUGZILLA_PRODUCT_VERSION=8.7
REDHAT_SUPPORT_PRODUCT="Red Hat Enterprise Linux"
REDHAT_SUPPORT_PRODUCT_VERSION="8.7"

bash-4.4$ ps aux

USER PID %CPU %MEM VSZ RSS TTY STAT START TIME COMMAND
1005220+ 1 0.0 0.0 710904 8500 ? Ssl 20:58 0:00 /opt/odo/bin/supervisord -c /opt/odo/conf/devfile-supervisor.conf
1005220+ 65 0.0 0.0 11928 2744 ? S 20:59 0:00 /bin/sh /opt/odo/bin/devfile-command devrun
1005220+ 67 0.1 0.1 727496 62480 ? Sl 20:59 0:00 npm start
1005220+ 78 0.0 0.0 11928 2792 ? S 20:59 0:00 sh /tmp/start-e7474728.sh
1005220+ 79 0.2 0.2 637608 77668 ? Sl 20:59 0:01 node ./bin/www
1005220+ 158 0.3 0.0 12060 3248 pts/0 Ss 21:07 0:00 /bin/bash
1005220+ 164 0.0 0.0 44700 3472 pts/0 R+ 21:07 0:00 ps aux
Création pendant ce temps d’une instance Ubuntu 22.04 LTS dans Linode :

et récupération de Warpgate, un bastion intelligent SSH, HTTPS et MySQL pour Linux. Installez-le dans votre DMZ, ajoutez des comptes d’utilisateurs et attribuez-les facilement à des hôtes et URL spécifiques au sein du réseau.
- Warpgate enregistre chaque session pour que vous puissiez la visualiser (en direct) et la rejouer ultérieurement via une interface web d’administration intégrée.
- Warpgate transmet vos connexions directement à la cible.
- Support natif de 2FA et SSO (TOTP et OpenID Connect).
- Un seul binaire sans dépendances.
- Écrit 100% en Rust …
GitHub - warp-tech/warpgate: Smart SSH, HTTPS and MySQL bastion that needs no client-side software

root@localhost:~# chmod +x warpgate-v0.7.0-x86_64-linux && mv warpgate-v0.7.0-x86_64-linux /usr/local/bin/warpgate
root@localhost:~# warpgate
warpgate 0.7.0

USAGE:
    warpgate [OPTIONS] <SUBCOMMAND>

OPTIONS:
    -c, --config <CONFIG> [default: /etc/warpgate.yaml]
    -d, --debug
    -h, --help Print help information
    -V, --version Print version information

SUBCOMMANDS:
    check Create a password hash for use in the config file
    client-keys Show Warpgate's SSH client keys
    help Print this message or the help of the given subcommand(s)
    recover-access Reset password and auth policy for a user
    run Run Warpgate
    setup Run first-time setup and generate a config file
    test-target Test the connection to a target host
    unattended-setup Run first-time setup non-interactively
Configuration et lancement de Warpgate :
root@localhost:~# warpgate setup
21:24:12 INFO Welcome to Warpgate 0.7.0
21:24:12 INFO Let's do some basic setup first.
21:24:12 INFO The new config will be written in /etc/warpgate.yaml.
21:24:12 INFO * Paths can be either absolute or relative to /etc.
✔ Directory to store app data (up to a few MB) in · /var/lib/warpgate
✔ Endpoint to listen for HTTP connections on · 0.0.0.0:8888
21:24:19 INFO You will now choose specific protocol listeners to be enabled.
21:24:19 INFO
21:24:19 INFO NB: Nothing will be exposed by default -
21:24:19 INFO you'll set target hosts in the config file later.
✔ Accept SSH connections? · yes
✔ Endpoint to listen for SSH connections on · 0.0.0.0:2222
✔ Accept MySQL connections? · yes
✔ Endpoint to listen for MySQL connections on · 0.0.0.0:33306
✔ Do you want to record user sessions? · yes
✔ Set a password for the Warpgate admin user · ********
21:24:39 INFO Generated configuration:
---
sso_providers: []
recordings:
  enable: true
  path: /var/lib/warpgate/recordings
external_host: ~
database_url: "sqlite:/var/lib/warpgate/db"
ssh:
  enable: true
  listen: "0.0.0.0:2222"
  keys: /var/lib/warpgate/ssh-keys
  host_key_verification: prompt
http:
  enable: true
  listen: "0.0.0.0:8888"
  certificate: /var/lib/warpgate/tls.certificate.pem
  key: /var/lib/warpgate/tls.key.pem
mysql:
  enable: true
  listen: "0.0.0.0:33306"
  certificate: /var/lib/warpgate/tls.certificate.pem
  key: /var/lib/warpgate/tls.key.pem
log:
  retention: 7days
  send_to: ~
config_provider: database

21:24:39 INFO Saved into /etc/warpgate.yaml
21:24:39 INFO Using config: "/etc/warpgate.yaml"
21:24:40 INFO Migrating config file into the database
21:24:40 INFO Generating Ed25519 host key
21:24:40 INFO Generating RSA host key
21:24:40 INFO Generating Ed25519 client key
21:24:40 INFO Generating RSA client key
21:24:42 INFO Generating a TLS certificate
21:24:42 INFO
21:24:42 INFO Admin user credentials:
21:24:42 INFO * Username: admin
21:24:42 INFO * Password: <your password>
21:24:42 INFO
21:24:42 INFO You can now start Warpgate with:
21:24:42 INFO warpgate --config /etc/warpgate.yaml run

root@localhost:~# warpgate run

21:25:26 INFO Warpgate version=0.7.0
21:25:26 INFO Using config: "/etc/warpgate.yaml"
21:25:26 INFO --------------------------------------------
21:25:26 INFO Warpgate is now running.
21:25:26 INFO Accepting SSH connections on 0.0.0.0:2222
21:25:26 INFO Accepting HTTP connections on https://0.0.0.0:8888
21:25:26 INFO Accepting MySQL connections on 0.0.0.0:33306
21:25:26 INFO --------------------------------------------
21:25:26 INFO Listening address=0.0.0.0:2222
21:25:26 INFO Listening address=0.0.0.0:8888
21:25:26 INFO Listening address=0.0.0.0:33306
et connexion à l’interface graphique de Warpgate :


Installation de miniserve, un petit outil CLI écrit en Rust, autonome et multiplateforme et qui vous permet de un ou plusieurs fichiers via HTTP.
root@localhost:~# chmod +x miniserve-0.22.0-x86_64-unknown-linux-gnu && mv miniserve-0.22.0-x86_64-unknown-linux-gnu /usr/local/bin/miniserve
root@localhost:~# miniserve --help

miniserve 0.22.0
Sven-Hendrik Haase <svenstaro@gmail.com>, Boastful Squirrel <boastful.squirrel@gmail.com>
For when you really just want to serve some files over HTTP right now!

USAGE:
    miniserve [OPTIONS] [--] [PATH]

ARGS:
    <PATH>
            Which path to serve

OPTIONS:
    -a, --auth <AUTH>
            Set authentication. Currently supported formats: username:password, username:sha256:hash, username:sha512:hash (e.g. joe:123,
            joe:sha256:a665a45920422f9d417e4867efdc4fb8a04a1f3fff1fa07e998e86f7f7a27ae3)

    -c, --color-scheme <COLOR_SCHEME>
            Default color scheme

            [default: squirrel]
            [possible values: squirrel, archlinux, zenburn, monokai]

    -d, --color-scheme-dark <COLOR_SCHEME_DARK>
            Default color scheme

            [default: archlinux]
            [possible values: squirrel, archlinux, zenburn, monokai]

    -D, --dirs-first
            List directories first

    -F, --hide-version-footer
            Hide version footer

    -g, --enable-tar-gz
            Enable gz-compressed tar archive generation

    -h, --help
            Print help information

    -H, --hidden
            Show hidden files

        --header <HEADER>
            Set custom header for responses

        --hide-theme-selector
            Hide theme selector

    -i, --interfaces <INTERFACES>
            Interface to listen on

        --index <index_file>
            The name of a directory index file to serve, like "index.html"

            Normally, when miniserve serves a directory, it creates a listing for that directory. However, if a directory contains this file, miniserve will serve that file
            instead.

    -l, --show-symlink-info
            Visualize symlinks in directory listing

    -m, --media-type <MEDIA_TYPE>
            Specify uploadable media types

            [possible values: image, audio, video]

    -M, --raw-media-type <MEDIA_TYPE_RAW>
            Directly specify the uploadable media type expression

    -o, --overwrite-files
            Enable overriding existing files during file upload

    -p, --port <PORT>
            Port to use

            [default: 8080]

    -P, --no-symlinks
            Hide symlinks in listing and prevent them from being followed

        --print-completions <shell>
            Generate completion file for a shell

            [possible values: bash, elvish, fish, powershell, zsh]

        --print-manpage
            Generate man page

    -q, --qrcode
            Enable QR code display

    -r, --enable-tar
            Enable uncompressed tar archive generation

        --random-route
            Generate a random 6-hexdigit route

        --readme
            Enable README.md rendering in directories

        --route-prefix <ROUTE_PREFIX>
            Use a specific route prefix

        --spa
            Activate SPA (Single Page Application) mode

            This will cause the file given by --index to be served for all non-existing file paths. In effect, this will serve the index file whenever a 404 would otherwise occur
            in order to allow the SPA router to handle the request instead.

    -t, --title <TITLE>
            Shown instead of host in page title and heading

        --tls-cert <TLS_CERT>
            TLS certificate to use

        --tls-key <TLS_KEY>
            TLS private key to use

    -u, --upload-files [<ALLOWED_UPLOAD_DIR>...]
            Enable file uploading (and optionally specify for which directory)

    -U, --mkdir
            Enable creating directories

    -v, --verbose
            Be verbose, includes emitting access logs

    -V, --version
            Print version information

    -W, --show-wget-footer
            If enabled, display a wget command to recursively download the current directory

    -z, --enable-zip
            Enable zip archive generation

            WARNING: Zipping large directories can result in out-of-memory exception because zip generation is done in memory and cannot be sent on the fly
et exposition d’un dossier avec miniserve :
root@localhost:~# miniserve rathole/

miniserve v0.22.0
Bound to [::]:8080, 0.0.0.0:8080
Serving path /root/rathole
Available at (non-exhaustive list):
    http://127.0.0.1:8080
    http://139.144.180.183:8080
    http://[::1]:8080
    http://[2a01:7e01::f03c:93ff:fe0b:e749]:8080

Quit by pressing CTRL-C
Obtention de l’archive de Rathole sur Github, un programme écrit en Rust, qui agit comme frp et ngrok et peut aider à exposer son service derrière un NAT vers Internet via un serveur avec une IP publique :
root@localhost:~# cd rathole && wget -c https://github.com/rapiz1/rathole/releases/download/v0.4.7/rathole-x86_64-unknown-linux-gnu.zip
root@localhost:~/rathole# unzip rathole-x86_64-unknown-linux-gnu.zip
Archive: rathole-x86_64-unknown-linux-gnu.zip
  inflating: rathole
root@localhost:~/rathole# chmod +x rathole
root@localhost:~/rathole# ./rathole
error: The following required arguments were not provided:
    <CONFIG|--genkey [<CURVE>]>

USAGE:
    rathole [OPTIONS] <CONFIG|--genkey [<CURVE>]>

For more information try --help

Je peux écrire deux fichier de configuration en TOML pour rathole :
=> partie serveur
[server]
bind_addr = "0.0.0.0:2333" # `2333` specifies the port that rathole listens for clients

[server.services.nodejs]
token = "SI1r1vB25wmX2EBu" # Token that is used to authenticate the client for the service. Change to a arbitrary value.
bind_addr = "0.0.0.0:5202" # `5202` specifies the port that exposes `nodejs` to the Internet
=> partie cliente
# client.toml
[client]
remote_addr = "139.144.180.183:2333" # The address of the server. The port must be the same with the port in `server.bind_addr`

[client.services.nodejs]
token = "SI1r1vB25wmX2EBu" # Must be the same with the server to pass the validation
local_addr = "127.0.0.1:3000" # The address of the service that needs to be forwarded
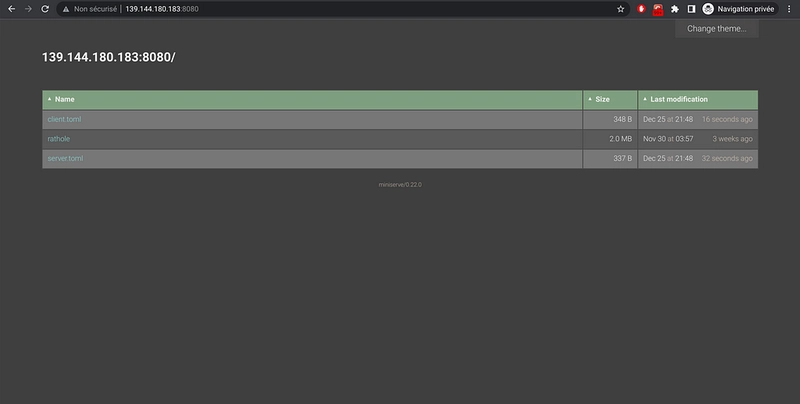
Je vois tous mes fichiers dans miniserve :
Lancement de la partie serveur :
root@localhost:~/rathole# ./rathole server.toml

Dec 25 21:50:17.511 INFO config_watcher{path="server.toml"}: rathole::config_watcher: Start watching the config
Dec 25 21:50:17.511 INFO rathole::server: Listening at 0.0.0.0:2333
et du côté du Pod dans OpenShift, récupération de rathole et du fichier client via miniserve :

bash-4.4 ~ $ kubectl exec -it po/nodejs-fcdemo3-ofgj-app-759fb5f8d5-zqlbw -- /bin/bash
Defaulted container "runtime" out of: runtime, copy-supervisord (init)

bash-4.4$ curl -LO http://139.144.180.183:8080/rathole
  % Total % Received % Xferd Average Speed Time Time Time Current
                                 Dload Upload Total Spent Left Speed
100 1947k 100 1947k 0 0 2375k 0 --:--:-- --:--:-- --:--:-- 2372k
bash-4.4$ curl -LO http://139.144.180.183:8080/client.toml
  % Total % Received % Xferd Average Speed Time Time Time Current
                                 Dload Upload Total Spent Left Speed
100 348 100 348 0 0 1901 0 --:--:-- --:--:-- --:--:-- 1912
bash-4.4$ chmod +x rathole
bash-4.4$ ./rathole client.toml
Dec 25 21:53:04.070 INFO config_watcher{path="client.toml"}: rathole::config_watcher: Start watching the config
Dec 25 21:53:04.070 INFO handle{service=nodejs}: rathole::client: Starting 81df1af4ed72b1b82fed99c73be4831908af977f3bd52c7cb7dfc738e38571dd
Dec 25 21:53:04.344 INFO handle{service=nodejs}:run: rathole::client: Control channel established
De l’autre côté, la connexion vers le démonstrateur FC est effective via rathole :
root@localhost:~# curl http://localhost:5202

<!doctype html>
<html lang="en">
<head>
    <meta charset="UTF-8">
    <meta name="viewport"
          content="width=device-width, user-scalable=no, initial-scale=1.0, maximum-scale=1.0, minimum-scale=1.0">
    <meta http-equiv="X-UA-Compatible" content="ie=edge">
    <link rel="stylesheet" href="https://cdnjs.cloudflare.com/ajax/libs/bulma/0.7.1/css/bulma.min.css" integrity="sha256-zIG416V1ynj3Wgju/scU80KAEWOsO5rRLfVyRDuOv7Q=" crossorigin="anonymous" />
    <title>Démonstrateur Fournisseur de Service</title>
</head>

<body>
<nav class="navbar" role="navigation" aria-label="main navigation">
    <div class="navbar-start">
        <div class="navbar-brand">
            <a class="navbar-item" href="/">
                <img src="/img/fc_logo_v2.png" alt="Démonstrateur Fournisseur de Service" height="28">
            </a>
        </div>
        <a href="/" class="navbar-item">
            Home
        </a>
    </div>
    <div class="navbar-end">
        <div class="navbar-item">

                <div class="buttons">
                    <a class="button is-light" href="/login">Se connecter</a>
                </div>

        </div>
    </div>
</nav>

<section class="hero is-info is-medium">
    <div class="hero-body">
        <div class="container">
            <h1 class="title">
                Bienvenue sur le démonstrateur de fournisseur de service
            </h1>
            <h2 class="subtitle">
                Cliquez sur "se connecter" pour vous connecter via <strong>FranceConnect</strong>
            </h2>
        </div>
    </div>
</section>

<section class="section is-small">
    <div class="container">
J’initie une session HTTP dans le bastion Warpgate :


Je récupère donc en backend la connexion du proxy rathole vers le démonstrateur FC en exécution dans le Pod OpenShift sans passer par la couche services ou les routes …


et la session est visible depuis les logs de Warpgate :


Sur le même principe, Chisel, un tunnel TCP/UDP rapide, transporté par HTTP, sécurisé par SSH sous la forme d’un seul exécutable comprenant à la fois le client et le serveur et écrit cette fois çi en Go.

Chisel est principalement utile pour passer à travers les pare-feu, bien qu’il puisse également être utilisé pour fournir un point d’accès sécurisé à votre réseau …
GitHub - jpillora/chisel: A fast TCP/UDP tunnel over HTTP

À suivre !

Latest comments (0)