There are many ways to connect your sensors to the network in the IoT. For short-range connections, there is Bluetooth LE, or Zigbee, or 802.15.4, or ZWave. For longer distances (though still fairly short) there’s always WiFi. But when you need longer distances, sometimes very long distances, there’s LoRaWAN. It’s a sub-gigahertz set of frequencies that are available for small bits of data. These are typically only a few bytes of data but can be sent over much longer distances — up to 2 km or more in some instances! They are very low-power, so they are great for remote-sensing applications.
In order to test out some LoRaWAN data transmission, and see how hard it might be to get that data into InfluxDB, I decided to move one of my sensors, a temperature/humidity/pressure sensor, to The Things Network (TTN), a community-based LoRaWAN provider. I wasn’t sure how hard, or easy, this transition might be, but I was able to complete it in less than a day! So here’s how you can do it too.
The hardware
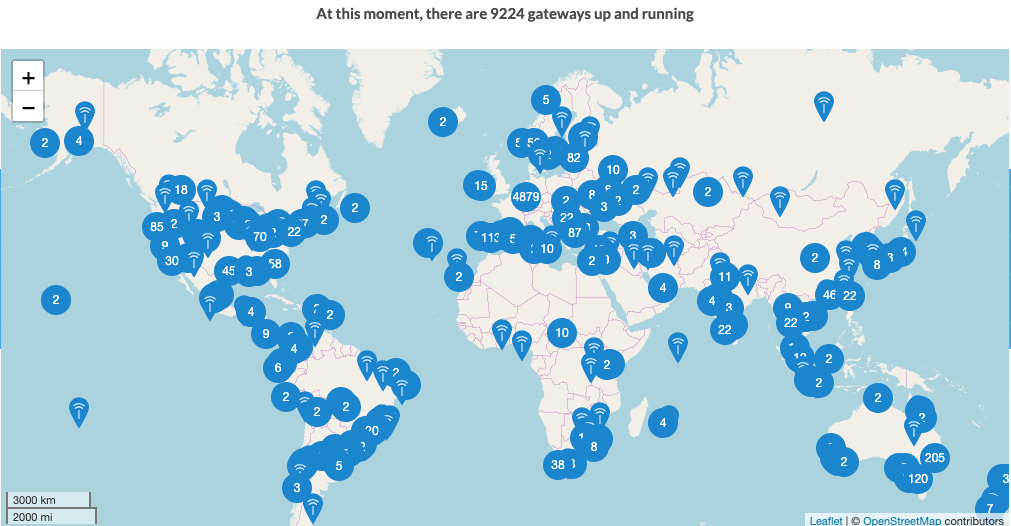
First of all, you will need to make sure that either you have a TTN Gateway yourself, or that there is one in your area. As you can see, there are a lot of gateways available.
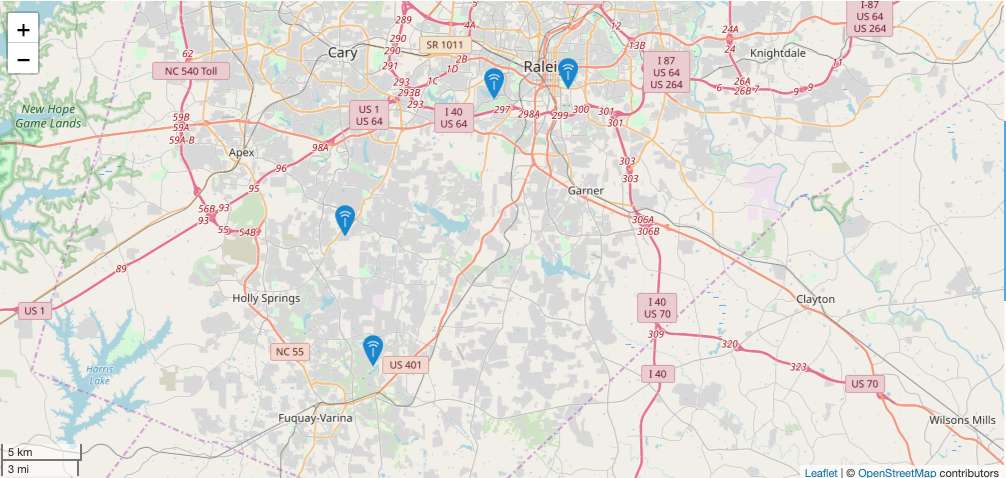
There wasn’t one close enough, so I put up my own (Tip: These are not cheap to buy — mine cost me >$200) so you can see me on the map now:
There are lots of tutorials on how to set up a gateway, so I’m not going to cover that here.
Next, you’ll need a LoRA radio for your sensor. I happened to have an Adafruit Feather M0 board lying around (I have a lot of random pieces of hardware just ‘lying around’), so I got an Adafruit LorRa Featherwing for it and put it on. Lastly, I used a BME280 breakout board (again from Adafruit. They really ought to sponsor me!) to collect the data and I was ready to go.
Wiring everything up takes a minute, so I’ll give you the details on how I wired mine. The first thing to note is that with the LoRaWAN Featherwing, you must do additional soldering. You can see below how I had to solder jumpers in from IRQ, CS, RST, DIO1 and DIO2. These then map to pins on the M0 Feather, which we will see in the software section. If you wire these jumpers up differently, you will need to adjust the pin settings in your software accordingly.
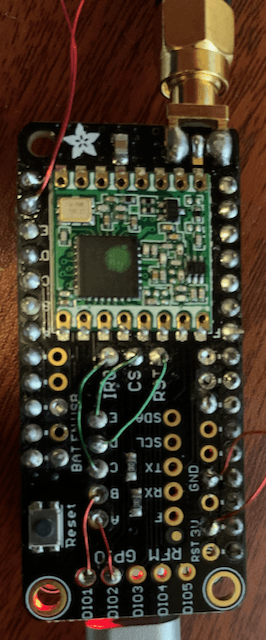
You can also see some small red wires coming in from off-screen (I love this ceramic-coated wire, even if it is a pain to solder). Those come from the BME280 Breakout board and go to the I2C pins and the 3v/ground on the board to power the sensor. Once all that is wired up, it’s down to software!
The software
Software for this took me a minute to get working, but most of that had to do with the difference in how you send data over LoRaWAN. I’m used to using BLE or WiFi, so the size of the data packets really doesn’t matter that much. With LoRaWAN, the size of the data packets reigns supreme.
The first thing you’ll want to do is install the right library for your Arduino. I used the MCCI LoRaWAN LMIC Library. It seemed the easiest for integrating with TTN. Some of the documentation on this library was a bit less than clear (at least for me) so I’ll give you the specifics of what I did to get this running on an M0 Feather. From there, I started with the ttn-otaa-feather-us915 sample program. Now, to fill in the pieces. You’ll need to go to your TTN Console and create a new Application.
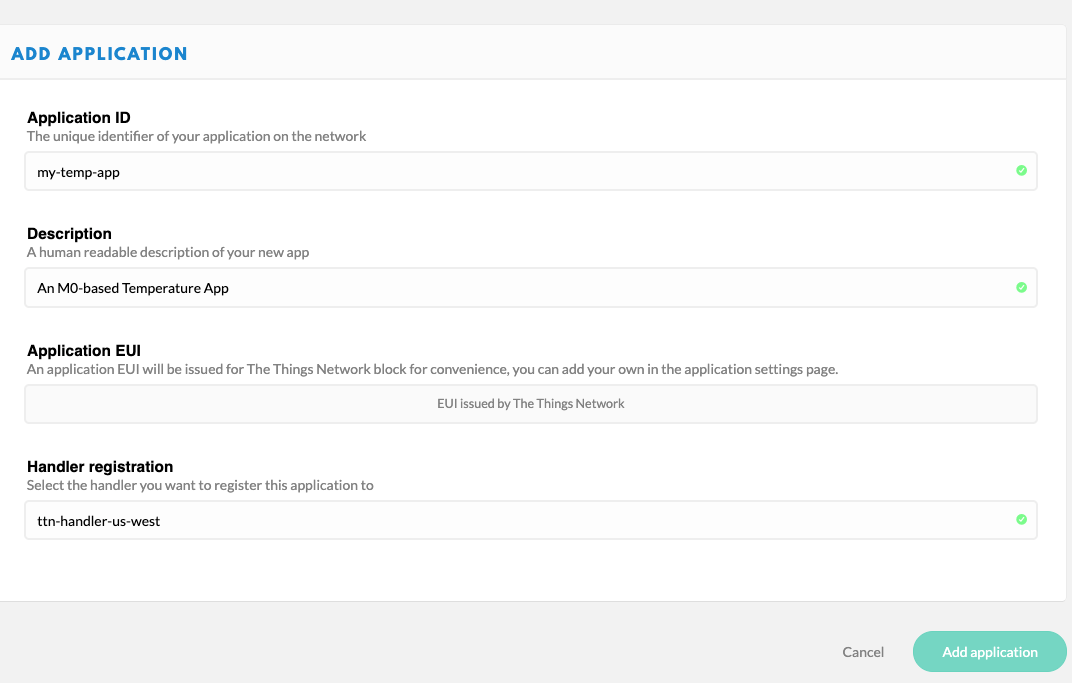
Once you’ve registered that application, you will need to get the Application EUIS (ID) to paste into your Arduino Sketch. It’s important to note that, by default, the TTN console gives you your EUIS with most significant bit first (big-endian) whereas the Arduino sketch expects it in little-endian. Luckily, the TTN console makes all of that easy:
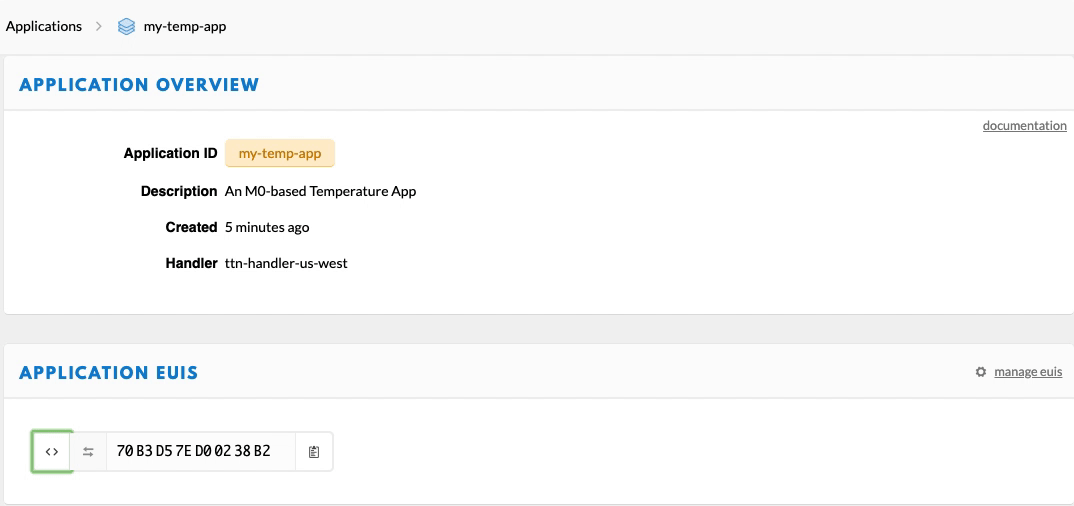
As you can see, it even makes copying it into a byte-array simple.
static const u1_t PROGMEM APPEUI[8] = { 0xB2, 0x38, 0x02, 0xD0, 0x7E, 0xD5, 0xB3, 0x70 };
void os_getArtEui (u1_t* buf) {
  memcpy_P(buf, APPEUI, 8);
}
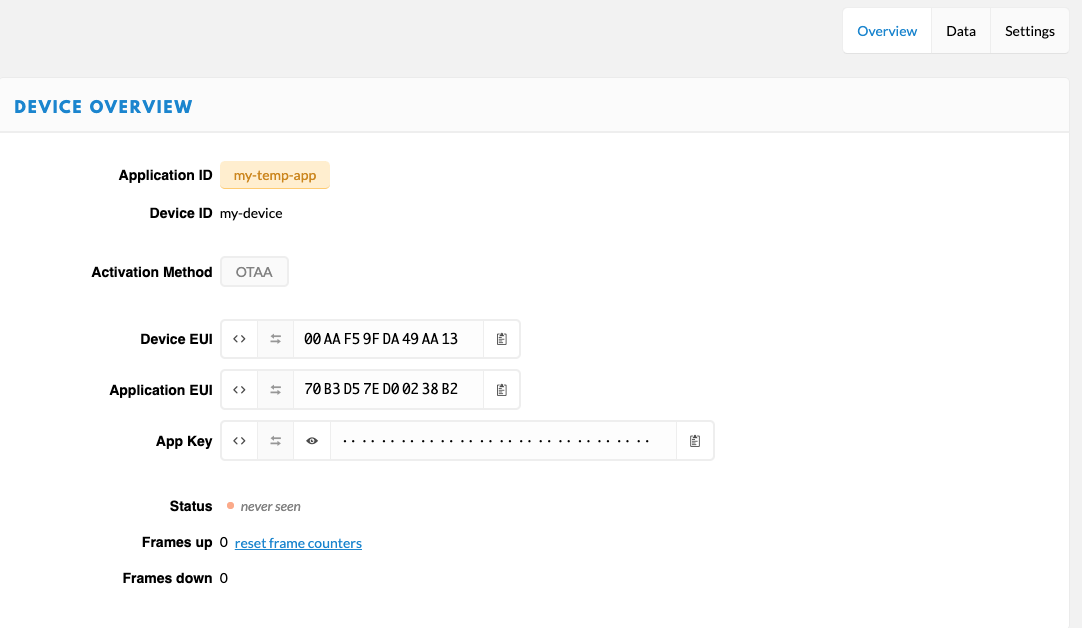
So, that’s the APP ID. Next you’ll do the same thing for your Device ID and your App Key. Click to register a new device, and you can get access to all the needed information from there:
// This should also be in little endian format, see above.
static const u1_t PROGMEM DEVEUI[8] = { <insert Dev Key };
void os_getDevEui (u1_t* buf) {
  memcpy_P(buf, DEVEUI, 8);
}

// This key should be in big endian format (or, since it is not really a
// number but a block of memory, endianness does not really apply). In
// practice, a key taken from the TTN console can be copied as-is.
static const u1_t PROGMEM APPKEY[16] = { <insert Program Key };
void os_getDevKey (u1_t* buf) {
  memcpy_P(buf, APPKEY, 16);
}
And don’t worry about me publishing those IDs. I created that dummy application and device just for this blog post, and they are long-gone now. But as a reminder, never publish your IDs or keys like this.
You will need to adjust this data buffer for your data, but here’s what I used: unsigned char mydata[11]; Remember, I said that the data transmitted was intentionally kept very low, so I’m packing a whole lot of data into this 11 bytes! We’ll see how I do that in a bit.
Next comes the pins. Remember from the hardware section? If you wired your LoRaWAN feather exactly like mine, this should work for you.
#if defined(ARDUINO_SAMD_FEATHER_M0) || defined(ADAFRUIT_FEATHER_M0)
// Pin mapping for Adafruit Feather M0 LoRa, etc.
const lmic_pinmap lmic_pins = {
  .nss = 5,
  .rxtx = LMIC_UNUSED_PIN,
  .rst = 6,
  .dio = {9, 10, 11},
  .rxtx_rx_active = 0,
  .rssi_cal = 8, // LBT cal for the Adafruit Feather M0 LoRa, in dB
  .spi_freq = 8000000,
};
Those were a little hard to figure out, and in the sample code it leaves a couple of those dio pins as LMIC_UNUSED_PIN but mine wouldn’t work until I defined them all.
For the rest of my code I used some boiler-plate I have for the BME280:
Adafruit_BME280 bme;
double temperature = 0.00;
double pressure = 0.00;
double altitude = 0.00;
double humidity = 0.00;
bool bme_config = true;

// this goes in the setup() function:
int tryInit = 0;
  while (!bme.begin()) {
    Serial.println("Could not find a valid BME280 sensor, check wiring!");
    delay(3000);
    if (++tryInit > 9) {
      bme_config = false;
      break;
    }
  }

// a function to get readings:
void getReadings() {
  if (bme_config) {
    temperature = bme.readTemperature();
    pressure = bme.readPressure() / 100.0F;
    altitude = bme.readAltitude(SEALEVELPRESSURE_HPA);
    humidity = bme.readHumidity();
    Serial.print("Temp: "); Serial.println(temperature);
    Serial.print("Humidity: "); Serial.println(humidity);
    Serial.print("Pressure: "); Serial.println(pressure);
    Serial.print("Altitude: "); Serial.println(altitude);
  }
}
Now, to get the data stuffed into 11 bytes! You’ll notice that in my boilerplate BME280 code I defined all the measurements as double which was fine for high-bandwidth applications, but it just won’t do for LoRaWAN. So I’m going to whittle them down to 2-bytes each (except the pressure measurement, which will stay at 4-bytes).
getReadings();
    uint16_t ft = (uint16_t)(temperature * 100);
    uint16_t fh = (uint16_t)(humidity * 100);
    uint32_t fp = (uint32_t)(pressure * 100);
    uint16_t fa = (uint16_t)(altitude * 100);
If I have readings like:
Temp: 25.04
Humidity: 54.60
Pressure: 1006.38
Altitude: 57.34
Then I’ll end up with
Temp: 2502
Humidity: 5460
Pressure 100638
Altitude: 5734
All 16- and 32-bit integers. Now, to stuff them all into my data array:
mydata[0] = ft >> 8;
    mydata[1] = ft & 0xFF;
    mydata[2] = fh >> 8;
    mydata[3] = fh & 0xFF;
    mydata[4] = fp & 0xFF;
    mydata[5] = (fp >> 8) & 0xFF;
    mydata[6] = (fp >> 16) & 0xFF;
    mydata[7] = (fp >> 24) & 0xFF;
    mydata[8] = fa >> 8;
    mydata[9] = fa & 0xFF;
If you’re not familiar with bit-wise data manipulation, basically I’m just moving each byte of each number into a spot in my byte-array. Since the pressure number is a 4-byte value, I have to do extra shifting. I can then send that off to TTN via LoRaWAN and my data transmission is completed.
Sadly though, we’re not done yet!. TTN will politely send all the data I send to it out to an MQTT broker for me so that I can subscribe to it and do with it as I please. ( Spoiler alert: I’m going to put it into InfluxDB!)
Getting the data
My data is now coming into TTN via LoRaWAN, and is being written out to an MQTT broker for me, but how do I get at it? Well, the first thing to do is subscribe! I use an app called MQTT Box on my Mac to subscribe to various MQTT brokers to see data from different inputs. It allows me to define multiple brokers, and to subscribe to any number of topics from those brokers to see my data. To subscribe to the broker you need 3 pieces of information: The name/address of the broker, the username and the password to connect. For those of us in the US, the address of the broker is us-west.thethings.network . For your username, you will use the name of your application. In the example above, we’d use my-temp-app as the username. For the password, you’ll go to your application on the TTN Console, and look for the Application Key at the bottom of the page. Copy/paste that in to the password field for the broker and you should connect.
If I look at my data coming out to my MQTT broker, I immediately notice a problem: It’s just a random-looking string of characters. It’s actually not random at all, it’s your data buffer, base-64 encoded.
{ "app_id":"my-temp-app",
  "dev_id":"my-device",
  "hardware_serial":"009E9BA30C869232",
  "port":1,
  "counter":17,
  "payload_raw":"CdgVLRGJAQAWzg==",
}
Not super helpful. I did find a super helpful website that would help me translate that into something more meaningful. Go Crypti.com and paste in your raw, base-64-encoded data, and it will … translate it to Hexadecimal. Hmm … still not what I want to see. It turns out, in order to get the data in a usable form, you have to go back to your TTN console and click on the Payload Formats tab. From here, we will decode the Hex into something we can actually use.
Remember, we send an array of bytes. I pasted the base-64-encoded message into that website above, and got the following:
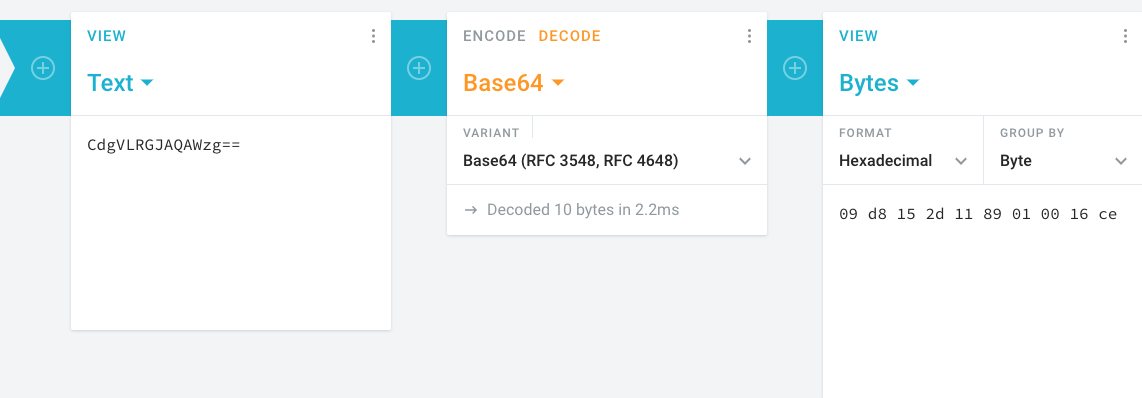
It decoded it into a series of bytes. Cool! Now to decode those bytes! (We’re almost there, I promise!)
On your TTN Consoles Payload Formats tab, we will enter the following function (it’s javascript!)
function Decoder(bytes, port) {
  var decoded = {};

  var cInt = (bytes[0] << 8) | bytes[1]; // temperature ºC
  var rem =(bytes[2] << 8) | bytes[3]; // humidity %
  var pre = (bytes[4]) + // pressure is a 4-byte value
  ((bytes[5]) << 8)
      + ((bytes[6]) << 16)
  + ((bytes[7]) << 24) ;
  var alt = (bytes[8] << 8) + bytes[9];
      // Decode integer to float
  decoded.temp_c = cInt / 100;
  decoded.humidity = rem / 100;
  decoded.pressure = pre / 100;
  decoded.altitude = alt / 100;

  return decoded;
}
I’ll step through what we’re doing here. If we look back at the data buffer we sent, you’ll remember that the first 2 bytes were the temperature. So we strip off those 2 bytes and store those in a temperature variable. We strip off the next 2 and that’s our humidity. We then need to grab the 4 bytes of the pressure, and finally the last 2 bytes for the altitude. Finally, we decode those back into their original floating-point state, and we’re done! Now if we look at what’s coming out of our MQTT broker, we will see:
{ "app_id":"my-temp-app",
  "dev_id":"my-device",
  "hardware_serial":"009E9BA30C869232",
  "port":1,
  "counter":28,
  "payload_raw":"CeEVJg6JAQAW7A==",
  "payload_fields":{
      "altitude":58.68,
      "humidity":54.14,
      "pressure":1006.22,
      "temp_c":25.29
  },
}
Which is a proper JSON object, with our data in a usable form! Now for the final bit: getting it all into InfluxDB!
Getting it into InfluxDB
Luckily this is the easiest part of the whole thing thanks to telegraf! On your telegraf host, edit your telegraf.conf file. Look for the section entitled Read metrics from MQTT topic(s) and add the following:
[[inputs.mqtt_consumer]]
  servers = ["tcp://us-west.thethings.network:1883"]
  qos = 0
  connection_timeout = "30s"
  topics = ["+/devices/+/up"]
  client_id = "ttn"
  username = "APP_NAMEr"
  password = "APPKEY"
  data_format = "json"
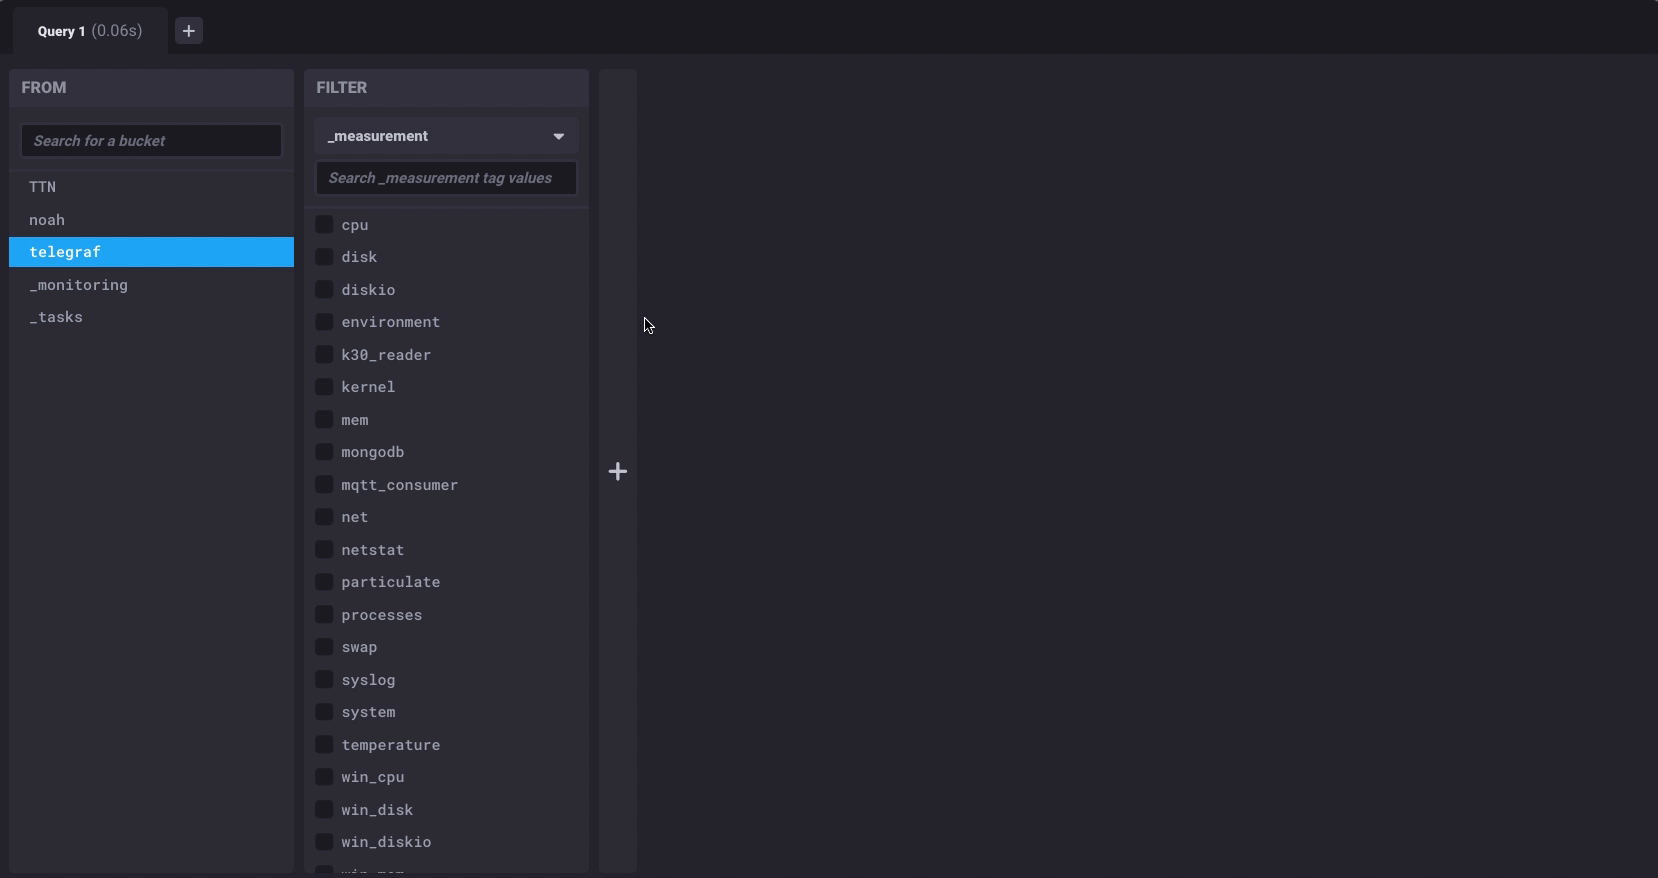
Then restart telegraf, and, like magic, you should be getting data into InfluxDB! If I go look in my data explorer in Chronograf, I should see a new measurement called mqtt_consumer and in there … Whoa!! A lot of data fields! It turns out that TTN provides a bunch of additional data about how the device connected and sent its data, and that is all preserved by the telegraf plugin.
Your sensor data will have payload_fields_ prepended to it. All the rest is data about your data.
As usual, the easiest part of almost any deployment I do is the InfluxDB part. Once I had the data coming out of the MQTT broker in the proper format, having it stored in InfluxDB took just a few lines of configuration. I can now build a dashboard of my temperature, humidity, pressure and altitude data in Chronograf.
The post Sensing with The Things Network appeared first on David G. Simmons.

Top comments (0)