
The objective of this article is to provide guidance on how to enable disaster recovery with Azure DNS zones and Kemp LoadMaster GEO(global balancing) in HA Mode to increase resiliency across multiple regions on Azure.
This solution is built on the Azure managed services: Virtual Network, Azure DNS, Azure Load Balancer and Azure Virtual Machines.
Special thanks to James Basso and Frankie Cotto for your guidance.
*You can check the article also here: https://wikiazure.com/networking/disaster-recovery-with-azure-dns-zones-and-kemp-loadmaster-geo/
Key Takeaways:
- Provide guidance on how to setup Azure Networking components
- How-to configure Kemp LoadMaster in HA mode (active-passive)
- How-to configure the Kemp LoadMaster GEO capabilities to enable automated failover across azure regions
Pre-requisites
- An active azure subscription with contributor role at least
- A domain/subdomain
Table of contents
- Architecture Reference
- Preparing the primary region
- Create Resource Group
- Configure Azure Networking Components
- Create Vnet and subnets
- Create Azure Load Balancer
- Prepare the Compute components
- Provision VMs (Application Server)
- Install IIS role on the VMs
- Create 2 Kemp LoadMasters
- Licensing LoadMasters
- Configure LoadMasters in HA mode
- Configure Virtual Service on LoadMaster
- Configure Azure Load Balancer for the primary region
- Configure Backend pool
- Create a health probe
- Create Load Balancer rules
- Create Inbound NAT Rules
- Preparing the secondary region
- Create Resource Group
- Create Vnet and subnets
- Provision VMs (Application Server)
- Create Azure Load Balancer
- Create 2 Kemp LoadMasters
- Configure the Azure Load Balancer on the secondary region
- Configure Vnet peering
- Enable DNS load balancing using Kemp LoadMaster GEO on Azure.
- Create Azure DNS zones
- Delegate the domain
- Create DNS records(A, NS records)
- Configure Global Balancing on Kemp LoadMaster
- Configure GEO LoadMaster partners
- Add fqdn
- Add clusters
- Configuring Site Resiliency Options
- Source of Authority
- Test configuration
- Kemp GSLB statistics
- Conclusion
- Resources
Architecture Reference:

Enable disaster recovery with Azure DNS Zones and Kemp LoadMaster GEO
Preparing the primary region
First of all we need to deploy the Vnet where our resources will reside
Create Resource Group
I´ll use the Azure Portal to provision the resources, some of them can be provisioned through CLI, PowerShell etc.
Go to the Azure Portal and create a resource group:
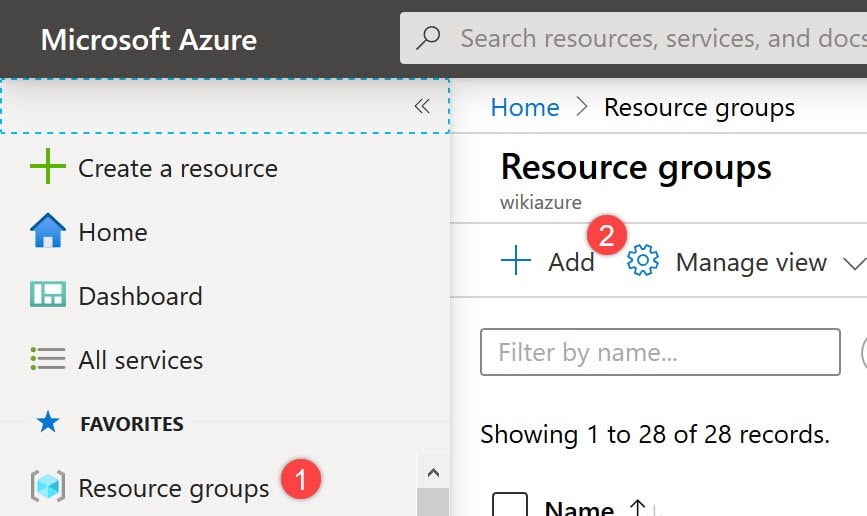
- Select Add.
- Enter the following values:
- Subscription: Select your Azure subscription.
- Resource group: I´m using “ps-kemp-ha”
- Region: Select an Azure location, in this case I´m using West US.

Once Created let’s proceed to create the Networking components for the primary region.
Configure Azure Networking Components
Create Vnet and subnets
From the Azure portal menu, select Create a resource. From the Azure Marketplace, select Networking > Virtual network.
In Create virtual network, enter or select this information:
SettingValueSubscriptionSelect your subscription.Resource groupSelect ps-kemp-ha.NameI’m using “_ps-kemp-ha-vnet“_.LocationSelect West US.
Select Next: IP Addresses, and for IPv4 address space, enter 10.20.0/16. (Please ensure you don´t overlap any other IP Address space)
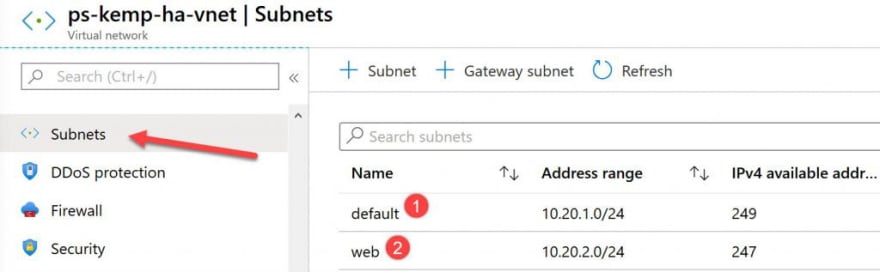
Select Add subnet, then setup 2 subnets:
- 1 subnet will be for the Kemp LoadMaster, enter default for Subnet name and 10.20.1.0/24 for Subnet address range.
- 1 subnet will be for the VM with the website, enter web for Subnet name and 10.20.2.0/24 for Subnet address range.
Select Add, then select Review + create. Leave the rest as default and select Create.
In Create virtual network, select Create.
After creation you should see the configuration as below for the Vnet and subnets:

Create Azure load balancer:
**Notes: Since we will deploy the Kemp LoadMaster on HA mode(active-passive) there are some considerations that are relevant to the configuration:
- Azure Basic Load Balancer does not support HTTPS probes.
- Azure Basic Load Balancer will terminate all TCP connections
- There is no SLA is provided for Basic Load Balancer
- Azure Standard Load balancer support Availability Zones
- The Standard SKU also allows you to load balance services on multiple ports and multiple IP addresses.
- Consider using standard load balancer if you need to load balance multiple workloads using different front-end IPs
The following diagram provides a high level overview of the configuration that we will be doing:
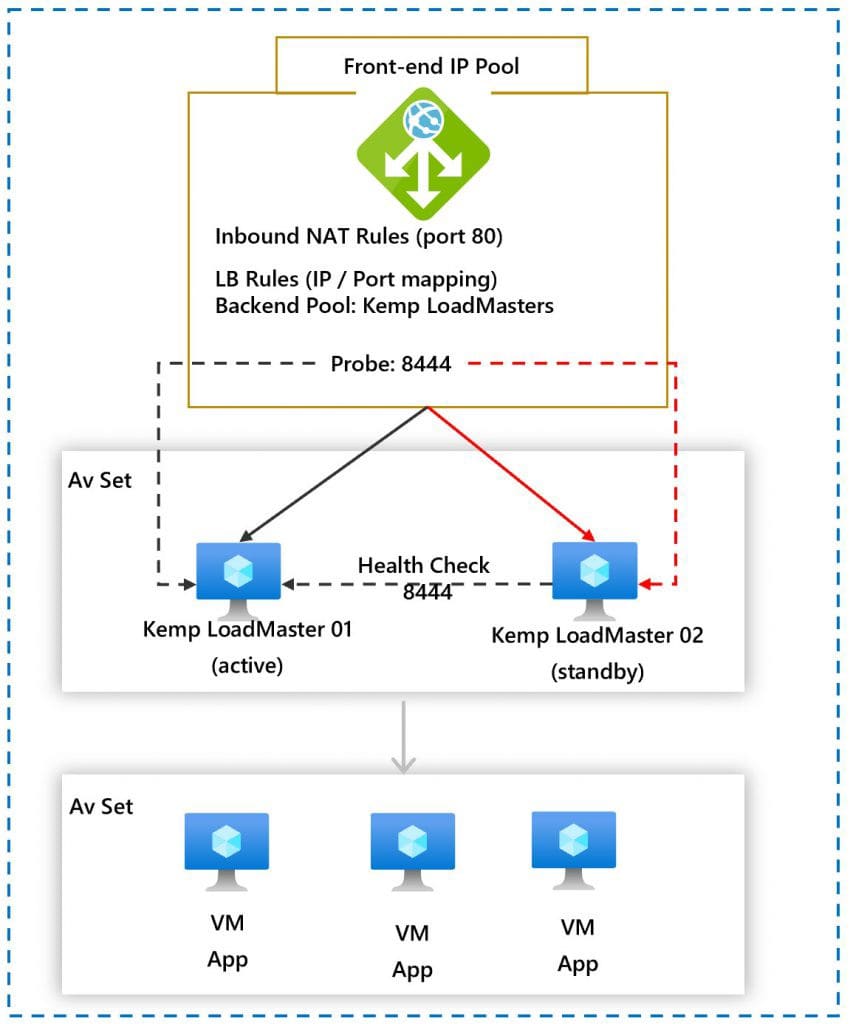
LoadMaster in HA mode for Azure involves two LoadMasters that synchronize settings bi-directionally. If you perform any change on the master node, this changes made to the master are replicated to the slave node and changes made to the slave node are replicated to the master.
The replication of settings (from master to slave) may take a few moments to complete.
Also, the master unit is always set as active and the slave unit can be standby or active if the master fails.
The master unit, is the master and never becomes the slave, even if it fails.
So when the master unit comes back up it is set as active and connections are automatically directed to the master node again.
Either the master or slave unit, can be active or standby.
And the HA Check Port must be set to the same port on both nodes, in this case we will use port 8444,
You must ensure that the NSG/ network security group — rules are properly configured to allow inbound traffic to the LoadMaster.
A network security group (NSG) contains a list of security rules that allow or deny network traffic to resources connected to Azure Virtual Networks (VNet)
So when we setup the LoadMaster on HA mode on azure we will leverage the Azure Load balancer ip address as the shared IP address or most commonly known as the “Shared interface” which is shared with the partner unit. The shared IP address is identical for both LoadMaster appliances but it is associated with only the active LoadMaster at any given time.
Now let’s proceed to create the Azure load balancer.
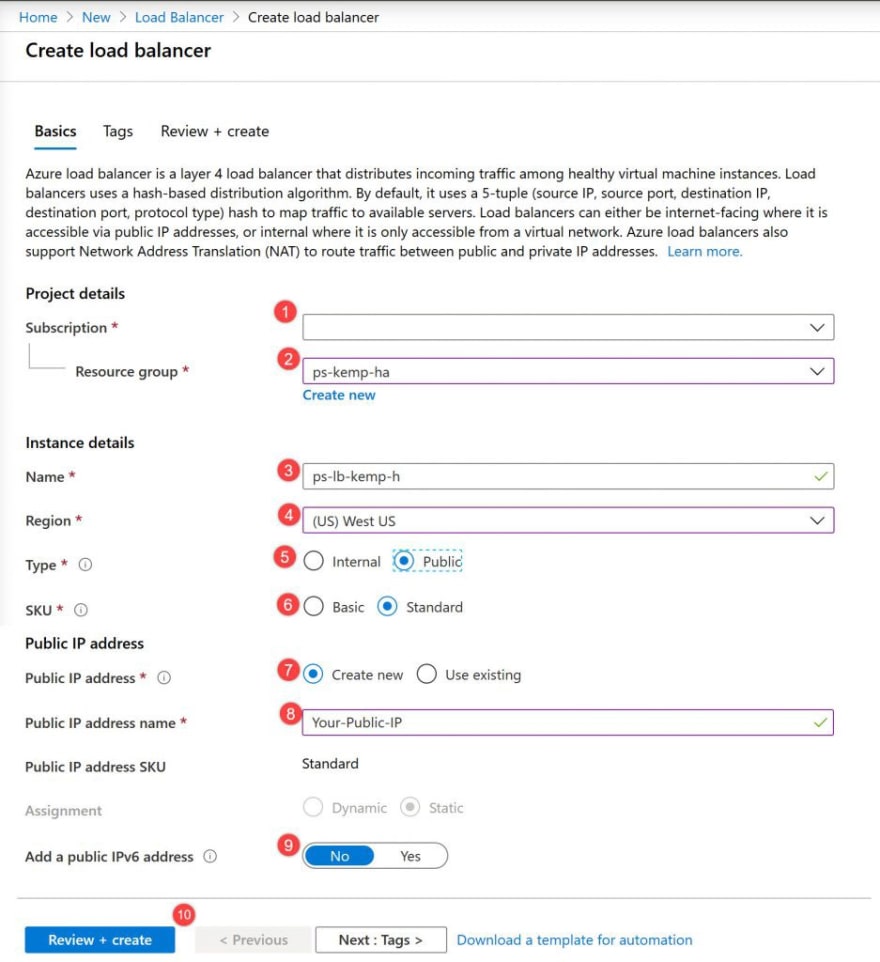
- Go to the Azure portal, on the top left-hand side of the screen, select Create a resource > Networking > Load Balancer.
- In the Basics tab of the Create load balancer page, enter or select the following information, accept the defaults for the remaining settings, and then select Review + create:
SettingValueSubscriptionSelect your subscription.Resource groupSelect ps-kemp-haName*ps-lb-kemp-haRegionSelect **West US.TypeSelect **Public.SKUSelect **Standard* Public IP addressSelect Create new. If you have an existing Public IP you would like to use, select Use existingPublic IP address nameType ps-lb-kemp-ha-ip in the text box.
We will configure the load balancer later on.
Prepare the Compute components
Provision VMs (Application Server)
Follow this steps to create 2 virtual machines that will work as the webservers for this scenario:
https://docs.microsoft.com/en-us/azure/virtual-machines/windows/quick-create-portal
- Go to the Azure Portal and type virtual machines in the search bar, then under Services, select Virtual machines.

- In the Virtual machines page, select Add.
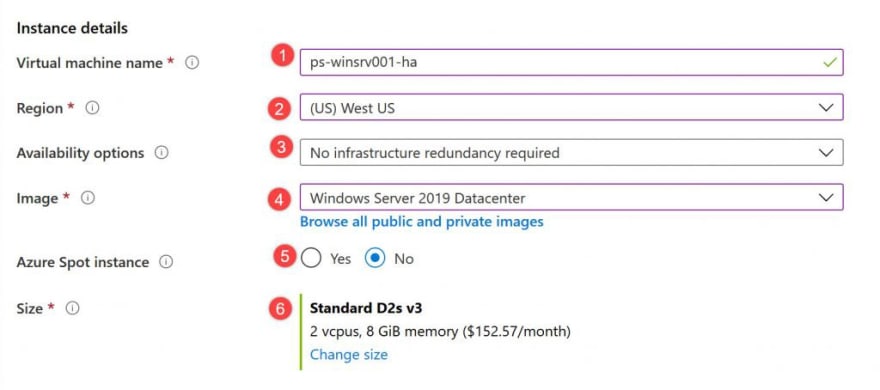
- In the Basics tab, under Project details, make sure the correct subscription is selected and then choose the previously created resource group.

Under Instance details, type ps-winsrv01-ha for the Virtual machine name and choose WestUS for your Region, and then choose Windows Server 2019 Datacenter for the Image. Leave the other defaults.
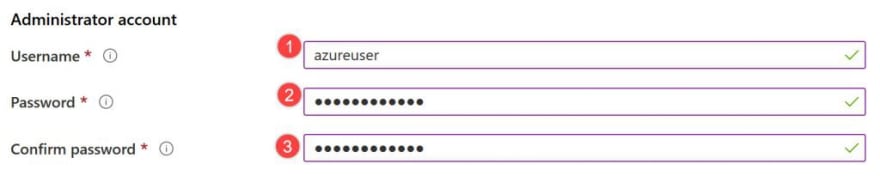
Under Administrator account, provide a username, such as azureuser and a password. The password must be at least 12 characters long and meet the defined complexity requirements.
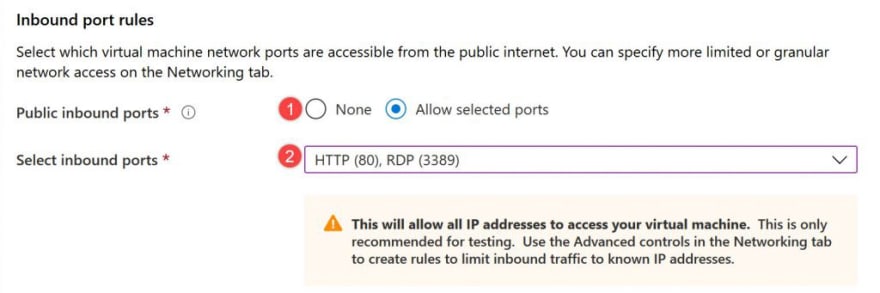
Under Inbound port rules, choose Allow selected ports and then select RDP (3389) and HTTP (80) from the drop-down
Click next: Disks.
On the Disks tab select Standard HDD as the OS Disk type and click next.

On the networking tab ensure you select the web subnet, previously created:

Leave the remaining defaults and then select the Review + create button at the bottom of the page.
Install IIS role on the VMs
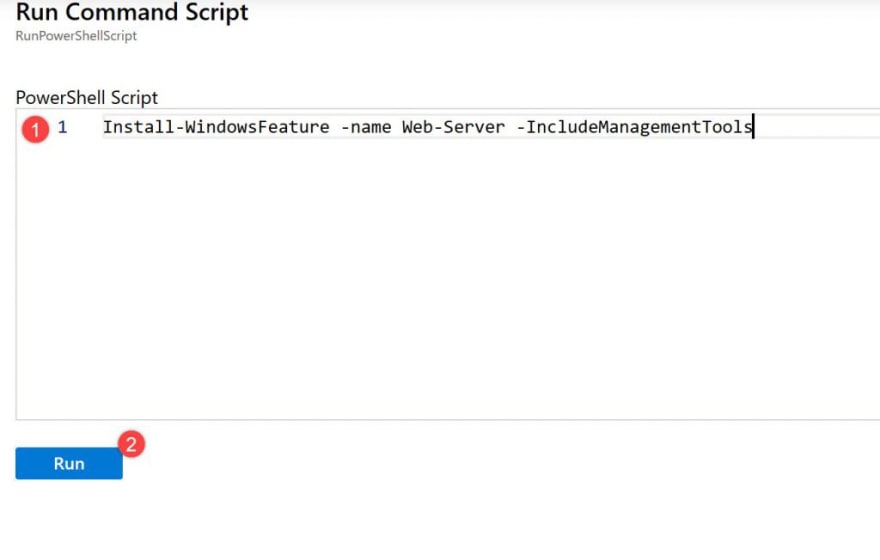
Once the VM is provisioned, go to the VM settings, select Run command and click on Run PowerShell script:
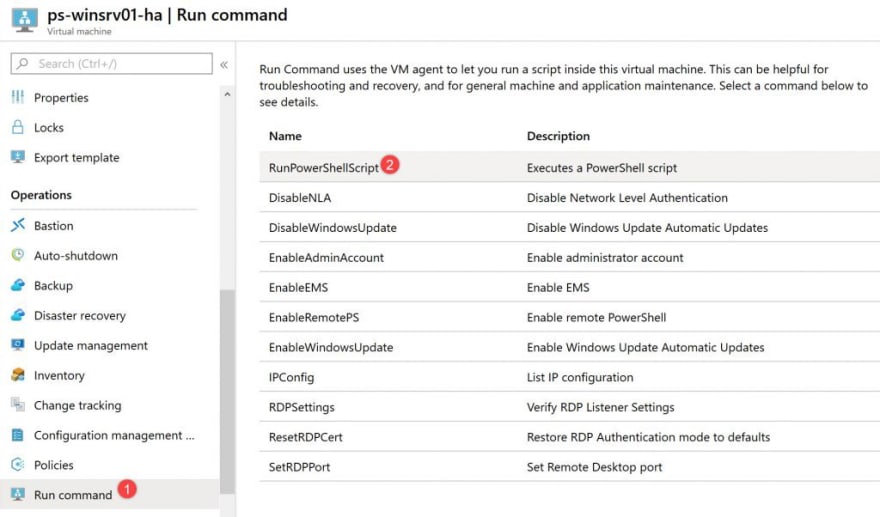
Then paste the following cmd and click Run:
Install-WindowsFeature -name Web-Server -IncludeManagementTools
If all goes well, you should be able to access to the IP address of the VM on your browser and see the IIS start page.

Repeat this steps to create the second webserver.
Create 2 Kemp LoadMasters (HA Pair)
Now let’s create the 2 Virtual LoadMasters using the Azure Portal.
- On the Azure Portal, click create a resource and Type LoadMaster in the search.
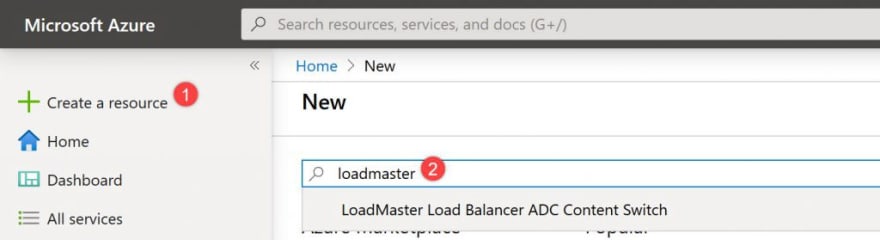
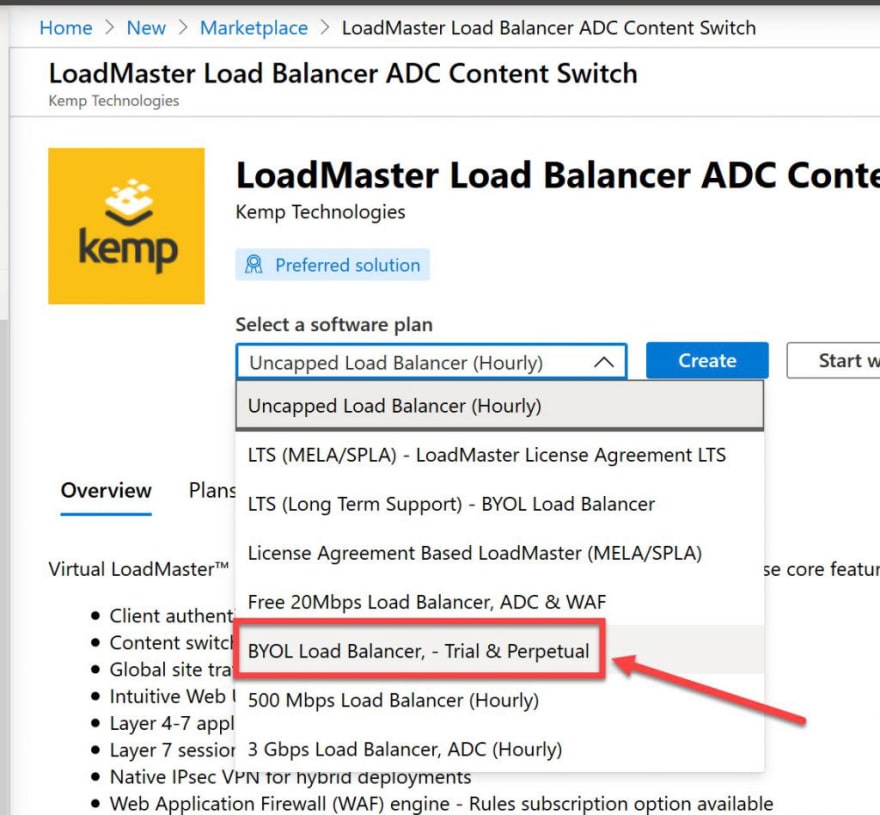
The LoadMaster will appear on the Marketplace screen, select the LoadMaster:

- Select the BYOL license and click create
In the Basics tab, under Project details, make sure the correct subscription is selected and then choose the previously created resource group, in this case ps-kemp-ha

Under Instance details, type ps-vlm01-ha for the Virtual machine name and choose West US for your Region. On the availability options select Availability Sets and click on Create New:

Now provide a name for the availability set, in this case ps-vlm-ha-avset and leave the default configuration, then click OK.

**Note: The virtual machine guest environment for the LoadMaster, at minimum, must include:
- 2 x virtual CPUs
- 2 GB RAM
- 16 GB disk space
For this case we can use the Standard A3 as shown below:

Under Administrator account, provide a username, this should be “bal“.
The password must be at least 12 characters long and meet the defined complexity requirements.

On the disks tab you can use an standard hdd disk to save costs, then click next:Networking

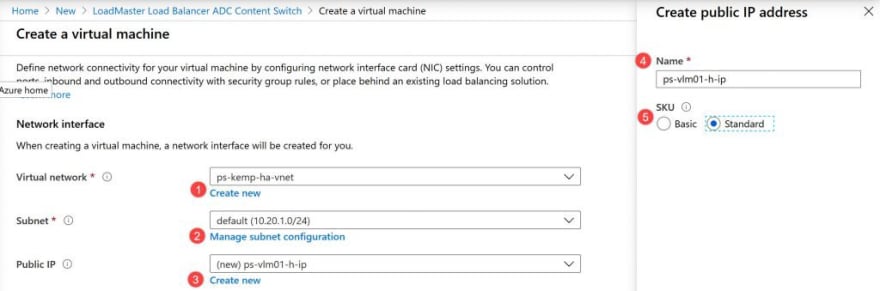
On the networking, ensure you use the previously created Vnet and create a new Public IP address with SKU-standard:
Now on the NIC network security group you should see that the VM has preconfigured NSG rules, you can use the same NSG for both LoadMasters(recommended) or assign a NSG per LoadMaster

Now under the load balancing configuration, select Yes on the option to place the VM behind an existing load balancing solution, then select the previously created load balancer and create a new backend pool, in this case ps-vlm-ha-backendpool and click Next:Management.
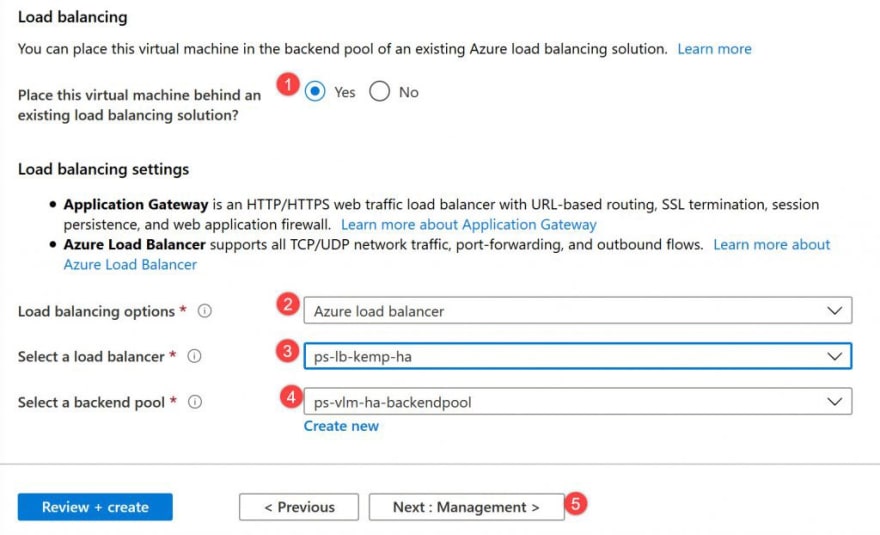
On the management tab, leave the default configuration and click review and create. Once the validation process is completed, click on Create:

Repeat the previous steps to create the second LoadMaster.
Licensing LoadMasters
Once the 2 LoadMasters are deployed, lets’s access to the first LoadMaster through port 8443 on a browser using the public IP address of the virtual machine. Example: https://Your-LoadMaster-IP:8443
A warning may appear regarding website security certificates. Please click the continue/ignore option.
The LoadMaster End User License Agreement screen appears. Please read the license agreement and click on the Agree button to proceed.

If using the Online licensing method, fill out the fields and click License Now

Then you should see the login screen, enter the “bal” user name and the password.

In the screen informing you that the password has changed, press the Continue button.
Perform the same process for the second LoadMaster.
Configure LoadMasters in HA mode (active-passive)
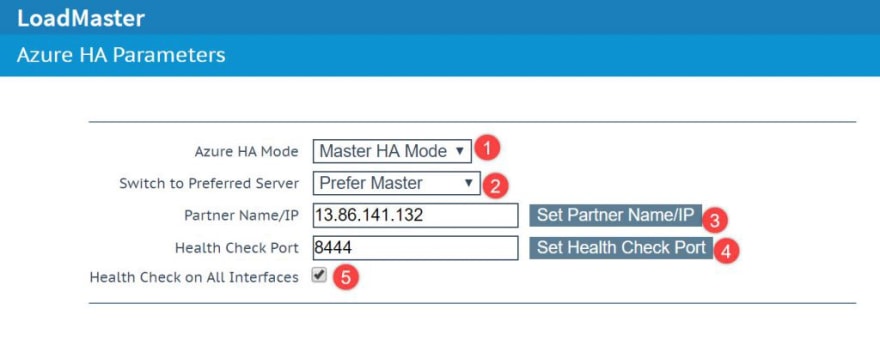
Go to the first LoadMaster through your browser, then go to System Configuration > Azure HA Parameters

Now Select Master HA Mode in the Azure HA Mode drop-down list
Select the desired option in the Switch to Preferred Server drop-down list:
- No Preferred Host: Each unit takes over when the other unit fails. No switchover is performed when the partner is restarted.
- Prefer Master: The HA1 (master) unit always takes over. This is the default option.
Enter the internal address of the slave LoadMaster unit in the Partner Name/IP text box and click Set Partner Name/IP.
Enter 8444 as the Health Check Port and click Set Check Port.
The Health Check Port must be set to 8444 on both the master and slave units for HA to function correctly.
Now configure the slave LoadMaster
Complete the following steps in the slave unit, but select Slave HA Mode as the Azure HA Mode instead: In the main menu, go to System Configuration > Azure HA Parameters. Now enter the internal address of the slave LoadMaster unit in the Partner Name/IP text box and click Set Partner Name/IP.
Once you complete this setup, reboot both LoadMasters, then you should see the Master and slave status:

Configure virtual service on the LoadMaster
- Go to the LoadMaster and create a new virtual service:

Now you will see that the Virtual Address field is preconfigured, provide a port and a name for this virtual service and click add new virtual service:

Now go to Real servers and expand this module, then select the http protocol as the healthcheck method and click on add New to add the real server- in this case our Windows Server VM.

Now add the Public IP address of your windows server VM and provide the port 80, then click on Add This Real Server

Now proceed to add the second Real Server, again under Real Servers, click add new and provide the IP of the second Windows Server VM.
Then go back to virtual services and you should see that the virtual service is routing traffic to your webservers:

Now if you go to the virtual ip address from a jumbpox you should be able to see the IIS screen.
Let’s setup the Azure Load balancer rules.
Create Azure Load Balancer
Configure Backend pool
To distribute traffic to the VMs, a backend address pool contains the IP addresses of the virtual (NICs) connected to the Load Balancer.
Go to your Azure Load balancer and under Settings, select Backend pools, then select the previously created backend pool.
On the Add a backend pool page, add the LoadMaster VMs and then click Save:

Configure Health probes
To allow the Load Balancer to monitor the status of the LoadMasters, you use a health probe. The health probe dynamically adds or removes VMs from the Load Balancer rotation based on their response to health checks. Create a health probe ps-vlm-ha-healthprobe to monitor the health of the LoadMaster VMs.
- Go to your Azure Load Balancer, under Settings, select Health probes, then select Add.
SettingValueNameEnter ps-vlm-ha-healthprobe.ProtocolSelect HTTP.PortEnter 8444.IntervalEnter 5 for number of Interval in seconds between probe attempts.Unhealthy thresholdSelect 2 for number of Unhealthy threshold or consecutive probe failures that must occur before a VM is considered unhealthy.
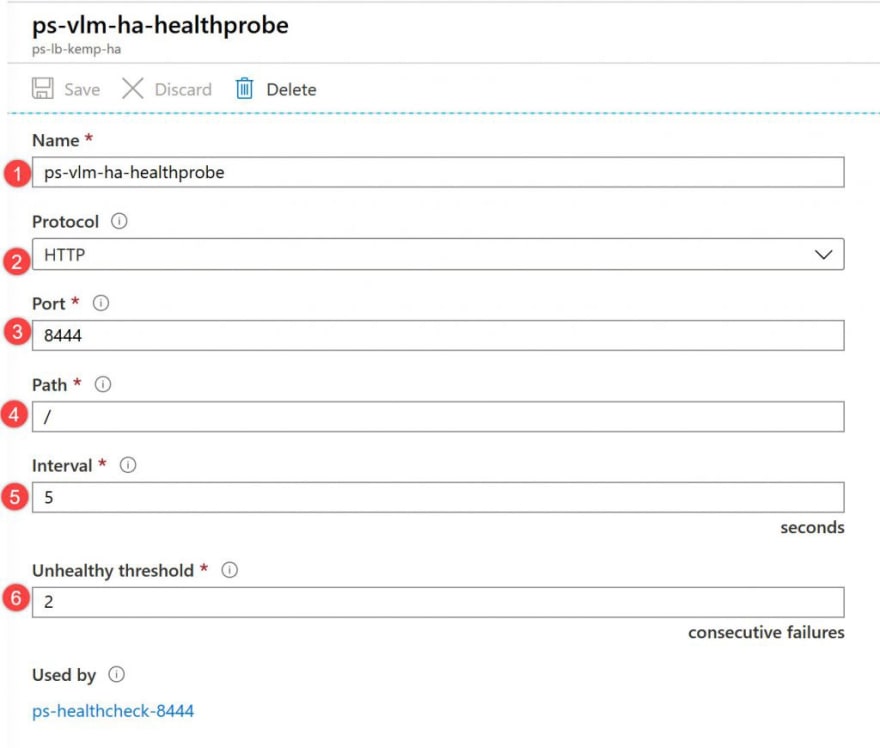
Select OK.
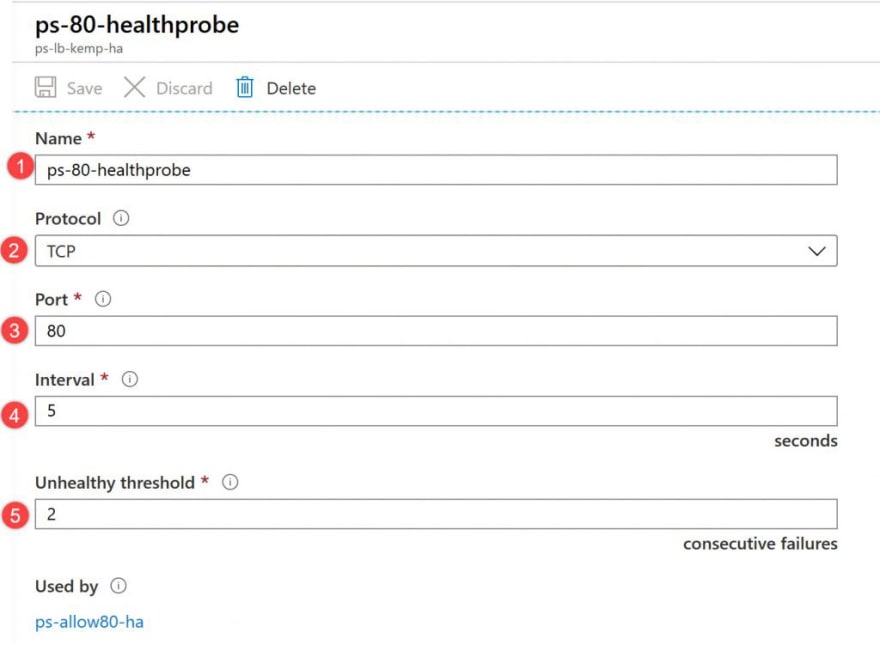
Now create a second healthprobe for the virtual Service on the LoadMaster:
SettingValueNameEnter ps-vlm-ha-healthprobe.ProtocolSelect HTTP.PortEnter 80.IntervalEnter 5 for number of Interval in seconds between probe attempts.Unhealthy thresholdSelect 2 for number of Unhealthy threshold or consecutive probe failures that must occur before a VM is considered unhealthy.
Create Load Balancer rules
A Load Balancer rule is used to define how traffic is distributed to the VMs. You define the frontend IP configuration for the incoming traffic and the backend IP pool to receive the traffic, along with the required source and destination port.
Create 2 Load Balancer rules.
– A rule called ps-healthcheck-8444 for listening to port 8444 in the frontend and sending load-balanced network traffic to the backend address pool ps-vlm-ha-backendpool also using port 8444. Under Settings, select Load balancing rules, then select Add

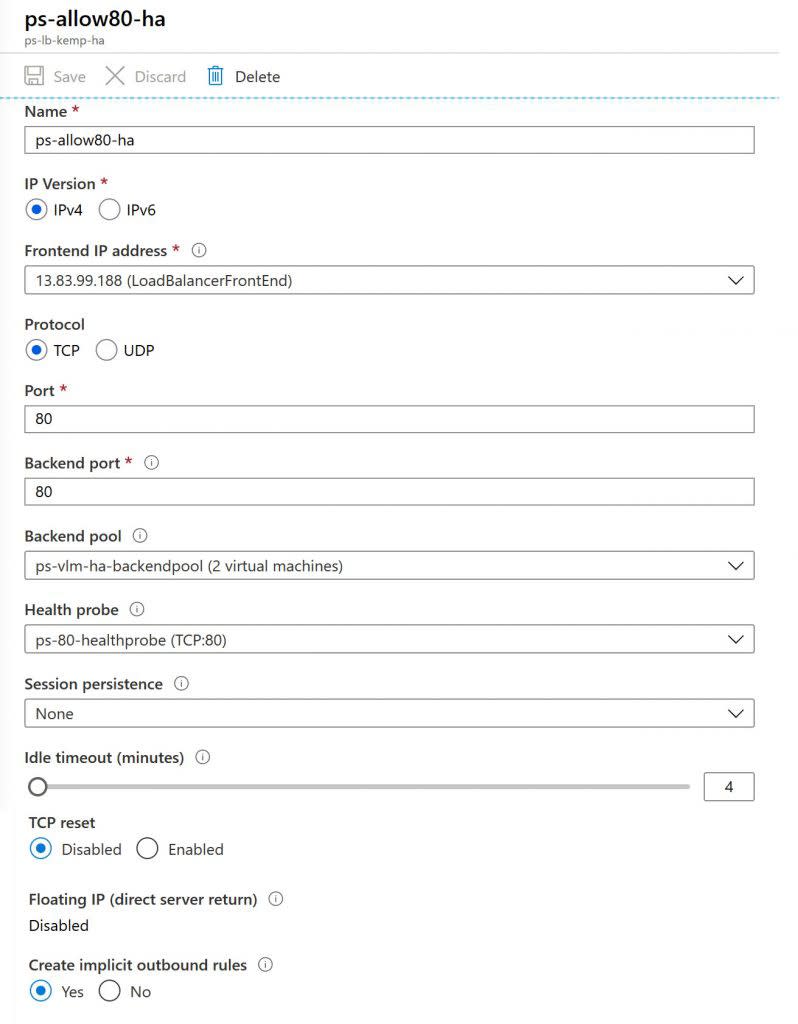
- A rule called ps-allow80-ha for listening to port 80 in the frontend and sending load-balanced network traffic to the backend address pool ps-vlm-ha-backendpool also using port 80.
Under Settings, select Load balancing rules, then select Add
Create Inbound NAT Rules
Inbound NAT rules provide a translation for management access into each of the LoadMasters in the Backend pool. Each LoadMaster does not require a Public IP Address (PIP). A unique port must be configured in an Inbound NAT rule for each LoadMaster. The example rules are the following:
TargetPortTarget PortLoadMaster1 — WUI84418443LoadMaster1 — SSH22122LoadMaster2 — WUI84428443LoadMaster2 — SSH22222
The LoadMaster uses port 22 and 8443 by default. The remaining port numbers listed above are recommended, but you can use other port numbers if needed.
Example of the inbound nat rule for the LoadMaster SSH:

Example of the inbound nat rule for the LoadMaster WUI:

You can check if the HA is working properly by accessing on your browser: http://Your-AzureLoadBalancerPublicIP:8444
You should see the screen with a message: “OK-Master active”
Create the other 2 rules the same way for the second LoadMaster.
Note: ** Ensure you have the right inbound rules configured on the LoadMaster:
The network security group must contain a rule for 8443. This is the WUI port. If the LoadMaster is public-facing, other best practice, recommended (but not mandatory) ports that should be in the security group, are; 8441, 8442, 8444, 22, 221, 222, the Virtual Service ports (such as 80) and any other ports that are needed by the backend.
Preparing the secondary region
**Note: I´ll create a second Resource Group to highlight the secondary region, however you can use the same previous resource group.
Create Resource Group.
I´ll use the Azure Portal to provision the resources, some of them can be provisioned through CLI, PowerShell etc.
- Go to the Azure Portal and create a resource group:

- Select Add.
- Enter the following values:
- Subscription: Select your Azure subscription.
- Resource group: I´m using “ps-kemp-ha-2”
- Region: Select an Azure location, in this case I´m using North Europe.

Create Vnet and subnets for the secondary region
From the Azure portal menu, select Create a resource. From the Azure Marketplace, select Networking > Virtual network.
In Create virtual network, enter or select this information:
SettingValueSubscriptionSelect your subscription.Resource groupSelect ps-kemp-ha-2.NameI’m using “_ps2-kemp-ha-vnet“_.LocationSelect North Europe.
- Select Next: IP Addresses, and for IPv4 address space, enter 10.60.0/16. (Please ensure you don´t overlap any other IP Address space)
- Select Add subnet, then setup 2 subnets:
- 1 subnet will be for the Kemp LoadMaster, enter default for Subnet name and 10.60.1.0/24 for Subnet address range.
- 1 subnet will be for the VM with the website, enter web for Subnet name and 10.60.2.0/24 for Subnet address range.
- Select Add, then select Review + create. Leave the rest as default and select Create.
- In Create virtual network, select Create.
After creation you should see the configuration as below for the Vnet and subnets:

- Provision VMs (Application Server)
Repeat the process previously demonstrated to provision another pair of webservers for the secondary region
Create Azure Load Balancer on the secondary region
Repeat the process previously demonstrated to provision another Azure Load Balancer with Standard SKU
Create 2 Kemp LoadMasters
Repeat the process previously demonstrated to provision a new pair of LoadMasters on the secondary region
Configure the Azure Load Balancer on the secondary region
You can check all the previous configuration on this video:
Configure Vnet peering
Virtual network peering enables you to seamlessly connect networks in Azure Virtual Network. The virtual networks appear as one for connectivity purposes. The traffic between virtual machines uses the Microsoft backbone infrastructure. Like traffic between virtual machines in the same network, traffic is routed through Microsoft’s private network only.
Azure supports the following types of peering:
- Virtual network peering: Connect virtual networks within the same Azure region.
- Global virtual network peering: Connecting virtual networks across Azure regions
For this scenario we will configure a Global Vnet peering to connect West US and North Europe.
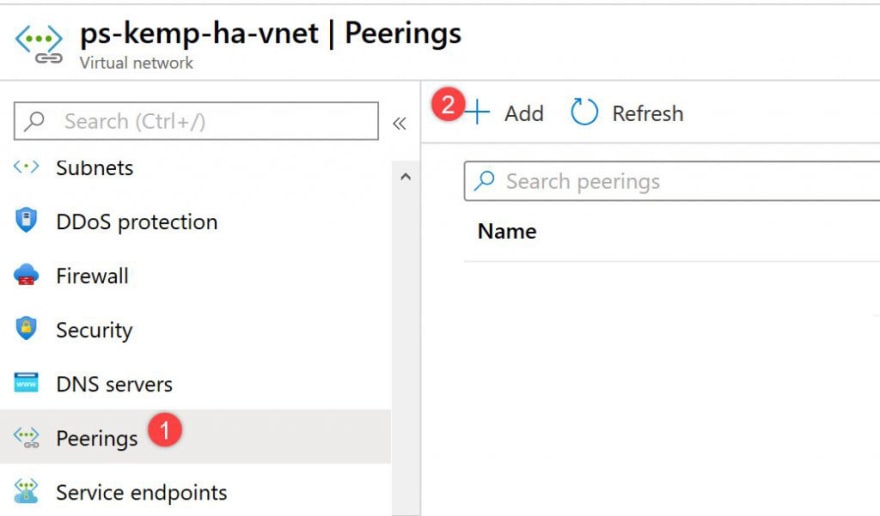
Go to the Azure Portal and select your primary Virtual Network, then select Peerings and Add:
Now provide the name for your Vnet peering, note that this action will create a Peering from West US to North Europe and will automatically generate the peering from North Europe to West US:
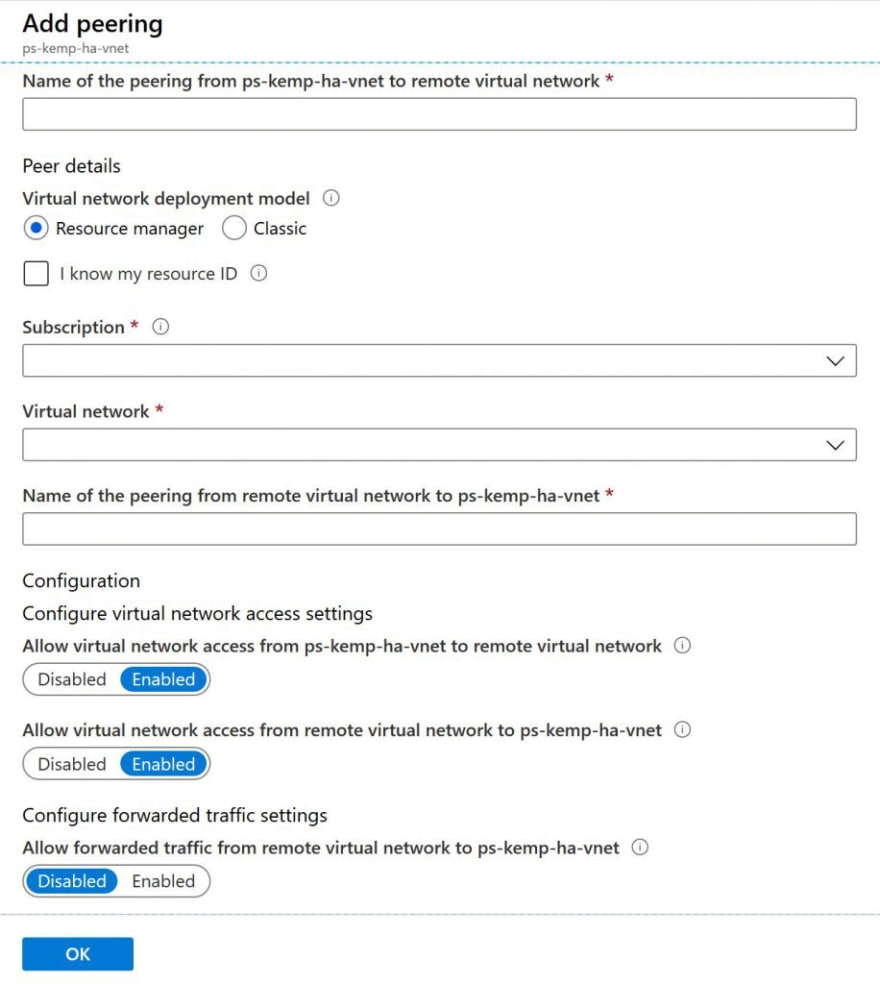
See the example below:

If the configuration is correct, you should see the “Connected” status on the Peering:

To test the peering you could go to any of the webservers VM and try to ping the internal IP address of a VM running in the secondary region
Enable DNS load balancing using Kemp LoadMaster GEO on Azure.
Kemp GEO offers the ability to move past the single data center, allowing for multi data center High Availability (HA). Even when a primary site is down, traffic is diverted to the disaster recovery site. Also included in GEO is the ability to ensure clients connect to their fastest performing and geographically closest data center.
We could say that LoadMaster GEO which performs DNS load balancing extends the Azure traffic manager capabilities.
Let’s check how Kemp LoadMaster GEO works:
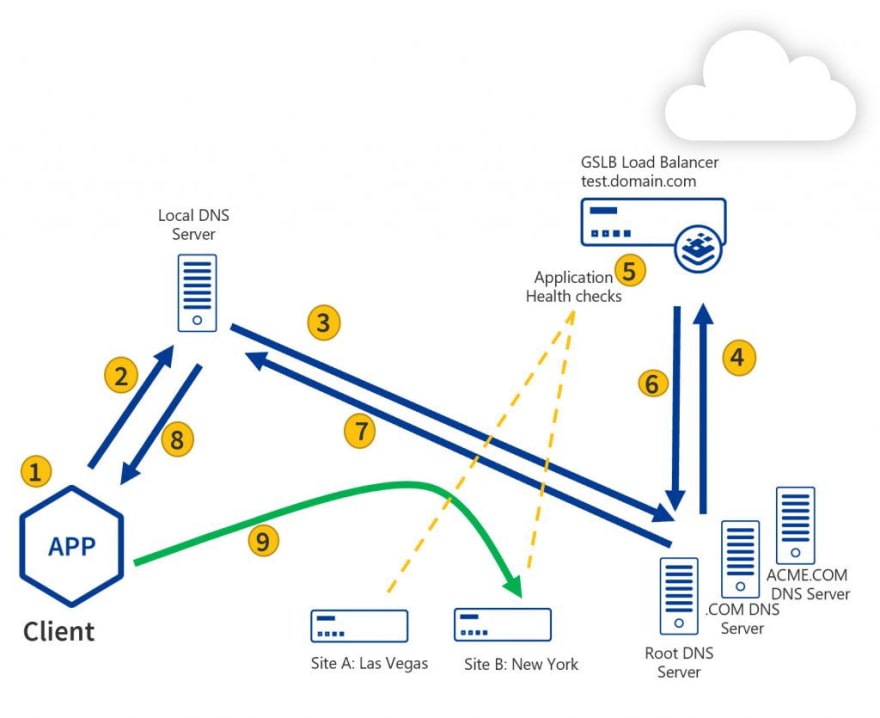
- A public client tries to connect to FQDN test.domain.com.
- The public client checks its local DNS.
- The local DNS forwards the request to the public DNS.
- The Public DNS forwards the request to GEO as it is the authoritative DNS for this record.
- GEO checks persistence and scheduling and decides which site to return.
- GEO returns the IP address for the client that made the request (in this case; the public DNS).
- The public DNS returns the results to the Local DNS.
- The local DNS returns the result to the client.
- The client connects directly to the site.
In this scenario we will review how to leverage Kemp LoadMaster GEO to enable global balancing across 2 azure regions.
Create Azure DNS zones.
First of all we need to configure the DNS records and for this we will use Azure DNS Zones with a new domain kemp.tools.
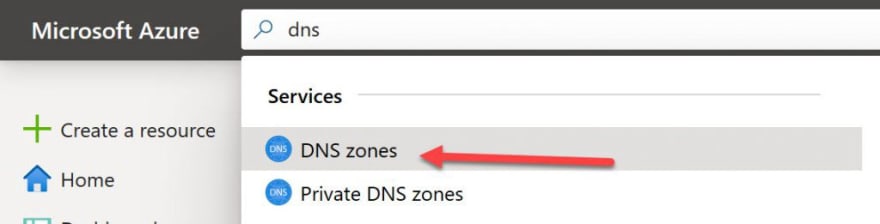
Once you have your domain/FQDN, go to the Azure portal to create a DNS zone. Search for and select DNS zones
- Create DNS zone.
- On the Create DNS zone page, enter the following values, and then select Create:
SettingValueDetailsNameKemp.toolsThe domain name you bought. This tutorial uses kemp.tools as an example.Subscription[Your subscription]Select a subscription to create the zone in.Resource groupPs-kemp-ha The location of the resource group has no impact on the DNS zone. The DNS zone location is always “global,” and isn’t shown.LocationWest US
Before you can delegate your DNS zone to Azure DNS, you need to know the name servers for your zone. Azure DNS allocates name servers from a pool each time a zone is created.
- With the DNS zone created, in the Azure portal Favorites pane, select All resources. On the All resources page, select your DNS zone.
- Retrieve the name servers from the DNS zone page. In this example, the zone contoso.net has been assigned name servers ns1–01.azure-dns.com, ns2–01.azure-dns.net, ns3–01.azure-dns.org, and ns4–01.azure-dns.info:

Delegate the domain
Now that the DNS zone is created and you have the name servers, you need to update the parent domain with the Azure DNS name servers. Each registrar has its own DNS management tools to change the name server records for a domain.
- In the registrar’s DNS management page, edit the NS records and replace the NS records with the Azure DNS name servers.
- When you delegate a domain to Azure DNS, you must use the name servers that Azure DNS provides. Use all four name servers, regardless of the name of your domain. Domain delegation doesn’t require a name server to use the same top-level domain as your domain
Create the Azure DNS records:
We will create 3 records for this example:
- NS record for your service, in this case app.kemp.tools. Pointing to geo1.kemp.tools and geo2.kemp.tools
- An A record geo1.kemp.tools pointing to the LoadMaster on the primary region
- An A record geo2.kemp.tools pointing to the LoadMaster on the secondary region

Please see below the configuration for the NS record:

Please see below the configuration for the A record for geo1.kemp.tools :

Now here’s the configuration for the A record for geo2.kemp.tools:

**Note: Usually you would point the A records to the Azure Load Balancer IP address which works as the “LoadMaster Shared Interface”, however if you have only a single LoadMaster per region then you can point it to the Public IP address of the LoadMaster.
Configure Global Balancing on Kemp LoadMaster
Now let’s review the configuration of the Kemp LoadMaster GEO to enable global balancing across different Azure regions
Configure “Distributed LoadMaster Partners”
From Kemp official docs:
When there are multiple LoadMaster boxes, where each box could be a single LoadMaster or a HA pair, they can be linked together to act as a single resource.
When a HA LoadMaster pair is configured to do GEO synchronization, all of the shared IP addresses must be added to each partner configuration correctly.
All of the boxes remain synchronized with each other and share their DNS Configurations, FQDN information, ‘Stickiness’ information and health checking updates. Any updates are automatically shared with all the other Distributed Partners

HA is the same for GEO LoadMasters as it is for regular LoadMasters — it is an active-passive pair of units.
Partners are two or more GEO units in an active-active mode.
It is possible to have both HA and partners.
Partner the GEO LoadMasters
Go to your primary LoadMaster on Azure on the primary region, in this case ps-vlm01-ha:
- Select Certificates & Security > Remote Access option from the main menu
- Then provide the 2 public IP addresses of the Azure Load Balancer, separate them by a single space, then click on the button “Set GEO Loadmaster access”
- Now provide the 2 internal IP addresses of the LoadMaster VM, in this case 10.20.1.4 and 10.60.1.4, again separate them by a single space and click on “Set GEO LoadMaster Partners”
- Set the GEO LoadMaster port as 22 and click the button “Set GEO LoadMaster Port”
**Note: You should be able to see the partner status in green after a few seconds indicating that the two partners can see each other.
From now on, all the configurations related to GEO performed on this LoadMaster will be replicated to the LoadMaster located on the secondary region and viceversa

Add fqdn
In the main menu, select Global Balancing and Manage FQDNs.
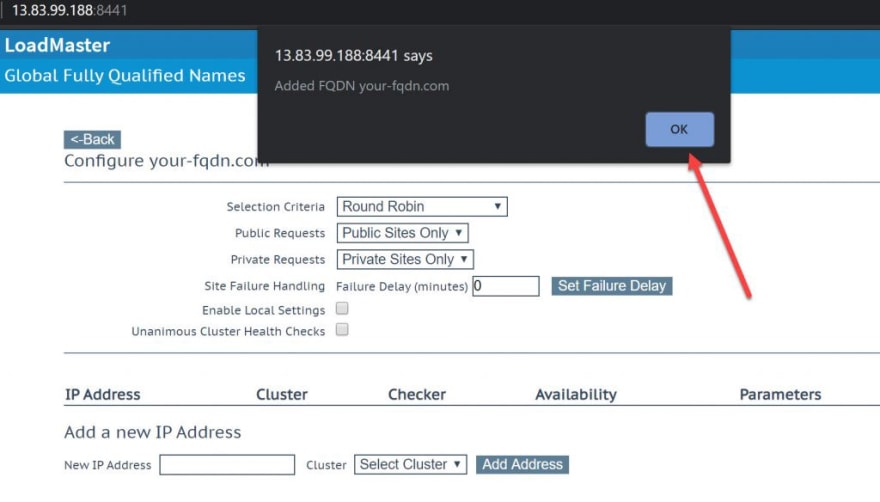
Click the Add FQDN button.
In this case we will add the FQDN: app.kemp.tools

Click OK on the message that appears.
Now we will add the clusters.
Add clusters
A cluster is a group of LoadMasters working in conjunction. Clusters can also be non-LoadMaster entities using TCP or ICMP health checks. GEO clustering is a feature mainly used inside data centers. Health checks are performed on a machine (IP address) associated to a specific FQDN, using the containing cluster server, rather than the machine itself.
You can add a maximum of 18 GEO clusters.
Go to the left menu and click on manage clusters.
A cluster can be:
- An IP address of a Virtual Service configured on the Kemp LoadMaster
- An IP Address of the Kemp LoadMaster
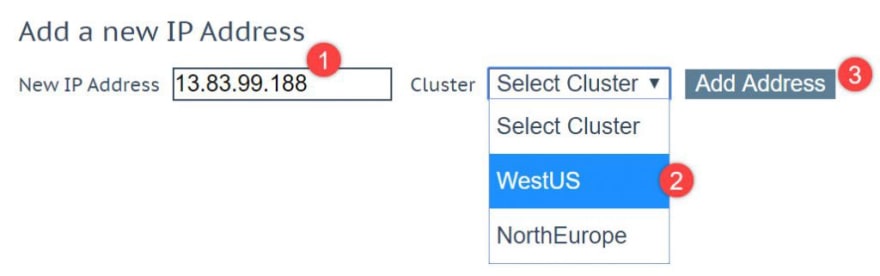
To add a cluster add the IP address, in this case the IP address of the Azure Load Balancer, then provide a name in this case WestUS and then click on Add cluster as shown below:

Perform the same process for the secondary region:

Now when you add a cluster you have the option to:
- Rename your Cluster
- Specify the location, this can be used for the “selection critieria” option to decide how you want to distribute traffic across different regions
- Set the cluster type to default :
- Default: When the type of cluster is set to Default, the check is performed against the cluster using one of the following three available health checks:
- None: No health check is performed. Therefore, the machine always appears to be up.
- ICMP Ping: The health check is performed by pinging against the cluster IP address.
- TCP Connect: The health check is performed by connecting to the cluster IP address on the port specified.
- Remote LM: The health check for this type of cluster is Implicit (Remote LM health checks are performed using SSH on port 22.).
Define the Checker as TCP Connect through port 80, then click on Set Port

**Best practice: if you select Default as the Cluster type, it is recommended to prefer TCP Connect Checkers rather than ICMP Ping

Perform the same configuration for the NorthEurope Cluster.

Now that we have configured the Clusters, let’s go back to our FQDN configuration.
**Note: When setting up clustering in a multi-GEO environment, all LoadMaster clusters must be of the type Remote LM

Configuring Site Resiliency Options
Go to the left main menu and click Global Balancing — Manage FQDNs

You will see that your fqdn is not configured yet, click on Modify:

First of all add a new IP address, in this scenario we could use the Azure Load Balancer IP as it is a public IP address and it is pointing to the LoadMaster:
Perform the same configuration for the secondary region:

You can set an specific Checker, like ICMP Ping, TCP or Cluster checks:

Now select TCP Connect, then provide the internal IP address of the LoadMaster, select Port 80, then click on Set address, now provide an specific weight for this location (the higher the number, the higher the priority this region gets) then click on “Set Weight”.

There are various methods of distributing traffic across different regions. The traffic distribution is based on a load balancing algorithm or scheduling method. Here is a list of the methods:
- Round Robin
- Weighted Round Robin
- Fixed Weighted
- Real Server Load
- Proximity and Location Based
- All Available
For this example we will use Fixed Weighting.

So bottomline, the selection criteria = scheduling method on a virtual service.
Now, when you have multiple IP addresses that you can refer the user to, you can provide a different path depending if the request is public or private.
(GEO it´s going to look at the class full addressing )
Also, you might have 2 type of users that you are going to get requests from:
- Public users IP Addresses
- Private users IP Addresses
If you have an on-premises LoadMaster GEO you can have listed both type of users on the fqdn, in this case we are considering just external users reaching to app.kemp.tools
So you could setup the GEO to support internal users and external users looking for the resolution, you can change that behavior here:

The Public Requests and Private Requests drop-downs in the modify FQDN screen allows granular control of DNS responses. This provides finer control of DNS responses to configured FQDNs
- internal user will be able to reach one of the 2 internal IP addresses (example 11.22.33.44 / 99.88.77.66)
- external user will be able to reach one of the 2 external IP addresses (example 192.168.1.100 / 192.168.150.100)
We will leave the site failure handling to 0.
A Failure Delay (minutes) can be set if needed. If a Failure Delay is set, another option called Site Recovery Mode becomes available.
Two modes are available:
- Automatic: The site is brought back into operation immediately upon site recovery
- Manual: After the site has failed, disable the site. Manual intervention is required to restore normal operation.

Source of Authority
This is the configuration of global parameters controls the behavior of the entire LoadMaster. The Source of Authority (otherwise known as Start of Authority) information is not required for basic functionality; however, it is recommended to populate this metadata to accurately represent the LoadMaster DNS server.

Test your disaster recovery with Azure DNS Zones and Kemp LoadMaster GEO
Now you should be able to go to your fqdn and access to the service in this case I´ve configured a Docker site on ubuntu on the primary region just to test and differentiate the region I´m accessing to.

Kemp LoadMaster GEO Statistics
You will be able to see some insights related to the GEO module under Global Balancing — GSLB Statistics


Conclusion:
Along this article we reviewed how to enable disaster recovery with Azure DNS Zones and Kemp LoadMaster GEO. Azure offers a rich ecosystem of cloud services that you could leverage to improve the resiliency of your infrastructure. By utilizing network virtual appliances such as the Kemp LoadMaster you can have the best application experience across multi-cloud or hybrid scenarios through the GEO which provides a seamless failover and failback in the event of a critical resource failure.
Resources:
- Virtual LoadMaster on Azure: https://azuremarketplace.microsoft.com/en-us/marketplace/apps/kemptech.vlm-azure
- ARM Templates. https://github.com/KEMPtechnologies/azure-resource-templates
- GEO. https://support.kemptechnologies.com/hc/en-us/articles/203125189-GEO-Feature-Description#MadCap_TOC_48_2
- Setup Azure Load Balancing for High Availability
Written by

Top comments (0)