
I created a Netflix clone using Piral: an open-source framework for creating modular applications.
In this article, I will go over what microfrontends are, why they are useful, and what frameworks exist to make implementing them easier. I'll also share my experiences creating a project by myself using React and Piral: two technologies I had previously never touched. I will cover what I did, and how I did it. Finally, I will present some closing thoughts, opinions, and personal notes about this endeavor.
The "How I did it" section will be written in a way where every developer, regardless of skill level, should be able to follow. Be sure to give Piral or microfrontends as a whole a try, and let me know how it went!

Contents
- What are microfrontends?
- Why microfrontends?
- Microfrontend frameworks
- Piral
- The project
- Final thoughts
- Quick links to all code
What are microfrontends?
Microfrontends try to extend the idea and the benefits of microservices into the frontend space. In essence, this architecture pattern comes down to "splitting up the frontend monolith" into smaller, more easily manageable pieces.

This allows fully cross-functional teams to work on these, focussing on a specific business feature or company mission. Rather than "horizontal" teams, per layer or technology; these teams manage the "vertical" slices of the application. Each team is autonomous, and has end-to-end – from the database to the UI – responsibility for the features they develop.
Teams should be able to independently create and deploy these microfrontends. This cuts down on inter-team communication; which could then also enable distributed development.
This is especially beneficial for larger companies and projects, where the Jeff Bezos "Two Pizza Team" rule (i.e. the whole team can be fed by two pizzas) can be helpful. Spotify for example, calls these smaller feature teams "squads". Interesting read here.
Why microfrontends?
Microfrontends make teams more agile
When comparing the characteristics and benefits of microfrontends with the 12 Agile Principles, lots of overlap emerges:
-
Autonomous teams
Autonomous teams satisfy lots of these agile principles. In short: teams that can operate on their own are less prone to being slowed down, can make changes quickly, and feel a greater sense of ownership.
-
Incremental upgrades
By being decoupled and decentralized, the microfrontends architecture pattern ensures that the incremental and iterative process of agile software development can succeed.
-
Independent deployment
Microfrontends can be deployed independently. This can enable shorter release cycles, because all different parts don't have to be in sync with each other.
Simple and decoupled codebases
Simplicity is essential to agility: this makes it easier for the whole team to be on board and iterate fast. Decoupling makes using different technologies possible; but even when using the same technologies throughout the app it can still be very beneficial for efficiency of development.
Microfrontend frameworks
While you could take the microfrontend principles and devise your own solution to manage them (in fact, that's kinda what my bachelor thesis will be about); there are lots of frameworks already out there that can do some of the heavy lifting for you.
Florian Rappl outlines and categorizes a lot of these frameworks in the following blog post:

Popular options include Single SPA, Open Components, Mosaic, Podium, Luigi and Piral.
Rather than competing frameworks, most of these exist side by side, and they each provide a different way of creating these microfrontend solutions. They differ in key properties such as completeness (just solving some problems such as routing vs providing a full end-to-end solution with error boundaries, tooling, eco-system, etc.) or architecture style (e.g., build-time composition vs client-side composition vs server-side composition).
Piral
Piral is an open-source framework for fully flexible modular applications. It is built on top of React, but has lots of plugins available for other frameworks and technologies.

Building blocks and terminology
An application built with piral consists of multiple parts.
If you have no experience with microfrontends, this section can be confusing. Don't be alarmed: the section "The project" below will turn the abstract into the practical, which will be easier to follow.
The Pilets (feature modules)
These are the individual feature modules, also known as microfrontends. They each include their own dependencies and assets, and are completely independent of each other.
Pilets can define how the integration of their components will happen. Does the pilet need a dedicated page, or will the content be rendered inside an already existing pilet? Maybe we need a dedicated page, and also register a button somewhere else that will link to the page? It is all possible.
The feed service
Pilets are usually published to a feed service (e.g. a REST API). Piral provides its own feed service over at piral.cloud.
It should be noted that Piral can work without a feed service but a feed service makes deployments easy and consumption very dynamic; showcasing all the advantages of Piral.
The Piral Instance (app shell)
This is the place where all feature modules will be integrated. The piral instance will pull all registered pilets from the feed service, and put them where they need to go as defined by the pilets themselves. The app shell also is the place to put your basic layout: navbars, headers, footers, and shared components.
The result of building the app shell is a dist/release directory for hosting, and a dist/emulator directory with a tarball which can be published to an NPM registry to aid in the development and the debugging of the individual pilets.
(Component) extensions, pages and menu items
The piral API supports registering extensions in your pilets and Piral instance. Let's say for example we have a webshop with 2 pilets: a discover pilet that lists products and a checkout pilet that enables users to purchase these items (this is by the way a classic example for microfrontends, read more here). The discover pilet should include a button to purchase items, but since that is not the responsibility of this team, the checkout team will create this button and register it as an extension that all pilets can use. The discover pilet will then just register an extension slot where the app shell will integrate the right extension into.
Piral also has a built-in way to register pages and menu items. These can also be seen as extensions, but where the work is already done for you.
The project
What I did
Application overview
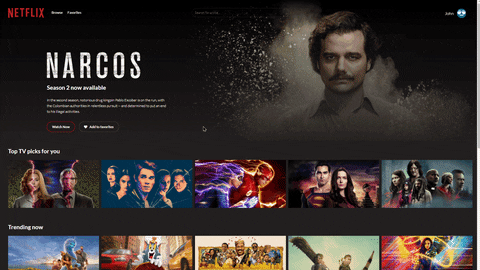
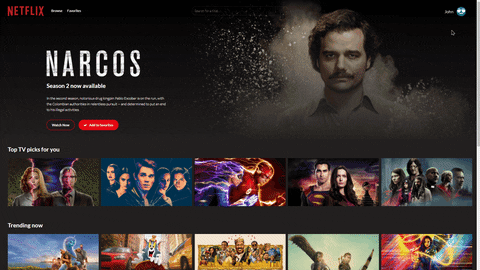
You can find the application online on netflixclone.deruwe.me.
This application is a Netflix clone with some basic functionalities. There is a Browse page where the user can discover showcases of trending series and movies, top-rated ones, etc.
Of course, to find a specific movie or series, the user can also use the provided Search bar.
Every media tile also has a Favorites toggle in the top right corner. Clicking it adds the series or movies to the user's favorites list, to be found on the favorites page.
The user can switch accounts via the Profile option in the top right. All favorites are linked to the specific account.
It is worth noting that this demo project does not come with a custom backend: all data is coming from a 3rd party API, the accounts are dummy accounts, and the favorites are stored in local storage.
Impressions
Structure of the application

The app shell
The app shell contains only the logo, navigation, and footer. All the other components are provided by the pilets in the form of extensions, pages, and menu items.
The pilets
| Pilet | Registered components |
|---|---|
Browse |
Browse (page) |
Favorites |
FavoritesToggle (component extension) |
Watch |
MovieTile (component extension)Player (page) |
Search |
Search (component extension) |
Profile |
UserProfile (component extension)AccountSwitcher (page) |
How I did it
Throughout the creation of the project using piral, obviously, the Piral documentation was my main source of inspiration. There, they also have video tutorials on lots of topics regarding Piral.
The Piral documentation also talks about the 3 phases of the development workflow. This is also the way I tried to develop my application. Of course, to be able to experiment, I sometimes stepped a bit of out bounds.
0. The planning phase
But before following any of the laid-out steps provided by Piral, I looked out for a sample project that I could build upon. I'm not a designer, so looking for a React project with good styling was the easiest option. I found this project, which was written using an older React syntax, and was all in one big App module. I converted everything into separate React functional components. This was a great way to learn how React works.
You can see the results in the following repo. The commit history here shows what I did.
 DanteDeRuwe
/
react-netflix-clone
DanteDeRuwe
/
react-netflix-clone
Learning React by creating a simple Netflix clone. (I transformed this into a microfrontend solution! See https://git.io/netflix-piral)
1. The setup phase
What needs to be done in this phase?
- Develop the piral instance
- Set up a feed service and connect the piral instance to it
- Distribute an emulator package
1.1. Creating the Piral instance (app shell)
You can find the code on github
Following the documentation showed me how to get this up and running. Install the Piral CLI globally by running:
npm install piral-cli -g
(one could also use npx to avoid unsafe global installations, see below)
The CLI exposes commands starting with piral and pilet. In this phase, of course, we will need the piral commands.
To create a Piral instance (app shell) called netflix-piral, let's run
piral new --target netflix-piral
We can run the newly created Piral instance with the following command:
piral debug

# or, if you want to open the browser automatically:
piral debug --open
– using
npx–Instead of a command like
piral debugwhich only works inside a directory with apackage.jsonor if you have the Piral CLI installed globally, you can also usenpx:
- if the given name is not available in (modified) path (e.g., global path or
node_modules/.bin), npx will try to get the command from NPM and run it (non-globally i.e. from user privileges)- if the given name is available it will just run it from there (also from user privileges)
Let's have a look at one of the most important files, index.tsx:
The renderInstance function outlines the responsibilities of the app shell: it takes care of the layout, the error layout, and requests the pilets from a feed service. As we can see on line 6 - by default - it's just pulling from an empty feed.
In fact, the only thing that will change in this file, is the feed URL. To be able to do that: let's first set up a feed.
1.2. Setting up the feed service
While you could (and in some circumstances, should) set up your own feed service, most of the time the service provided by the Piral team itself will suffice. For development purposes, you get multiple feeds for free! This service can be found on piral.cloud.
▸ Creating a feed on piral.cloud
Sign in to the service and you'll see the following screen

Of course, we're going to click + New Feed.
Next, we'll give the feed a unique name (which cannot be changed), and optionally, a description so it's clear for what this feed will be used.
You can also configure the allowed hosts.
You'll see the result on the overview:

- To be able to publish pilets later, we'll need an api key. You can manage them by clicking

- To get the feed url for the app shell, we can click the feed title. The url will be displayed:

We'll copy the feed url and place it where we wanted it before: in the index.tsx of the Piral instance (line 6).
1.3. Creating the app shell layout
We have an app shell now which pulls from our own (still empty) feed! We'll add pilets to this feed later. But first, maybe we should customize the layout of this app shell. As written before, the main responsibilities we want for this app shell are the logo, the navigation, and the footer.
After scaffolding, the layout.tsx file contains a lot of components and also combines them in a layout object to be used by the index.tsx. While this is fine, I like to split up all my components using a single file per component, so the result looks like this:
We'll put the layout in ./components/App.tsx, the navigation template in .components/Navigation.tsx and for the menuitems, they are just rendered using <li>...</li>.
Remember what I mentioned before:
The app shell contains only the logo, navigation, and footer. All the other components are provided by the pilets in the form of extensions, pages, and menu items.
This is absolutely the case, but we do however need to define where the pilets need to render these extensions! Here is a quick wireframe diagram for the app shell.

The pages registered by the pilets will just be given to the App component as children. We can use a react-router to surround them.
As for the extensions: The key to being able to integrate these is an ExtensionSlot with a specific name. The pilets are then able to register extensions, providing a name, and the app shell will put them in the right slot.
The code for the App component is below. On line 14 the extension slot with name="header-items" is registered, on line 19, the different pages will be rendered.
The menu items are standardized in Piral. The component registered in index.tsx as the MenuContainer (= in our case, the Navigation component) will get menu items as children when pilets register them.
1.4. Deploying the app shell on Netlify (or somewhere else)
If you already know how hosting works, here's a TLDR: execute
piral build --type releaseand publish thedist/release/folder! You could of course set up CI/CD to do this for you. Don't forget a_redirectsfile for routing!
To deploy the application for the world to see, we need to publish it somewhere. To me, the best place to do this is Netlify. One could of course choose Azure Static Web Apps, Github pages, or another hosting platform, but Netlify is easy to use and has a lot of great features that are completely free.
To get started, create an account on Netlify. I like to use my Github account because this way the accounts are already linked.
Next, create a "New site from git" in the sites tab of the interface.

Find the Github repository of your app shell. If you don't have one already... you should create one ;)

Now configure the build settings as follows:
- set a branch (I use master, you could also create a custom
releasebranch) - set the build command to
npm run buildorpiral buildorpiral build --type release - set the publish directory to
/dist/release/(don't skip this step!)

Then you are ready to deploy your site with the click of a button! Now every time you push your code to the selected branch, the site will be updated! CI/CD for the win!
▸ The _redirects file
When you deploy the app shell for the first time, you will not notice it, but the routing is not perfect. To save yourselves some headaches later on, you best follow the next steps already, so you won't have to touch your app shell again.
If you go to yourwebsite.netlify.app/test, Netlify will try to find a test.html page to serve you, will not find it, and show an error message. We want React Router to deal with routes. We have to redirect all routes to the index.html... To do this, we create a folder with path /src/static/ and put a _redirects file into it:
/* /index.html 200
To make sure this file is copied to the release directory on build, we need to configure webpack to do so.
Install the CopyWebpackPlugin
npm install copy-webpack-plugin --save-dev
In the root folder of your project, create webpack.config.js
This will copy everything from the src/static/ directory to the build directory. This means you can later on also add images and other files to this static directory if you so desire.
1.5. Publishing the emulator
▸ What is the purpose of the emulator?
Now, we have our app shell up and running. When pushing Pilets to our feed service, the app shell can access these immediately and the site will be updated. But what if we want to develop new pilets? Surely we won't be publishing them a hundred times to see how they look, right?
Luckily, Piral has a good solution to this: an app shell emulator. The pilets can use the emulator to see how they will look when integrated into the app shell, to be able to quickly debug the pilets.
To create an app shell emulator, run
piral build --type emulator
The emulator is a .tar.gz or .tgz file (a so-called "tarball") and can be found in the /dist/emulator/ directory.
Great. Now we have a file. If we are creating pilets alone, on one pc, this is no big deal. But ideally, we want the emulator to be accessible from every pilet, and also be able to update the emulator when a new version of the app shell is necessary. That's why it makes sense to publish the emulator.
▸ publishing the emulator package to npm
If you have experience with npm, here's a TLDR: run
npm publish dist/emulator/<emulator_file>.
To be able to access the emulator from everywhere, we are going to use the node package manager or npm. First, go to npmjs.org and create an account if you don't already have one.
Next, in your terminal, run
npm login
and log in using your username and password. Next, you can run
npm publish dist/emulator/<emulator_file>
The <emulator_file> will in our case be netflix-piral-1.0.0.tgz or something similar. If you get an error (which could mean the name you chose is already taken), refer to this article or the npm docs.
If you look at your registered packages on npmjs.org, you should be able to see the published emulator package! This will be very useful in the next phase: the feature phase, where the development of the pilets will be addressed.
2. The feature phase
What needs to be done in this phase?
- Build and publish pilets to enable functionalities in the app.
- Manage separation of concerns
- extract app shell functionality into pilets
- split larger pilets or merge smaller ones
2.1 Scaffolding a pilet
Creating a pilet is really straightforward. The piral CLI provides an easy way to scaffold a pilet based on a piral instance. For us the workflow will look like this:
mkdir browse
cd browse
pilet new netflix-piral
This will create a folder browse, and put a new pilet called "browse" – which is based on the Piral instance netflix-piral – inside of it.
2.2 The first version of the browse pilet
Let's create some functionalities! The home page of this app will be the "browse" page. Since discovering new series and letting the user browse through series and movies is a pretty big part of the app, this will be the responsibility of one pilet (and, by consequence, a separate dev team).
The file structure looks like this:

A pilet is very lightweight. The only file to look at is the index.tsx, where some interesting examples of the Piral API are shown:
The setup function is the heart of the pilet. This is where the app shell will look for instructions for integrations.
We won't need the notifications or the tiles. You can learn more on these from the Piral documentation.
The most interesting method for us is registerMenu, we'll need this for the "Browse" menu item:
app.registerMenu(() => <Link to="/browse">Browse</Link>);
And to register a page where this menu item can link to, we will need to add
app.registerPage('/browse', Browse);
Where this Browse is just a regular React component (for now). The structure looks a bit like this:
Browse
    ├── Hero
    ├── Showcase
    │       ├── MovieTile
    │       └── ... #more movietiles
    └── ... #more showcases with movietiles
▸ Debugging the pilet in isolation
To be able to test how the pilet will look after integration into the app shell, of course, we could just publish it and look at the live website. However, I won't have to explain why "testing in production" is not the best idea ever.
So, Piral offers a way to debug the pilet, this is where the emulator comes into play. To debug the pilet, you can run
pilet debug
After the build process is complete, the CLI will let you know on what local address you can look at the result (usually http://localhost:1234).
It's interesting to note that this command is almost identical to the one for the app shell, but there we used the piral keyword, and now we use pilet.
This section is called "debugging the pilet in isolation", which seems logical since we only have one pilet defined. Later on, I'll discuss a great feature that enables you to debug one pilet that is part of an application with multiple pilets.
▸ Publishing the pilet
We already published the piral instance (app shell), and the fun thing about working with Piral is that this app shell will pull every pilet from a feed and integrate them client-side.
This means, to publish a pilet, we won't have to touch deployment stuff. We just need to publish the pilet to the feed we created earlier.
We can do this by:
pilet publish --fresh --url <feed_url> ---api-key <feed_api_key>
Tip: I saved this snippet as a script called
publish.sh, added it to.gitignore(so my API key won't be on Github), and then ran the script whenever I wanted to publish.
The --fresh flag makes sure that before publishing, a fresh build is made to include any changes made after the last build.
The feed url and API key, as mentioned before, you can find in the piral feed service dashboard. The direct url is:
https://www.piral.cloud/feeds/<feed_name>/api-keys
2.3 The profile pilet
Next, let's tackle a more interesting case. The profile pilet. This pilet will again register a page, /profile, but will also do something else: it will register a component extension.

When looking back at the app shell, this component extension has to be put in the extension slot header-items. so that's what we will do.
The index.tsx of the profile pilet will then look like this:
Where ProfileExtension and ProfilePage are just regular React components.
As is the deal with component extensions: the app shell will integrate the registered extension into the right ExtensionSlot (the one with a matching name).
2.4 The favorites pilet
Here we start to run into an interesting thing. We want to introduce the favorites as a page where we can find all the favorite series or movies. This means multiple things:
- Just like in the Browse component, we will need a way of displaying media (
MovieTile) - We will need to provide a
FavoritesTogglebutton in everyMovieTile, to be able to toggle this item as a favorite
▸ The MovieTile and thoughts about code duplication
We could just copy over the MovieTile code from the browse component and reuse it here. This would be a very viable strategy, and it's also the one I used when you look back in the commit history.
– "Don't repeat yourself" ? –
While it is true that the DRY principle can result in cleaner code within the scope of one solution; it sometimes limits the desired decoupling of applications. Especially in microfrontends, sometimes repeating yourself cán be useful, and the reverse is often more difficult and undesirable. There is an interesting article to be read here
That being said, later on in the project, I looked back at this part in the Piral docs:
"Determine when to split pilets and potentially split larger pilets or merge smaller ones."
That's when it started making sense to extract the MovieTiles into a separate watch pilet, where they are registered as component extensions. I'll talk about the watch pilet in the next section.
▸ The FavoritesToggle
We'll offer the favorites button as a component extension, so all pilets or the app shell can integrate this button wherever they want them.
For that, we need this in the setup function of the favorites pilet:
app.registerExtension('ListToggle', props => <FavoriteToggle {...props.params}></FavoriteToggle>);
This is where passing parameters into component extensions becomes interesting. A very basic FavoriteToggle component may look like this:
(If you want to see the full code, check the github repo, I'm omitting stuff for brevity)
For this toggle function, it is important that the button gets some properties. Using a favourites toggle may look like this:
<FavoritesToggle movieId="15165" media_type="tv" />
or something similar. All this introduction leads us to the main question: how to pass parameters to component extensions when using them across pilets?
Well, it's pretty easy: the Extensionslot component has a property params. Whenever we want to use an extension, we give the slot the params, and piral will pass these params to the extension that will end up in that slot. This means, a registered extension will have props.params, which will come from wherever we defined the extension slot.
If we want to use this component extension from other pilets, the extension slot will have to look something like:
<ExtensionSlot name="ListToggle" params={/*an object with the params here*/}/>
We will see an example and best practices about this in the next section:
2.5 the watch pilet
This pilet would have 2 things registered:
- the
MovieTilewe talked about earlier.- this should have a spot where our
FavoritesTogglecomponent extension can fit into!
- this should have a spot where our
- the
Player(which is just a simple page and we won't discuss further)
▸ The MovieTile
This was an interesting lesson in what I like to call extensionception: we'll register a component extension, but within that extension, we'll use an ExtensionSlot where another component extension will fit into:
The eventual result on for example the favorites page will look like this:

Ok, let's look at the MovieTile component:
This component accepts a whole bunch of properties to be able to display the movie tiles with all the information. It's a purely presentational component.
▸ Passing extension dependencies via props
On line 11 you can see that the MovieTileProps also contain a definition for a React component reference: this will be the FavoritesToggle we defined before.
But why don't we just put <Extensionslot name="ListToggle"/> there? Well, it's because of what I learned while reading the Pilet best practices on using extensions
Using components provided from other pilets is done via "extensions". The problem is that the extensions require the Extension component of the Pilet API to be integrated.
Indeed. We would need to do this at the top of our component extension file
import { ExtensionSlot } from 'piral';
This is a bad practice: we couple our components to the Pilet API, and now they are no longer reusable, testable, and generic.
The fix comes down to this: The only file in a pilet that should depend on the Piral framework is the index.tsx file with the setup function. From there, we can pass down the needed dependencies. For the MovieTiles, it looks like this:
On line 10, we use app.Extension, which has the same purpose as an ExtensionSlot. We use the result of that to have a component to pass into another component. This way, the MovieTile has props.Toggle defined, and can use it just like any other React component.
▸ Debugging one pilet and seeing the interaction with the other pilets too
While developing the browse pilet, the section where I talked about debugging was called "debugging the pilet in isolation". Now, we're going to do something more powerful.
Let's recall what happens when we run pilet debug. We have an app shell emulator in which the pilet will be integrated. That's it – 2 parts:
- the app shell (emulated)
- the pilet that's being debugged
But what if we want to see the already published pilets too, to see how the pilet that we are debugging will fit into them? (mainly, in this case, we want to see how the extensions integrate)
At the time of writing, the Piral CLI is still in version v0.12.4, but I got the recommendation to switch to the v1.0.0 preview version (the @next version). This version of the CLI provides in my opinion a major game-changing feature: the ability to debug pilets, while also being able to include remote pilets from the feed!
It's also very easy to do:
pilet debug --feed <feed_url>
And voila! We can see how the new pilet will fit into the app shell and the already defined pilets in the feed! Amazing!
Honestly, since learning about this feature, I never ever used debugging in isolation again. It's so much easier to see how the pilet will fit into the application when also including other pilets into view.
To make my life easier, this is what my scripts looked like in every pilet's package.json:
  "scripts": {
    //...
    "debug": "pilet debug --feed <feed_url>"
  },
This way, I could just run the command npm run debug!
2.6 The search pilet
This pilet just registers one component extension. We'll also set it to render into the header-items slot. This way: we will get the search and the profile extension both in there.
3. The maintenance phase
This is mainly bug fixing and doing optimizations.
Persisted state
This has nothing to do with Piral, but I wanted to store some data via local storage and I ran into a pretty cool way to do this by using this custom react hook.
Lazy loading
In the pilet setup function, we can set pages to lazily load. This is related to bundle splitting: more info here.
e.g.
  const ProfilePage = React.lazy(() => import('./components/ProfilePage'));
  app.registerPage('/profile', ProfilePage);
Making changes to the app shell
If time was spent thinking about the responsibilities of the app shell before developing the first pilets, you can save yourself a lot of headaches. Though it is possible that the app shell needs to be updated. Of course, the pilets that depend on the app shell emulator for debugging would need to get an update as well!
Luckily, this is fairly simple
- the app shell is updated, built, and the update is pushed to npm
- in the pilet, run
pilet upgradeto pull in the latest version of the emulator
Final thoughts
While I had 0 experience using React and Piral before doing this project, I think the project turned out really well.
When working with microfrontends, the biggest hurdle is getting to the big picture. To me, it was really complicated to imagine how all the microfrontends would come together.
▸ The "black box method" for learning concepts
I saw this video recently and it really stuck with me. When trying to understand hard concepts: treat them like a black box first, and learn how to use them, before learning about how they work.
The experience you get by using a concept will give you a major advantage while learning how they work because you will already understand the desired outcome.
The key to understanding microfrontends – in my opinion – is to build some! Once you see visually how they all come together, it's easier to imagine how this integration is happening. This is why a microfrontend framework is valuable. Not only does it provide the best developer experience, but also: lots of stuff is already done for you, and you can get started easily.
This analogy, by the way, also makes sense when explaining how I learned to work with React in just one week. Rather than starting from scratch, I just tweaked an already existing project, and that already got me to understand lots of the concepts. (Of course, my experience with Angular helped a little as well)

Top comments (8)
Potential food for your thesis: You should definitely look at how Microsoft is solving problems around the Azure Portal front end and also VSCode to interop with a large plugin ecosystem. Essentially they have to deal with lots and lots of teams spanning a very long time.
Finally! Someone else talking about micro-frontends. lol
I use micro-frontend approach in my web-application, though I had to roll our own solution since I use MithrilJs and I needed a middle-tier architecture.
There are so many ways to deal with microfrontends, so I guess there's something for everyone! Pretty neat you created a custom solution, I would imagine it's not that straightforward
Great stuff and very good illustrations. Thanks for sharing!
Thanks for reading!
Wow, great article. Thank you so much!
Why variables in the constant layout which is exported, should have the exact names ? When I change the name of Layout to something else, the App Component is not rendered ?
And how is the pilet shared as a prop children ?
export const layout: Partial = {
Layout: App,
MenuContainer: Navigation,
MenuItem: ({ children }) =>
};
Great post bro, I love it so much that I'd like to create an API for it to sharpen my skills.
Do you have a place where I can easily find the endpoints you used and their models?