Do you use chrome? Need to check your email? Block some ads? Perhaps you needed a price tracker, or a way to stay more productive. If you've answered yes to any of these, then chrome extensions are for you!
I have always enjoyed customizing my chrome browser with extensions. They are practical and tailor my space to my needs. Whether it's for productivity, convenience, ad blocking, developer tools, and much more.
For those who don't know, chrome extensions are small software programs that are built on Javascript, HTML, and CSS. They are designed to add functionality and behavior based on a user's preferences and needs.
In order to make one, we'll follow google's own tutorial on making a simple chrome extension, which will be able to change the background color whenever we visit a URL containing developer.chrome.com.
If you'd like to install the already completed extension, you can download it here.
Let's get started
Start by creating a directory and opening it in your preferred text editor. Create a file called manifest.json. Each extension must have a manifest file, which contains important information about the extension.
Place the following code in the file:
  {
    "name": "Getting Started Example",
    "version": "1.0",
    "description": "Build an Extension!",
    "permissions": ["storage"],
    "manifest_version": 2
  }
Great!
Next step is to let chrome find your extension and load it. Type chrome://extensions into your browser, toggle on developer mode on the top right of the extension management page, and click load unpacked on the top left. It should eventually look like this:
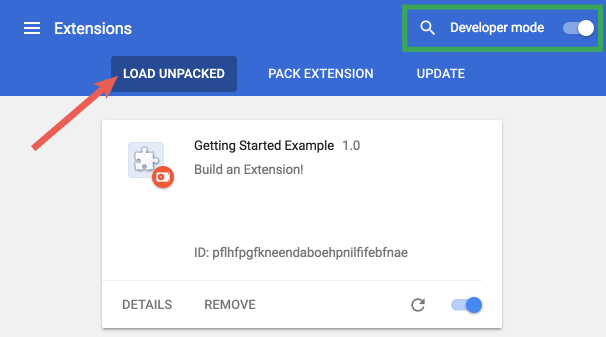
Huzzah! Chrome has recognized the extension. Now it's time to give it some instruction.
Create a file called background.js in your extension directory. This script will tell the extension which file to reference and how that file should behave. We need to register the background file in the manifest file like so:
  {
    "name": "Getting Started Example",
    "version": "1.0",
    "description": "Build an Extension!",
    "background": {
      "scripts": ["background.js"],
      "persistent": false
    },
    "manifest_version": 2
  }
From the tutorial:
The extension is now aware that it includes a non-persistent background script and will scan the registered file for important events it needs to listen for. This extension will need information from a persistent variable as soon as its installed. Start by including a listening event for runtime.onInstalled in the background script. Inside the onInstalled listener, the extension will set a value using the storage API. This will allow multiple extension components to access that value and update it.
Let's add this to our background.js file:
 chrome.runtime.onInstalled.addListener(function() {
    chrome.storage.sync.set({color: '#3aa757'}, function() {
      console.log("The color is green.");
    });
  });
Now we need a UI. Create a popup.html file in the extension directory. Store this HTML code in the file:
 <!DOCTYPE html>
  <html>
    <head>
      <style>
        button {
          height: 30px;
          width: 30px;
          outline: none;
        }
      </style>
    </head>
    <body>
      <button id="changeColor"></button>
    </body>
  </html>
Now we have a button to change the color of the background!
Like the background script, this file needs to be designated as a popup in the manifest under page_action.
  {
    "name": "Getting Started Example",
    "version": "1.0",
    "description": "Build an Extension!",
    "permissions": ["storage"],
    "background": {
      "scripts": ["background.js"],
      "persistent": false
    },
    "page_action": {
      "default_popup": "popup.html"
    },
    "manifest_version": 2
  }
Now we'll need some icons. Download them here and place the folder with the images inside the extension directory. These images will be used as icons for the toolbar as well as for other areas like the extension management page. Therefore, we will need to alter the permissions under page action => default_icon, and again separately under "icons" for the extension management page, permissions warning, and favicon.
  {
    "name": "Getting Started Example",
    "version": "1.0",
    "description": "Build an Extension!",
    "permissions": ["storage"],
    "background": {
      "scripts": ["background.js"],
      "persistent": false
    },
    "page_action": {
      "default_popup": "popup.html",
      "default_icon": {
        "16": "images/get_started16.png",
        "32": "images/get_started32.png",
        "48": "images/get_started48.png",
        "128": "images/get_started128.png"
      }
    },
    "icons": {
      "16": "images/get_started16.png",
      "32": "images/get_started32.png",
      "48": "images/get_started48.png",
      "128": "images/get_started128.png"
    },
    "manifest_version": 2
  }
As of now, the extension still has no functionality. We need to add conditions as to when the user can interact with the popup.html.
This extension will only be interactive when we are at a URL containing developer.chrome.com. We will need to supply this instruction to the background.js script. For this, we will use the declarativeContent API:
  chrome.runtime.onInstalled.addListener(function() {
    chrome.storage.sync.set({color: '#3aa757'}, function() {
      console.log('The color is green.');
    });
    chrome.declarativeContent.onPageChanged.removeRules(undefined, function() {
      chrome.declarativeContent.onPageChanged.addRules([{
        conditions: [new chrome.declarativeContent.PageStateMatcher({
          pageUrl: {hostEquals: 'developer.chrome.com'},
        })
        ],
            actions: [new chrome.declarativeContent.ShowPageAction()]
      }]);
    });
  });
We also need to add the permission to use the API in the manifest.json file:
  {
    "name": "Getting Started Example",
  ...
    "permissions": ["declarativeContent", "storage"],
  ...
  }
At this point, users will be able to click the extension icon and bring up a popup whenever they navigate to a URL containing developer.chrome.com.
The last step for the popup UI is adding color to the button. Create and add a file called popup.js with the following code to the extension directory
  let changeColor = document.getElementById('changeColor');

  chrome.storage.sync.get('color', function(data) {
    changeColor.style.backgroundColor = data.color;
    changeColor.setAttribute('value', data.color);
  });
This code grabs the button from popup.html and requests the color value from storage. It then applies the color as the background of the button. Include a script tag to popup.js in popup.html.
<!DOCTYPE html>
<html>
...
  <body>
    <button id="changeColor"></button>
    <script src="popup.js"></script>
  </body>
</html>
Reload the extension to view the green button.
Layer Logic
Let's add this code to our popup.js:
  let changeColor = document.getElementById('changeColor');
  ...
  changeColor.onclick = function(element) {
    let color = element.target.value;
    chrome.tabs.query({active: true, currentWindow: true}, function(tabs) {
      chrome.tabs.executeScript(
          tabs[0].id,
          {code: 'document.body.style.backgroundColor = "' + color + '";'});
    });
  };
The updated code adds an onclick event the button, which triggers a programatically injected content script. This turns the background color of the page the same color as the button. Using programmatic injection allows for user-invoked content scripts, instead of auto inserting unwanted code into web pages.
In order to permit access to the tabs API, we need to add it to our permissions in the manifest.json file.
{
    "name": "Getting Started Example",
  ...
    "permissions": ["activeTab", "declarativeContent", "storage"],
  ...
  }
If you go to any URL containing developer.chrome.com, you can now change the background to green! However, we can take it a step further.
Start by creating a file in the directory called options.html and include the following code
  <!DOCTYPE html>
  <html>
    <head>
      <style>
        button {
          height: 30px;
          width: 30px;
          outline: none;
          margin: 10px;
        }
      </style>
    </head>
    <body>
      <div id="buttonDiv">
      </div>
      <div>
        <p>Choose a different background color!</p>
      </div>
    </body>
    <script src="options.js"></script>
  </html>
Register the options page in the manifest.json file:
    {
    "name": "Getting Started Example",
    ...
    "options_page": "options.html",
    ...
    "manifest_version": 2
  }
Reload the extension and hit Details

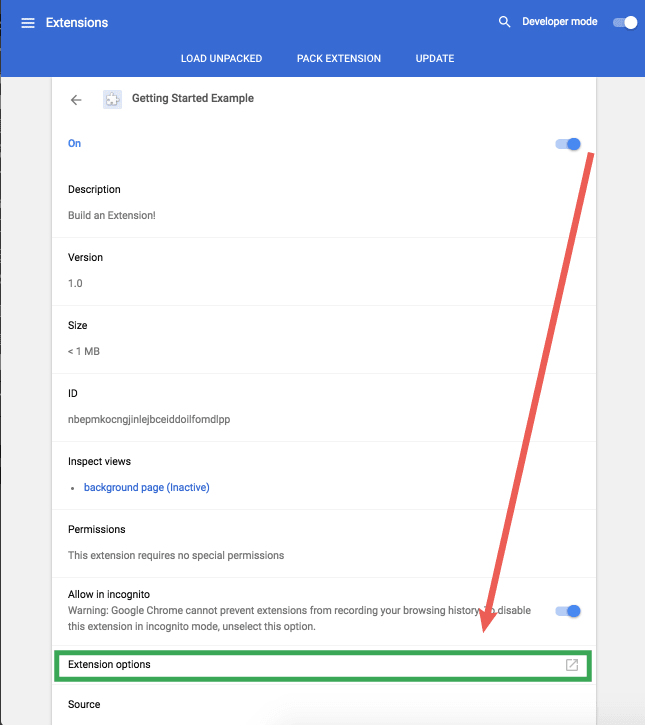
If you click Extension options to view the options page, it will appear blank.
Create a file called options.js and let's add the options logic:
  let page = document.getElementById('buttonDiv');
  const kButtonColors = ['#3aa757', '#e8453c', '#f9bb2d', '#4688f1'];
  function constructOptions(kButtonColors) {
    for (let item of kButtonColors) {
      let button = document.createElement('button');
      button.style.backgroundColor = item;
      button.addEventListener('click', function() {
        chrome.storage.sync.set({color: item}, function() {
          console.log('color is ' + item);
        })
      });
      page.appendChild(button);
    }
  }
  constructOptions(kButtonColors);
We are now provided with four color options which we can change either in the extension icon on the top right or in the extension management page within the details.
When the user clicks a button, it updates the color value in the extension's global storage. Since all of the extension's files pull the color information from global storage no other values need to be updated.
And there you have it! A simple chrome extension, built in a matter of minutes.
Google's chrome APIs documentation is available here for you to check out and go deeper with your future endeavors.

Top comments (2)
A worthwhile guide, easy to read and upbeat!
<3