
Hey there, there have been a lot of talks about continuous integration, deployment and testing. We have neglected one tool that is powerful enough to make our continuous deployment seamless for small scale applications.
Over the years, I deploy my application to Heroku by just login in through my terminal using:
$ heroku login
After which I create an application on Heroku from my terminal using:
$ heroku create application-name
That's all I needed and I add any needed environment variables and configure my add-ons then push my code to Heroku using:
$ git push heroku master
Boom 🎉🎉🎉🎉🎉, our application is live on Heroku, but is that only what Heroku can do 🤔? I will be showing you ways to use Heroku for continuous deployment, have staging and production apps, have review apps for your pull request and deploy automatically after running your test.
Let's Get Started
To begin, the first thing you are to do is to create an account and login to Heroku from your browser. The dashboard shows all the applications you have created. For continuous deployment, we will create a pipeline instead of an application. Click on new and you will see a dropdown to choose what to create, select create new pipeline.
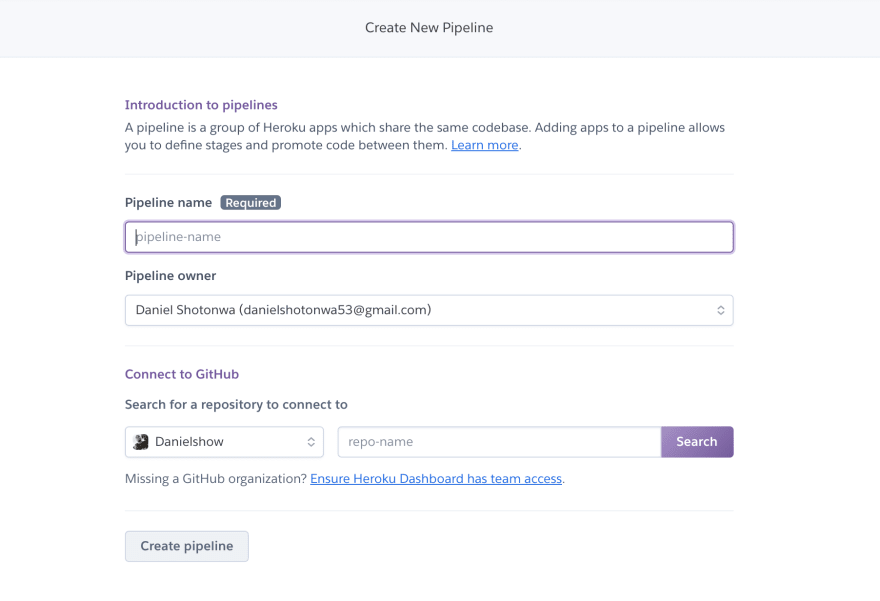
You will see something like the image above 👆, type in a pipeline name (any name you like), type in a repository name and it will auto-complete if you have connected your Heroku account to Github. Click on Create pipeline to create the needed Pipeline.
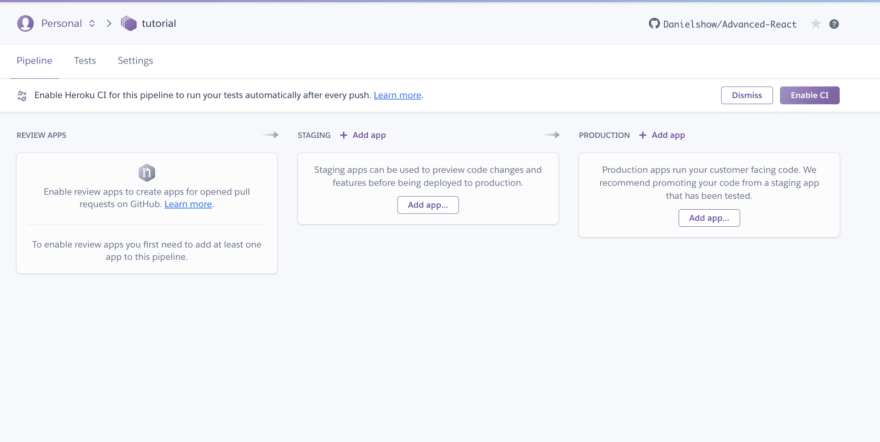
After creating the pipeline, you have this cool dashboard showing everything you can do with a pipeline.
- Enable Review Apps
- Create a staging application
- Create a production application
Click on Add app to create an application for both staging and production environment. Click on the staging application you created and navigate to Deploy tab. Go to automatic deploys and choose a branch you want to deploy to staging development, preferably the branch for staging will be develop. Check the box Wait for CI to pass before deploy to make sure your test passes before deploying the application.
Do the same step for the production environment and auto-deploy master branch.
The last step is to create review apps to enable our pull request automatically be deployed to Heroku and have their own application to ensure we can review to see if it works perfectly before deploying to staging.
Going back to the pipeline dashboard, the last tab we have not touched is enable review apps. clicking on the button to enable review app and you will see a pop-up, choose your staging application and click on Create an app.json file.
This will take you to a page containing some information about your application, scroll down and click a button to commit to Repo. This will commit an app.json file to Github. It will also pop-up a modal to choose settings for your review apps. check the box to create review apps automatically and destroy stale review apps. Click on enable to finalise the process.
Hurray, raise a pull request and you should see the pull request has been deployed to Heroku, after you merge the pull request, the review app will be deleted automatically.
Thanks for reading. That's all for Now.

Top comments (0)