
IT infrastructure spanning numerous on-premises data centers, cloud, servers, etc, can be complicated and cumbersome to effectively manage.
Organizations have adopted a solution to provision and manage IT Infrastructure through code.
This article will cover what Infrastructure as Code is, how Terraform functions as an IaC tool, some fundamental terraform commands and use cases, and of course, a simple tutorial so you can get your hands dirty.
Pre-requisites
The following are necessary to have before we can begin:
- Terraform CLI installed on your desktop.
- An Active AWS account.
- AWS CLI installed
- AWS IAM credentials set up.
- A code or text editor. You can download the Visual Studio Code editor.
Infrastructure as Code
Before IaC happened, deployment of applications was tedious and a lot of manual processes happened. Setting up servers, configuring networking, installation of software, etc. Basically every process happened manually! As a result, human errors were common, more effort and time had to be put in, expenses in terms of provisioning and human resource. Imagine having to maintain and deploy to multiple environments as well. Infrastructure as Code eliminated this manual process from being carried out every time by providing an automated process.
IaC is the process of managing and provisioning computer data centers through machine-readable definition files, rather than physical hardware configuration or interactive configuration tools. -Wikipedia
Infrastructure as Code uses a high-level descriptive coding language to automate the provisioning of IT infrastructure. This automation eliminates the need for developers to manually provision and manage servers, operating systems, database connections, storage, and other infrastructure elements every time they want to develop, test, or deploy a software application. -IBM
Similar to how source code for applications can be maintained, so can infrastructure. By doing so, the engineers can manage, inspect, test, alter, and reuse their infrastructure without relying solely on IT personnel.
How Terraform functions as an IAC tool
Terraform is mostly used by DevOps Engineers. The primary objective of DevOps is to provide software more quickly and efficiently which prompted the need for tools like Terraform.
Terraform is an infrastructure as code (IaC) tool that allows you to build, change, and version infrastructure safely and efficiently. - HashiCorp
Terraform helps in reducing the average time to provision, service complexity and improves the overall efficiency with decreased costs by allowing you to automate and manage your infrastructure, platform and services that run on that infrastructure.
Terraform is a stateful application.
This implies that it keeps track of everything it creates in your cloud environments so that, in the event that you need to update or delete something later, Terraform will be aware of what it created and be able to make the necessary modifications on your behalf.
Terraform is declarative
Declarative language entails articulating your needs without elaborating on how they should be met.
Declare the intended result, automation, or management process without having to define every step and Terraform will figure out how to implement it.
The declarative language Terraform uses is known as HCL (HashiCorp Configuration Language).
Terraform Commands
In this section, we would discuss some of the basic commands used with terraform CLI.
- terraform init
This command initializes a working directory that houses the Terraform configuration files and it is the very first command that needs to be executed when creating a new Terraform configuration. For existing terraform configurations, the command should be ran after making any changes to dependencies to ensure that the modifications are updated.
This command will scan configuration files in the working directory to see whether they require provider plugins. If they do, the plugin dependencies are downloaded either from the public Terraform registry or from any specified location.
- terraform validate
This commands scans the terraform configuration to confirm if all the required information have been specified.
The command is used for verification of reusable modules, which includes checking the accuracy of attribute names and value types.
- terraform plan
This command creates an execution plan describing the infrastructure it will create, update, or destroy based on the existing infrastructure and your configuration.
It does this by comparing the current configuration to the previous state, noting any differences, and then suggests a set of modification actions that allows the remote objects to match the configuration.
You should also note that terraform plan does not carry out the proposed changes
- terraform apply
This command executes the proposed changes given by terraform plan. Terraform apply command is used to create or introduce changes to real infrastructure. By default, apply scans the current working directory for the configuration and applies the changes appropriately. However, you’ll optionally give the path to a saved plan file that was previously created with terraform plan.
- terraform destroy
The terraform destroy is used to destroy infrastructure governed by terraform.
Use Cases of Terraform
Multi-Cloud Deployment
Terraform's native ability to support multiple cloud services helps increase fault tolerance. One of the main appeals of Terraform is how it works across all the cloud providers at the same time, unlike many of Terraform’s direct competitors which work primarily with a single cloud provider only. Multi-cloud deployments add complexity because each provider has its own interfaces, tools, and workflows. Terraform lets you use the same workflow to manage multiple providers and handle cross-cloud dependencies. This simplifies management and orchestration for large-scale, multi-cloud infrastructures.
Self-service clusters
The registries make it easy for users to find prepackaged configurations that can be used as it is or modified to meet a particular need in a case of repetitive infrastructure requests as it allows product teams manage their own infrastructure independently.
External resource management
Terraform supports public and private cloud infrastructure, as well as network appliances and software as a service (SaaS) deployments.
Disposable Environments
Using Terraform, the production environment can be codified and then shared with staging, QA or dev. These configurations can be used to rapidly spin up new environments to test in, and then be easily disposed of. Terraform can help tame the difficulty of maintaining parallel environments, and makes it practical to elastically create and destroy them.
Tutorial
This simple tutorial would give you a practical experience of how IaC works. In this section, we would be creating an EC2 instance using Terraform.
Creating the terraform files
Open up your Visual Studio Code editor and on the terminal, create a directory on your desktop which will contain the terraform configuration files. You can use the command below to do that.
mkdir ec2-with-terraform
cd ec2-with-terraform/

Now to configure your AWS account with Terraform, paste the below command in your terminal
aws configure
You would be asked to input your access key, secret key and region. These information can be gotten from your IAM user which you should have already created before now.
access_key: An access key grants programmatic access to your resources.
secret_key: Secret access keys are like passwords.
region: This is the region where you want your instance to be created. In my own case, I specified "us-east-1" which is also known as "Northern Virginia". Refer to this for more info.
Keep in mind that there are different ways this could be done. The access key, secret key and region could be provided in a provider block on your main.tf file but because you do not want your keys exposed, they should be directly configured.

Now your account has been configured, you can proceed to creating your resources.
main.tf
For storing resources in Terraform, a main.tf file serves as the main or primary entry point. To create resources, it is utilized in data sources, localities, and calling modules.
.tf is the file extension for terraform files
Use the below command to create the main.tf file.
code main.tf
Alternatively, hit the "+" icon for creating files and create a file with the name main.tf.


In the created main.tf file, copy and paste the below terraform configuration files into it.
#provider "aws" {
#    access_key = "${var.access_key}"
#    secret_key = "${var.secret_key}"
#    region = "us-east-1"
}
resource "aws_instance" "ec2_instance" {
    ami = "${var.ami_id}"
    count = "${var.number_of_instances}"
    subnet_id = "${var.subnet_id}"
    instance_type = "${var.instance_type}"
    key_name = "${var.ami_key_pair_name}"
}
As you can see, the provider module has been commented. This is just to show how you can reference your access key, secret key and region in a
main.tffile. If you won't be configuring AWS directly, you can uncomment this and use, otherwise delete.
Break down of terms;
ami: AMI's are referred to as "Amazon Machine Images". These are images used to create virtual servers (EC2 instances). They could also be referred to as templates for creation of instances. Visit this link to learn more
Count: Counts are used to specify the amount of instances to be created.
subnet_id: A subnet is a group of IP addresses in your VPC. It is expected that you have a default VPC created for use and a subnet attached to it. The ID of that subnet is what is required in this case.
instance_type: The host computer's hardware for your instance. CPU, memory, storage, and networking capacity combinations make up an instance type.
key_name: Key name refers to the name of your key pair. A key pair is a set of security credentials that you use to prove your identity when connecting to an Amazon EC2 instance.
To create a key pair, in your AWS Console, search key pair and select it.

Click on "Create key pair"

Give your key any name and select .pem or .ppk for the private key file format, the create the key. It would automatically be downloaded on your system. In my case, I used the .pem file format.

Looking at the above main.tf file again, notice how majority of the variables contain var in their references. This means that the information for that particular variable has been referenced or passed elsewhere. Referencing variables help to prevent hard-coding in your main.tf file where data is being inserted or added to the source code. It is good practice to keep your resource modules as simple as possible.
variable.tf
Next thing is to create a file for storing our variables. We would be making use of a variable.tf file.
A variable.tf file houses variable blocks or variable types which indicate the existence of a variable. They could be stored in any .tf file but are mostly used in variable.tf files. This file holds declarations of variables used in the main.tf file.
The essence of using in variable.tf file here is to prevent hard-coding (storing every variable info in the main.tf file)
Create a variable.tf file and paste the below configuration files into it.
variable "instance_name" {
        description = "Name of the instance to be created"
        default = "ubuntu"
}

variable "instance_type" {
        default = "t2.micro"
}

variable "subnet_id" {
        description = "The VPC subnet you want your instance(s)to be created in"
        default = "subnet-03011265c429b1804"
}

variable "ami_id" {
        description = "AMI ID for the instance"
        default = "ami-08d4ac5b634553e16"
}

variable "number_of_instances" {
        description = "number of instances to be created"
        default = 1
}


variable "ami_key_pair_name" {
        default = "demo-key"
}
description: Used to describe the variable.
default: In the event that no specific value is given, the default value will be used.
To get your ami_id, open your AWS Console, search for EC2 and select "Launch instance". Under "Application and OS Images (Amazon Machine Image)", select an AMI you want to create and copy the ID. In this case, I used "Ubuntu Server 20.04 LTS"

Create your resource(s)
To initialize a working directory, run the below command
terraform init
As discussed, this is the first command to be ran whenever a Terraform file has been created or if changes have been made.
Terraform creates a terraform.lock.hcl file automatically when you run the terraform init command.

Ask terraform its intentions;
terraform plan
Here, Terraform makes its objectives and its desired actions clear to you but doesn't carry them out since, of course, you have to instruct it to.

By executing the command below, you can tell Terraform to carry out its plans if you approve of them.
terraform apply

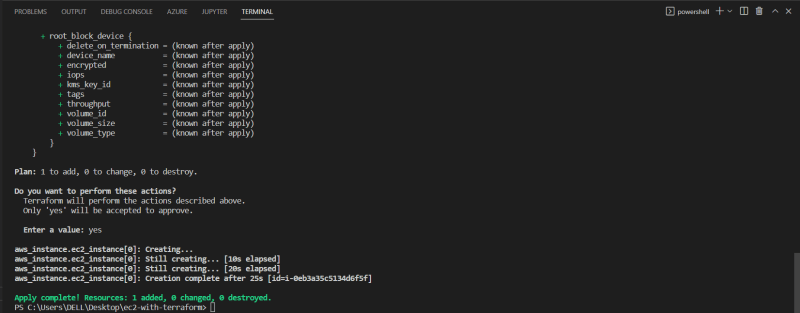
To check if your instance has been created, go back to your AWS console and search under EC2 >> Instances


and voila!
This how IaC works with Terraform. Terraform automatically creates your infrastructure for you after creating the configuration files
and the good part, you can always reuse them without having to create them from scratch again.
As previously discussed, terraform is declarative. Taking a look at the configuration files, they were all declared. We told Terraform what we wanted, and we left the rest for terraform to handle. The HCL syntax makes it easy to declare variables.
After creating your resources, if you want to destroy or terminate them, run the below command
terraform destroy
Conclusion
This article discussed IaC and how Terraform fuctions as an IaC tool, use cases of Terraform, Terraform commands, and a tutorial to demonstrate how IAC works using Terraform.

Top comments (0)