*** Note on 2020-06-26 ***
There is a very nice customization video, React Material-UI Themes: Customize Material Components for your Project.
Been searching for easy way to customize Material UI (MUI hereafter) theme and found few online tools to help me get it done quick.
Most of steps here are for configuring Gatsby for Material UI theme but a custom MUI theme set up is easy.
1. Bootstrap a new Gatsby site
npx gatsby new site-name-here
2. Install libraries
- Material UI (MUI)
  npm install @material-ui/core
  # or
  yarn add @material-ui/core
- gatsby-plugin-material-ui - Gatsby plugin for SSR support
  npm install -D gatsby-plugin-material-ui
  # or
  yarn add -D gatsby-plugin-material-ui
3. Create a custom MUI theme
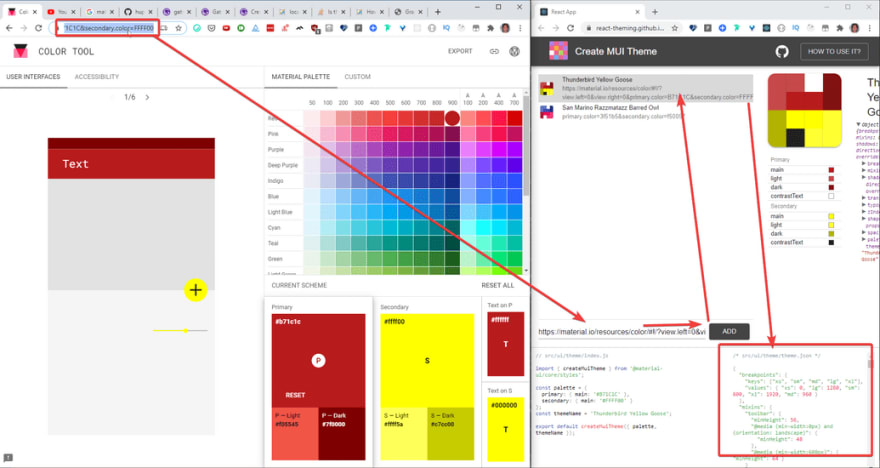
- Go to the Google's Material Design Color Tool site
- Select primary & secondary colors and copy the current URL (, which updates on color selection)

- Go to https://react-theming.github.io/create-mui-theme/ and paste the URL in
Paste URL hereinput box - Now custom Theme JSON should be generated on the bottom right

4. Configure MUI theme
I will create a local plugin to keep the code organized.
Refer to Creating a Local Plugin for more info
- Create a new local Gatsby plugins folder,
./plugins/custom-mui-themein the project root -
Configure Gatsby plugin
-
wrapRootElement.js- A helper module to add MUI theme context provider
- wrapRootElement is a way to wrap the root Gatsby element. We will wrap the root element with MUI theme provider
import React from "react" import { ThemeProvider } from "@material-ui/core/styles" import theme from "./theme" export const wrapRootElement = ({ element }) => { console.info(`theme`, theme) return <ThemeProvider theme={theme}>{element}</ThemeProvider> } -
gatsby-browser.js- To wrap the top-level element with MUI theme provider for the browser
- We can simply export
wrapRootElementin one line
export { wrapRootElement } from "./wrapRootElement" -
gatsby-ssr.js- To wrap the top-level element with MUI theme provider on the server side
- The implementation is the same as the browser version
export { wrapRootElement } from "./wrapRootElement" -
package.json- Required for the local plugin- Add the plugin name in the file
{
  "name": "custom-mui-theme"
}
-
Create a new folder
./plugins/custom-mui-theme/theme-
Create two files under the theme folder
-
theme.json- Copy & paste the theme JSON file in the previous step,
Createa custom MUI theme
- Copy & paste the theme JSON file in the previous step,
-
index.js- This is to provide the custom theme generated in
Createa custom MUI themesection - It needs a bit of change as we need to import the JSON theme
import { createMuiTheme } from '@material-ui/core/styles'; import themeData from "./theme.json"; const themeName = 'My custom theme name'; export default createMuiTheme({ ...themeData, themeName }); - This is to provide the custom theme generated in
-
Configure
gatsby-plugin-material-uiand add thecustom-mui-theme(the latter should be below) in the project root'sgatsby-config.js
  module.exports = {
    // ...
    plugins: [
      // other plugins ...
      {
        resolve: `gatsby-plugin-material-ui`,
        options: {
          stylesProvider: {
            injectFirst: true,
          },
        },
      },
      `custom-mui-theme`,
    ],
  }
- injectFirst lets us override the MUI styles with Tailwind CSS
5. Checking if the custom theme is applied
In ./src/pages/index.js, add the primary button to see if the color matches that of your custom style
import React from "react"

import Button from '@material-ui/core/Button'

const IndexPage = () => (
    <>
      <Button color="primary" variant="contained">A button!</Button>
      <Button color="secondary" variant="contained">A button!</Button>
    </>
)

export default IndexPage
You will see that the primary and secondary colors are applied according to the custom theme.
From here on, simply updating ./plugins/custom-mui-theme/theme/theme.json should update the MUI theme
6. Resources
- A Gatsby site source created by following the steps above - https://github.com/dance2die/blog.custom-material-ui-gatsby-theme
- Google's Material Design Color Tool: https://material.io/resources/color/
- Create MUI Theme site
- Home - https://react-theming.github.io/create-mui-theme/
- Source - https://github.com/react-theming/create-mui-theme (MIT licenced)
- Gatsby
-
gatsby-plugin-material-ui -
wrapRootElement- https://www.gatsbyjs.org/docs/browser-apis/#wrapRootElement - "Creating a Local Plugin" - https://www.gatsbyjs.org/docs/creating-a-local-plugin/
- Plugins documentation - https://www.gatsbyjs.org/docs/plugins/
-
- Material UI
- Home - https://material-ui.com/
- Official MUI + Gatsby sample - https://github.com/mui-org/material-ui/tree/master/examples/gatsby
- Theming - https://material-ui.com/customization/theming/
- Default Theme (Theme JSON overrides this) - https://material-ui.com/customization/default-theme/


Top comments (0)