Intro
Hello GUYS!!
Are you tired of building the same app thing twice or even more? What if I tell and so you one way that can help you save time and a lot of effort? So let me introduce to you a way that can help you saving time time sometimes. So what I'm gonna introduce to you is a way of creating PWA with Next JS.
Table of contents
- Intro
- What's a PWA?
- What we're building?
- Our Arsenal
- The Application
- Making The Application PWA
- Congratulations
- References
- The project
- See Demo
What's a PWA?
According to Developer Mozilla, PWAs(Progressive Web Apps) are web apps that use service workers, manifests, and other web-platform features in combination with progressive enhancement to give users an experience on par with native apps.
And what this means? This means that you can make your web apps work like a native app (no matter what platform you will use, windows, mac OS, android, IOS,...), you will be able to write once and make you web app installable making your app browser independent.
Checkout for more details about PWA: web.dev, Developer Mozilla
What we're building?
We'll build an Countdown App, that notifies the user in every two hours, to help us stand up and fight against the sedentary.
Our Arsenal
Since the goal is to build a Next JS app, it's mandatory to know the basics of React jS.
To bring this idea to life we'll use the following tools: Next JS, TypeScript and Mantine UI.
TypesScript is a strongly typed programming language that builds on JavaScript, giving you better tooling at any scale.
Mantine UI is a fully featured react component library.
The Application
If you already have your app done and you just want make it a PWA app, you can jump into Making The Application PWA section.
Else let's star by cloning
git clone https://github.com/Dalcio/sedentarism-alert

cd sedentarism-alert
yarn install && yarn run dev
or
npm install && npm run dev
Sedentarism App Alert
Now that we have our project settled, let's jump into and take a quick look at our project structure:
public/* we have two files, our logo and the sound that's played when the times end.
src/styles contains a simple component at src/styles/global that contains a couple of global styles.
src/pages responsible to contain our pages, we have only one page (the Home page).
src/components contains the body of our countdown.
src/hooks contains our custom hooks useCounter responsible to handle the time and usePlaySound responsible to handle the audio played when the clock is zero.
So, now that we understand our project let make our tiny app PWA.
Making The Application PWA
Now that we have an app (if don't), it's time to make our app PWA.
First I'll resize the icons 4x because of the the different screen that exist.
Steps
To make our app pwa we need to do the following steps:
- install next-pwa dependency
- configure PWA in Next Config
- generate the manifest
- add the manifest in _document.tsx
Installing Next PWA dependency
We have to install next-pwa
yarn add next-pwa
or
npm i next-pwa
Configuring Next Config
Now we need to configure our next.config.js to look the following:
/** @type {import('next').NextConfig} */
const withPWA = require('next-pwa');
const nextConfig = withPWA({
pwa: {
dest: 'public',
register: true,
skipWaiting: true,
},
reactStrictMode: true,
});
module.exports = nextConfig;
```
#### Generating the manifest <a href="step-three"></a>
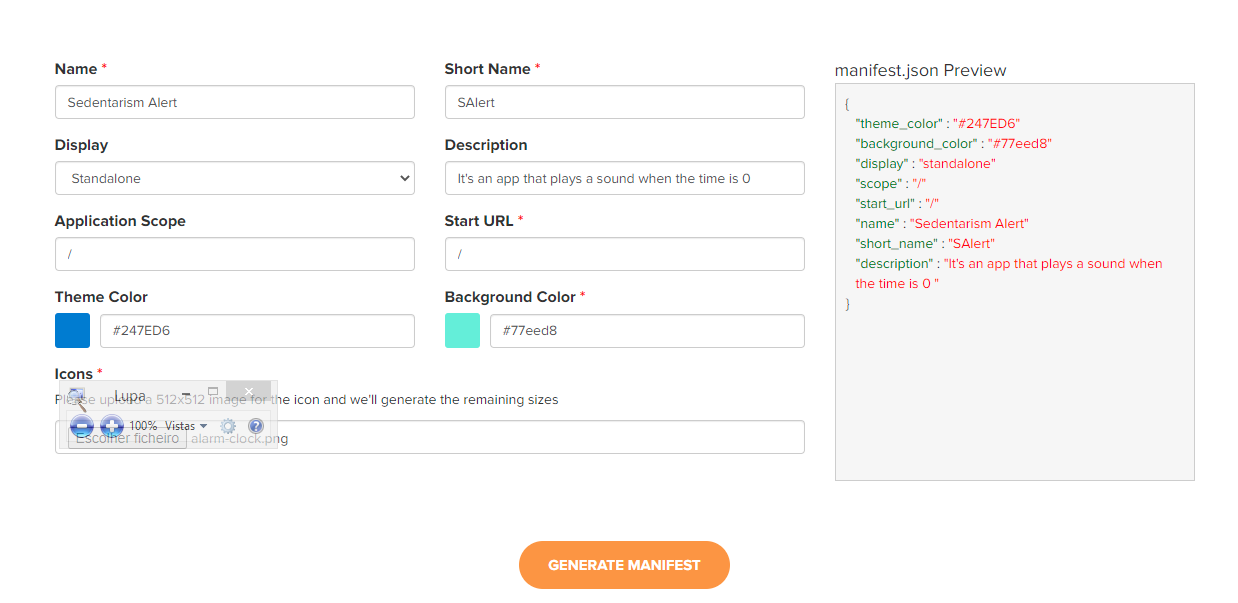
There's many option available that can help you generate the **manifest**, I'll just use [simicart](https://www.simicart.com/manifest-generator.html/)
and fill the form.

and click on generate and upload the files generated to your public folder. After all rename the `manifest.webmanifest` to `manifest.json`
The generated JSON file
````json
{
"theme_color": "#247ED6",
"background_color": "#77eed8",
"display": "standalone",
"scope": "/",
"start_url": "/",
"name": "Sedentarism Alert",
"short_name": "SAlert",
"description": "It's an app that plays a sound when the time is 0 ",
"icons": [
{
"src": "/icon-192x192.png",
"sizes": "192x192",
"type": "image/png"
},
{
"src": "/icon-256x256.png",
"sizes": "256x256",
"type": "image/png"
},
{
"src": "/icon-384x384.png",
"sizes": "384x384",
"type": "image/png"
},
{
"src": "/icon-512x512.png",
"sizes": "512x512",
"type": "image/png"
}
]
}
```
#### Add the manifest in _document.tsx <a href="step-four"></a>
Now we'll configure the manifest in our `_document.tsx` file, looking like:
```tsx
import { createGetInitialProps } from '@mantine/next';
import Document, { Head, Html, Main, NextScript } from 'next/document';
const getInitialProps = createGetInitialProps();
export default class _Document extends Document {
static getInitialProps = getInitialProps;
render() {
return (
<Html>
<Head>
<title>Sedentarism Alert - PWA</title>
<link
rel="shortcut icon"
href="alarm-clock.png"
type="image/x-icon"
/>
<link rel="manifest" href="/manifest.json" />
</Head>
<body>
<Main />
<NextScript />
</body>
</Html>
);
}
}
```
## Congratulations <a name="section-6"></a>
Now our app is a PWA. Congratulation. Now you can deploy it on [**Vercel?»*](https://vercel.com/guides/deploying-nextjs-with-vercel)
## References <a name="section-7"></a>
[Progressive web apps (PWAs)](https://developer.mozilla.org/en-US/docs/Web/Progressive_web_apps)
[Progressive Web Apps](https://web.dev/progressive-web-apps/?gclid=CjwKCAjw4ayUBhA4EiwATWyBrvb4n5SU8fTzo774tAXUQ8CgYo-bT1z2-EeUXuMtvN_yCvQOm6JE-BoC-nAQAvD_BwE)
[How to Create a PWA With Next.js in 10 Minutes](https://www.youtube.com/watch?v=ARNN_zmrwcw)
[How to make a Next.js app a PWA](https://medium.com/geekculture/how-to-make-a-next-js-app-a-pwa-a5e2b13da548)
## The Project <a name="the-project"></a>
### [**Project Repository**](https://github.com/Dalcio/sedentarism-alert)
## See Demo <a name="demo"></a>
### [Live Demo](https://sedentarism-alert.vercel.app/)


Top comments (2)
This tutorial is outdated as os next-pwa version 5.6.0.
The inclusion to Next configuration is done like this now:
Sources:
Release notice
next-pwa configuration docs
Stack Overflow question about this breaking change
bro you are a life saver