The easiest, and probably the quickest way to get familiar with NEAR blockchain development is to run it on Gitpod. On Gitpod you get for free 50 hours of use per month. This is great for start. Later you can always decide to set up everything needed for NEAR development on your computer. You will need Github account to sign in, which, if you don't have it, will take only minute or two to set up. I encourage you to do it now. By the way, besides Github you can also use Bitbucket and GitLab accounts for Gitpod, if you happen to have some of them.
Armed with your Github account go to NEAR website and click on the Developers link near the top, and then choose Explore Code Examples link.
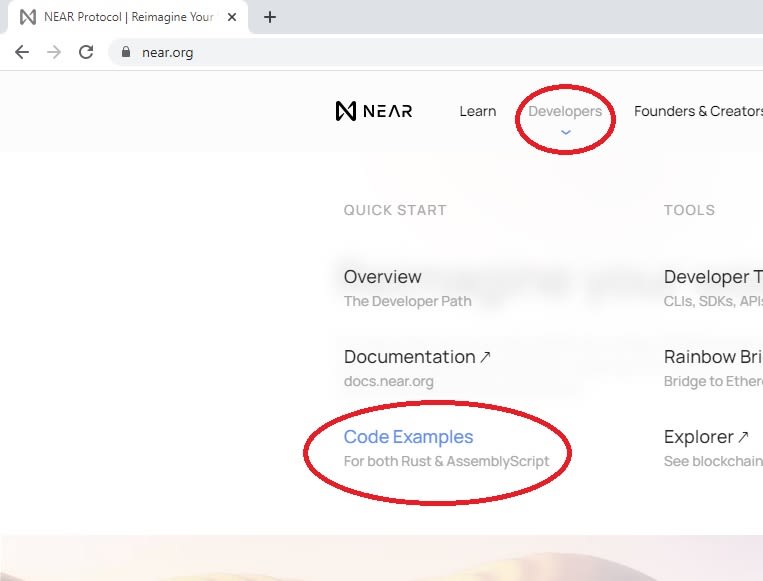
From there I suggest you to choose the Guest Book example, and to open it in Gitpod.
After some time the Gitpod workspace will be prepared in your browser, and you'll be ready to go. It has powerful editor with linux terminal right beneath it. The best things about Gitpod is that you will have everything you need without any effort, and moreover, you can continue working on your projects anywhere, no matter the computer, OS, or place. It's all in the cloud. If you want a quick route, Gitpod is perfect. Since everything is prepared, you can direct all your attention to the things that really interests you, like programming contracts for NEAR blockchain.
Building our first contract
Contracts for NEAR can be written in two languages, AssemblyScript and Rust.
AssemblyScript is practically identical to TypeScript, which means that it is very similar to Javascript, but with added types to variables. It's great for start with contracts, especially if you have any past Javascript experience.
Rust is a slightly more difficult programming language with some quirks, but as you will program more in it you will learn to appreciate it, and probably even love it. In many surveys Rust gets very high marks for programmers' satisfaction with it. However, this tutorial will not deal with Rust, yet the overall approach is more or less the same.
Both programming languages must be compiled into WebAssembly (or Wasm for short) before they can run on blockchain nodes. Wasm is a binary instructions format for executing on a virtual machine.
Gitpod workspace
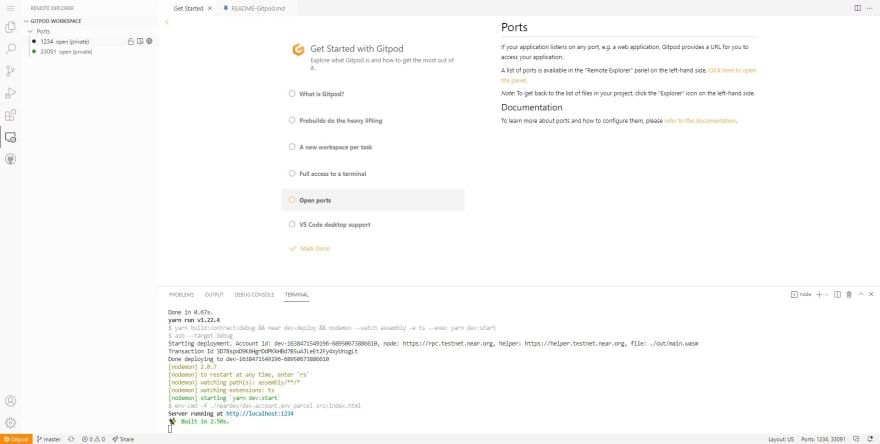
By now I hope the Gitpod workspace with the NEAR Guest Book project in it has opened. Workspace is consisting of editor, terminal below it, and file and search manager among other things in the left vertical pane.

If you look at the terminal more closely you will notice that the NEAR Guest Book project is automatically built, and that there is a web server running in cloud serving the frontend of the Guest Book contract. Anyway, you should give Gitpod permission to open new browser windows when asked, so it can automatically open the compiled and built program in it.
Well, that was easy, wasn't it? You haven't had to touch a thing and you already have a built project AND it is open in browser for you to try it. If it didn't open in the browser then first click on the Remote Explorer icon in the left pane, and then click the globe icon near the open port and the webpage of NEAR Guest Book contract will open in another tab of your browser.

Opening your NEAR testnet account
Now that the NEAR Guest Book page is open you can click on Log in, which expect you to have a NEAR testnet wallet (wallet.testnet.near.org) with a testnet NEAR account.
Testnet is a parallel NEAR blockchain for testing NEAR contracts for free. If you don't have an account you can easily create it. Just choose the desired name and a recovery method, and voila, you have a NEAR testnet account with a fortune of 200 NEAR to spend on the testnet.

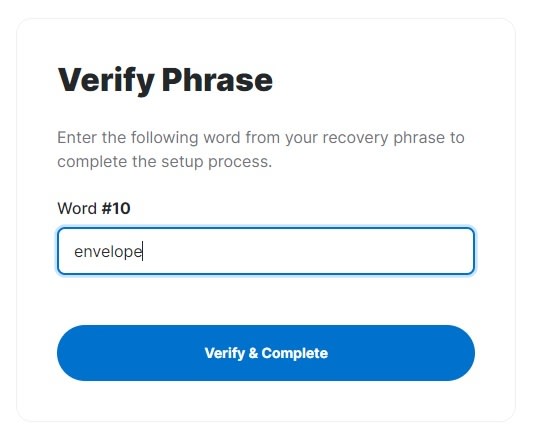
If you choose passphrase as your recovery option make sure that you copy it before continuing, because in the next step you will be asked to type in one of those twelve words.
Notice that if you delete the cookies, or switch browsers or computers, then you will need the passphrase to recreate that particular account. Or, alternatively, you can simply open a new testnet account.
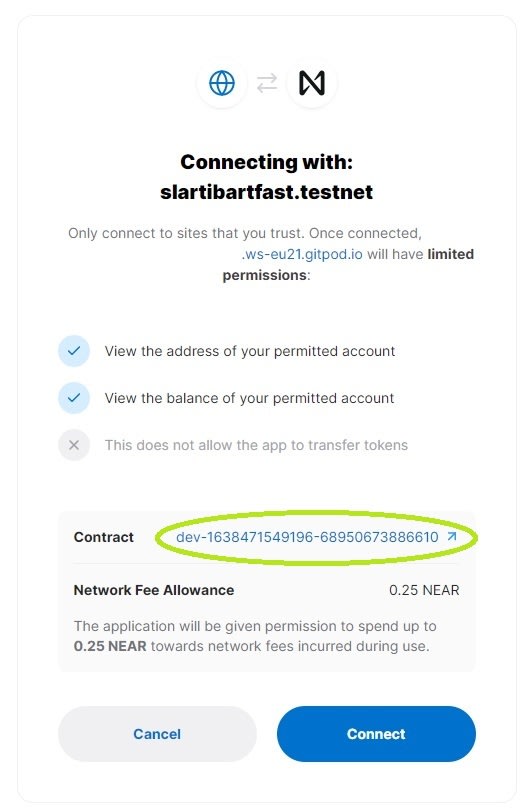
When your account is set up you will be asked for permission to connect the NEAR Guest Book frontend application with your NEAR account. If you forgot, it was the Guest Book web app that brought us here in the first place. So, go ahead and connect it.
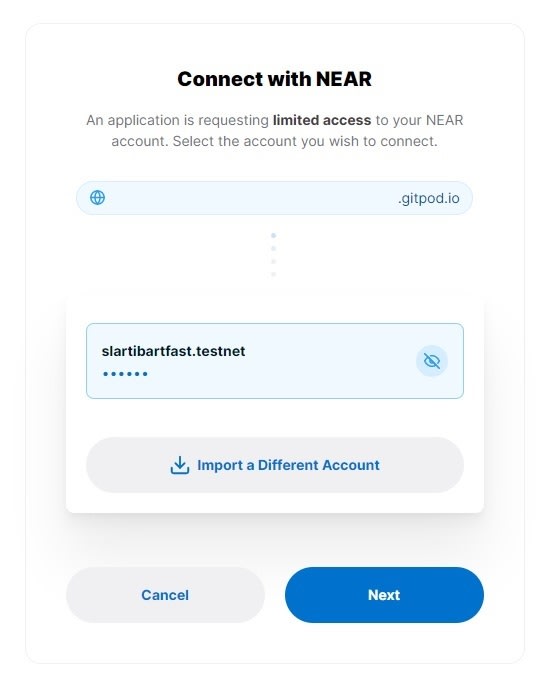
At the last step you will be able to see the NEAR account on which the contract built by Gitpod reside. This is just some random NEAR account starting with dev- created by the development environment for testing your contract. Later on, we'll learn how to deploy built contracts on the accounts we created ourselves.
NEAR Guest Book web app
Well, here we are. This is a full-blooded, if a bit simple, blockchain application!
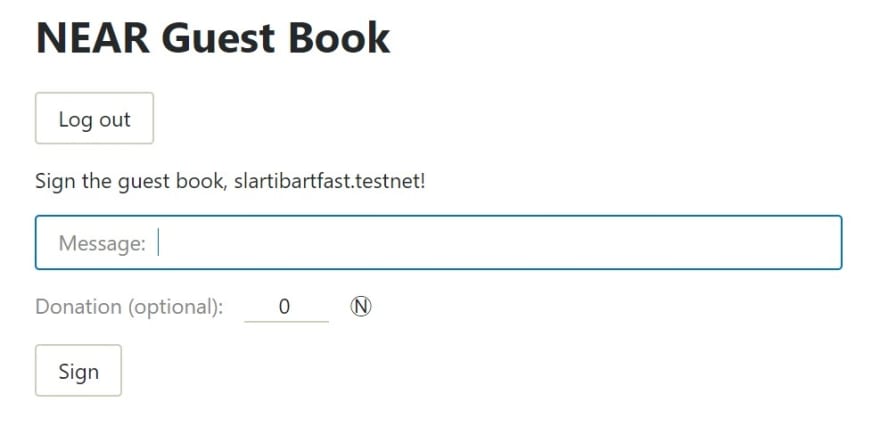
You can type in your message and click on Sign button to post it on the guest book, and you can also donate some NEAR at the same time. The amount which you decide to donate goes to the account on which the guest book contract resides.
So, what's so cool about this, you might ask... The cool part is that any message that you post is going to stay unchanged on the testnet blockchain for as long as blockchain files and network exist!
Upon clicking the Sign button, web page actually sends the message you wrote over the NEAR network to the Guest Book contract which then, executed by some random nodes on the NEAR network, processes it, and finally stores it on the blockchain.
After that the web page sends another message and retrieve the ten most recent messages from the blockchain and shows them to you.
As you will notice, the whole process takes slightly longer than posting on regular centralized message boards, but also ensures that nobody can ever change or remove this message from the blockchain. Not even you!
Let's get back to the Gitpod workspace and check what is going on under the hood.
Guest Book project
First let's see the important parts of the workspace and the project structure. In the left pane make sure that explorer is open. If it is not then click the top icon.
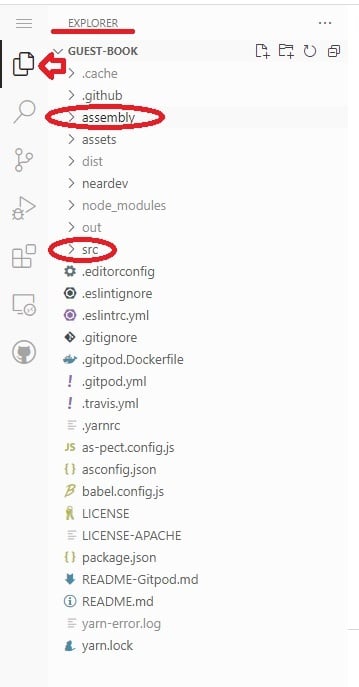
Explorer shows the project's files and directory structure. Those two directories (or folders, if you like) marked with red are of most interest at the moment.
Assembly is the directory in which the contract source program is, at least in this particular project. It is called assembly because this example is written in AssemblyScript. In other projects, especially Rust based, contract sources are usually in a directory contract/src.
Project's root src directory is where the frontend web page sources are. You know, html, css, Javascript, and whatnot.
Assembly
Let's finally open some of the .ts files. File extension .ts designates TypeScript source code files. AssemblyScript is based on TypeScript, so it kept the extension.
There are two files that concern us at this time, model.ts and main.ts.
model.ts

In model.ts the data for our contract is described. In it we can see two important parts, a class called PostedMessage, and a constant called messages, which is an instance of PersistentVector of PostedMessage objects.
What is a PersistentVector? Well you probably already guessed it. It is a special type of vector that will be inscribed on the blockchain. Contracts read from blockchain and write to it by the means of persistent objects. Beside vectors there are other persistent collections of data, like PersistentMap, PersistentUnorderedMap, or PersistentSet.
That ("m") passed to the PersistentVector constructor is needed by the NEAR system. Each persistent collection must be marked with a short string which has to be unique per contract.
export const messages = new PersistentVector<PostedMessage>("m");
Above the class definition note the @nearbindgen. This is a class decorator and it is used by Near Binding Generator to ensure proper serialization of class objects so they can be stored on the blockchain.
@nearBindgen
export class PostedMessage {
Serialization is a process of creating a stream of bytes from the objects in program's memory, so they can be stored on a disk. Later, when they are read, the process is going in reverse. The stream of bytes coming from the disk (or blockchain) must be deserialized and reconstructed into memory objects again. Each class that will end up in some persistent collection (in other words, on the blockchain) must be decorated with @nearbindgen.
Those export keywords are there so other .ts files could import those parts and use them. That's how functions in main.ts know about PostedMessage class and messages constant.
However, exported functions from the main.ts are different in the sense that they are primarily directed to end users. They can be called through the NEAR network by any program, web app, and even by us from a command line using NEAR command line interface (NEAR CLI).
But let's get back to model.ts. The context object that is used in class' constructor is an object prepared and provided by the system that runs our contract. You can see that it is, among other necessary stuff, imported from near-sdk-as in the first line of the source.
import { context, u128, PersistentVector } from "near-sdk-as";
Through context object we can see who signed and sent a transaction, how much NEAR is attached to it and several other things. By the way, When we say transaction, please don't just think about transfer of funds. Everything is transaction on the NEAR network. If some function from the contract is called, that is a transaction. When function finishes and returns some data, that is another transaction etc., and all transactions are written to the blockchain.
Easiest way to learn about the context members, is to type context. anywhere in the editor, and then the auto-complete will kick in and list all members that are available in context, along with short explanations, so make sure to browse and familiarize with them.
Now, let's talk just a little about numbers in contracts.
this.premium = context.attachedDeposit >= u128.from('10000000000000000000000');
u128 is a class that can hold an unsigned 128 bit integer number. from is one of its static method which translates number written as string and store it in some special way.
Such large numbers are necessary in crypto-world, including the world of crypto currencies. Unfortunately, 64 bit integers are the largest primitives that are available in AssemblyScript.
I won't talk much about large numbers except to mention that 1 NEAR is represented as a base 10 integer 1 with 24 zeros after it. All those zeros represent fractional part, or in other words decimal places. Consequently 0.1 NEAR is represented as base 10 number 1 followed with 23 zeros.
Consequently, the smallest amount of NEAR is 1 yoctoNEAR, which is 1 over 10 to the power of 24 of NEAR. One yoctoNEAR is represented by integer 1.
Therefore, to write 1 NEAR with its 24 decimal places in binary integer form you need 80 bits! (Just as a side note, Ether has 18 decimal places, while Bitcoin has only 8.)
Anyway, that amount, to which the attached deposit is compared to, is actually just 0.01 NEAR. (1 with 22 zeros behind)
As we can see, in this NEAR contract example, the PostedMessage objects will keep the message string, the NEAR account of the person who posted the message (NEAR accounts are also simple strings), and an additional boolean which will tell us if the person has donated at least 0.01 NEAR to the contract account along the posted message.
main.ts

As we can see from the main.ts, Guest Book's functionality is minimal. It has only two exported functions, addMessage, and getMessages.
addMessage receives the message as the argument from the caller, then, using that message it creates a new instance of PostedMessage class to finaly push the newly created object to the end of the PersistentVector, a persistent structure which will eventually be stored on the blockchain.
getMessage simply reads a certain amount of messages from the end of the PersistentVector which is stored on the blockchain, and returns them to the caller. Those messages at the end of the vector are the most recent ones.
Both of those are called by the web page, but there is one important difference between them. addMessage function is a change method, while getMessage is a view method.
Change methods modify the state of the objects stored on the blockchain.
View methods just read the data that was previously stored on the blockchain, and return what they've read to the caller.
Manual building and deploying contracts
If you try to write any additional instructions in the source code, you will notice that Gitpod constantly recompiles the program, and even more annoyingly, opens new tabs with the frontend webpage each time it successfully builds the project.
In order to stop such behaviour, simply click somewhere in the terminal and press CTRL-C. This will stop this maddening cycle and put the cursor in the terminal's command line.
Now we can initiate build process manually when we wish.
Complete rebuild of both contract and web page, redeployment of the contract to the automatically assigned NEAR account, and opening the web page in the browser is done with:
yarn dev
NEAR accounts and contracts
Each NEAR account can have exactly one attached contract. Moreover, the only way to detach a contract is to delete the account and then recreate it. For deleting the account you need another account to which the remaining funds are going to be transferred.
Because of all that I suggest against the Step 2 from the README.md file in the root project directory. Don't enter your newly created NEAR account in the src/config.js as is proposed.
Since you opened a new account to access the Guest Book example you probably didn't think that it will be used to deploy a contract in it.
Do it like this instead:
near login
This will open web page where you will authorize NEAR CLI to interact with your account and its subaccounts.
When you are back create a subaccount where the built project will be deployed. For example, let's say your account is called william.testnet, then for the Guest Book example you might want to create another NEAR account like this:
near create-account gb.william.testnet --masterAccount william.testnet --initialBalance 10
This will create a new account gb.william.testnet and transfer 10 NEAR to it from the master account. (Default initial balance transfer is 100.) You can always transfer additional testnet NEARs from one account to another, or even open a new testnet account if you need more funds.
You can check state of any account with:
near state any_account_name
Besides amount (NEAR balance in yoctoNEARs), and formattedAmount (NEAR balance in decimal format), please note code_hash field. If code_hash is populated by all ones then that means that no contracts were yet deployed to this account.
Now that you have an account specially for the contract, open config.js in src directory. Make the following change:
Now you do the Step 2 from the README.md, but slightly different.
Comment the first line in the source and add the line like the following below it:
//const CONTRACT_NAME = process.env.CONTRACT_NAME || 'guest-book.testnet';
const CONTRACT_NAME = 'your_manually_created_account.testnet';
Now simply do in terminal:
yarn dev
When you now build and initiate your contract Log out from the Guest Book web page and try to log in again. When you get to the confirmation you should no more see dev-... account, but the one you've created and deployed the contract to.
Next time we'll finally start to make some changes to the contract itself.

Latest comments (0)