
Recently, I started building a single-page web application (SPA) using the GitHub API as a side project, and along the way I came across a really cool and simple way to add GitHub OAuth authentication with minimal setup - using an OAuth proxy called Grant.
Quick overview of OAuth: OAuth allow applications to add third party "Sign-In" functionality without risk of your credentials getting leaked or applications accessing more data than you gave it permission to. It's a 3-step process that involves you (the end-user) granting consent to the application, then the application taking that consent (in the form of an authorization token) and exchanging it for an access token.
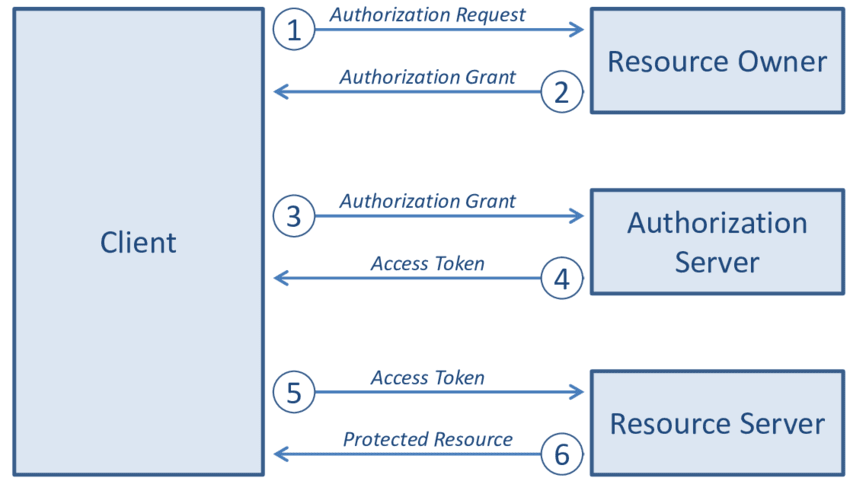
Simple OAuth 2.0 flow diagram - https://www.researchgate.net/figure/Interaction-between-the-four-roles-of-the-OAuth-protocol-flow_fig5_279063057
OAuth can provide integrations with third party services in a number of ways:
- They can be used to create extensions or third party applications for a particular service. The type of application I made falls under this category - it's an application that utilizes GitHub API resources to extend functionality.
- They can also be used as a way to handle user accounts and authorization for an entire application. Services such as Auth0 specialize in providing drop-in solutions for this type of flow.
I started work on a GitHub application that imports and exports issues as CSV after I noticed that there wasn't a feature on GitHub itself for exporting and importing issues to/from a spreadsheet. GitHub allows for developers to use personal access tokens with their API, but I wanted to build something that would only take the user a couple of clicks to get setup. I also wanted to learn more about OAuth and how to integrate with another service using it.
I originally started writing a backend with Golang to handle the authorization grant, but after discovering Grant I realized that it can be made simpler. In less than 50 lines, you can get a Node backend setup that will handle the entire OAuth flow.
const express = require('express');
const session = require('express-session');
const cors = require('cors');
const grant = require('grant-express');

var config = {
  defaults: {
    origin: process.env.ORIGIN,
    transport: 'session',
    state: true,
  },
  github: {
    key: process.env.GITHUB_CLIENT_ID,
    secret: process.env.GITHUB_CLIENT_SECRET,
    scope: ['repo'],
    response: ['tokens'],
  },
};

express()
  .use(
    session({
      secret: process.env.SESSION_SECRET || 'grant',
      resave: false,
      saveUninitialized: false,
    }),
  )
  .use(grant(config))
  .use(
    cors({
      origin: [process.env.REDIRECT_URI],
      credentials: true,
    }),
  )
  .use('/get_token', (req, res) => {
    res.send({
      accessToken: req.session.grant.response.access_token,
    });
  })
  .use('/connect/github/callback', (req, res) => {
    res.redirect(process.env.REDIRECT_URI);
  })
  .listen(process.env.PORT);
(features such as persistent session storage and error checking are omitted from this example for brevity)
After setting this up, it's just a matter of plugging in the environment variables:
-
ORIGIN: The URL of the grant server -
REDIRECT_URI: The redirect URI back to your application. It does not have to match the one on your GitHub OAuth app, since you'll be plugging the special route generated by Grant instead. -
SESSION_SECRET: Secret forexpress-session -
GITHUB_CLIENT_ID|GITHUB_CLIENT_SECRET: GitHub client ID and secret respectively, both obtained from settings page for your GitHub OAuth app -
PORT: port to run your Grant server on
...and setting up the "Authorization callback URL" in the GitHub OAuth app to point to the special callback generated by Grant which will go through the flow.

Once that's done, run the Grant server, point to its /connect/github route, and voilà!

Once it redirects back to your app, you can make an AJAX call to /get_token (passing the session ID cookie) to retrieve the access token.
Grant is a powerful tool. It abstracts away the entire process of issuing access tokens, and also provides built-in security features such as generating + checking of the state parameter, preventing attackers from injecting their own access tokens into your app. It's also extremely configurable, allowing for static configuration (from a config file or from an object) as well as dynamic configuration via HTTP GET/POST requests. Configuration can also be changed during runtime. It's very flexible.
Additionally, not only can you add multiple providers, but you can also add multiple OAuth apps for the same provider using overrides. This allows you to reuse the same OAuth grant server for many OAuth apps.
To learn more about Grant, check out the README.md on the Grant repository, it's very resourceful and contains information on how to easily setup the OAuth proxy for not just GitHub, but many other providers as well. (as a matter of fact, any OAuth-compatible server can be integrated into Grant)
If you're building OAuth integrations for your app, I recommend checking this out!
As an aside, if you want to check out my side project, github-issue-tools, it's located here.

Top comments (0)