
Building a JavaScript Weather application is an excellent project choice for beginners, as it imparts a fundamental understanding of DOM (Document Object Model) and showcases how to utilize the Fetch API to fetch data from external services.
A weather application is a digital tool that provides users with real-time weather information and forecast.
This tutorial guides you in building a weather application, where you can search for any city, region, or country and get its current weather using Weather API.
What We Will Build
Take a glimpse at the stunning application we'll be coding.

Here's the Live Demo to explore the weather ☁ application.
Note: I have provided a concise overview of key points and steps that you can incorporate into your code in this article. If you would like to review the complete code, please visit my Github repository. Feel free to check it out!
Prerequisites
- Basic HTML
- Basic CSS
- Basic JavaScript (knowing JavaScript Async/Await is a plus)
What we’ll learn? By creating this application, we will gain knowledge in the following areas:
- Interacting with the DOM
- Utilizing the Fetch API
- Implementing a third-party API service
Now that we have a grasp of the prerequisites and essential details, let's dive right into building.
The back story for the project
Okay, so I recently learned about the concept of APIs, which I find fascinating. Shortly after learning about it, I stumbled upon the Mini JS-thon hackathon( a week-long hackathon) organized by FemCode Africa. I decided to participate, and guess what I built? A real-time Weather App.
Key Functionality Of The App
- Weather Forecast: Displays real-time weather information for the specified city.
- User input: This feature allows users to input the name of the city they want to know the weather forecast.
- The application provides humidity and air pressure details.
- Temperature Conversion: This feature allows you to view weather forecasts in Celsius (°C) and Fahrenheit (°F).
Setup
Step 1
First thing first, we'll need to set up the environment and add all the resources. Use your preferred code editor, create a folder called "Weather App" or choose any name you prefer. Inside the folder, create the necessary folders and files, and add the required resources as shown below. 👇👇

You can download all the resources from the provided link 👉 here 👈.
Step 2
Begin by creating the standard HTML file template. Choose a title of your preference
Link the
style.cssandindex.jsfiles, and include the desired Google font. I have imported the Lora font in mystyle.css. (You can explore more fonts at Google Fonts).
Markup of the App
The HTML file is going to be basic, nothing complicated. Also, the HTML file should be linked to both the CSS file and the JS file.
<!DOCTYPE html>
<html lang="en">
  <head>
    <meta charset="UTF-8" />
    <meta http-equiv="X-UA-Compatible" content="IE=edge" />
    <meta name="viewport" content="width=device-width, initial-scale=1.0" />
    <!----------------- cSS ----------------->
    <link rel="stylesheet" href="./style.css" />
    <!----------------- Favicon ----------------->
    <link rel="shortcut icon" href="../images/clouds.png" type="image/x-icon" />
    <title>Weather App</title>
  </head>
  <body>
    <div class="card">
        <h1>Weather App</h1>

        <!-- Search bar start -->
        <div class="search">
            <input id="search-result" type="text" placeholder="enter city name" spellcheck="false" name="city" required/>
            <button class="btn">search</button>
        </div>
        <!-- Search bar end -->

        <div class="err">
            <p>Invalid city name</p>
        </div>

        <!-- Weather Section start -->
        <div class="weather">
            <img src="images/clouds.png" alt=" clouds" class="weather-icon" />
            <h1 id="temp" class="temp"></h1>
            <h2 class="city">Lagos, NG</h2>
        <!-- Weather Section end -->

        <!-- Card section start -->
        <div class="details">
            <div class="col">
                <img src="../images/humidity.png" alt="humidity" />

                <div class="card-details">
                    <p class="humidity">66%</p>
                    <p>Humidity</p>
                </div>
            </div>


            <div class="col">
                <img src="../images/barometer.png" alt="barometer" />

                <div class="card-details">
                    <p class="pressure">1013</p>
                    <p>Air pressure</p>
                </div>
            </div>
        </div>

        <!-- degree button -->
        <div class="degree-button">
            <button id="celcius" class="btn-item1">°C</button>
            <button id="farenheit" class="btn-item2">°F</button>
        <div>
        </div>
    </div>
      <script src="index.js"></script>
    </body>
  </html>
  </body>
</html>
Step 3 - Style the Index file
- Start with styling the
bodyand other elements. ``` CSS @import url(""); *{ margin:0; padding:0; font-family: "Lora", serif; box-sizing: border-box; }
body{
background: #e8eA96;
}
- Do check my [GitHub repository](https://github.com/Ajiboso-Adeola/Weather-app) to access the CSS code.
## Step 4 - Retrieving data from API
To obtain weather data, it is essential to comprehend the process. Obtaining the data relies on a third-party service, named OpenWeatherMap, a website that offers diverse weather data through an API. By integrating this API into our application, we can utilize the weather data on our website. In this context, an API acts as an intermediary, akin to a waiter, facilitating the transmission of data from the server to the client based on the client's specific requests.
To utilize the API, it is necessary to acquire an API key. Let's explore the process of obtaining our API key:
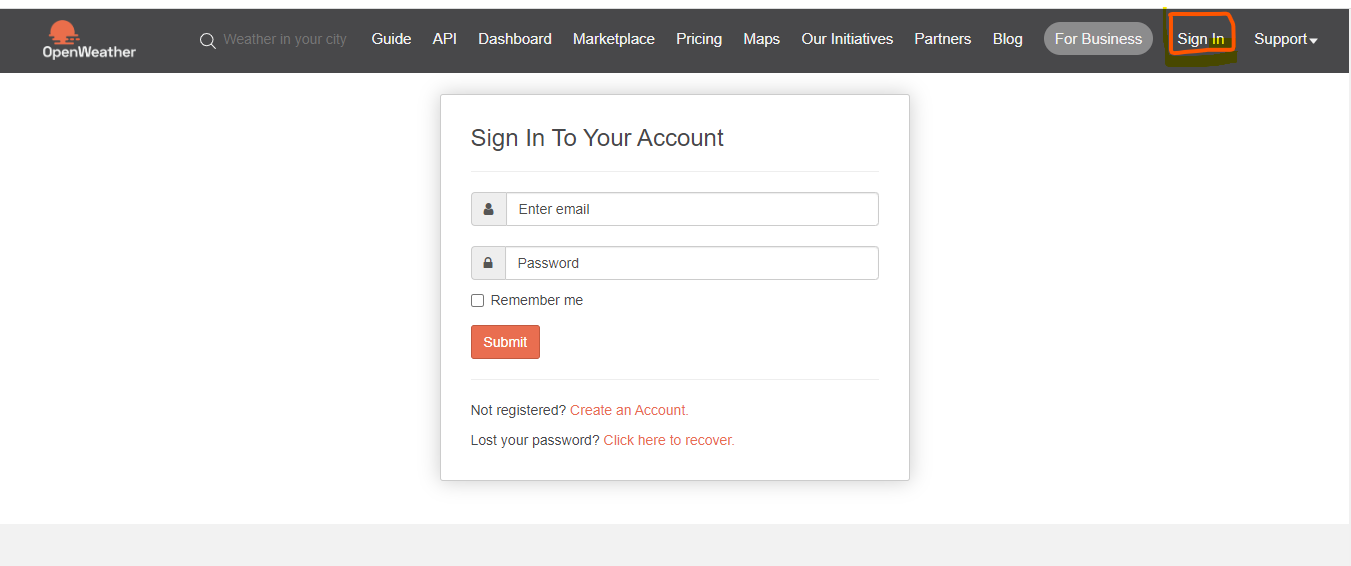
**Step 1:** Step 1: Visit [OpenWeatherMap](https://home.openweathermap.org/users/sign_in) and choose the "Sign In" option.
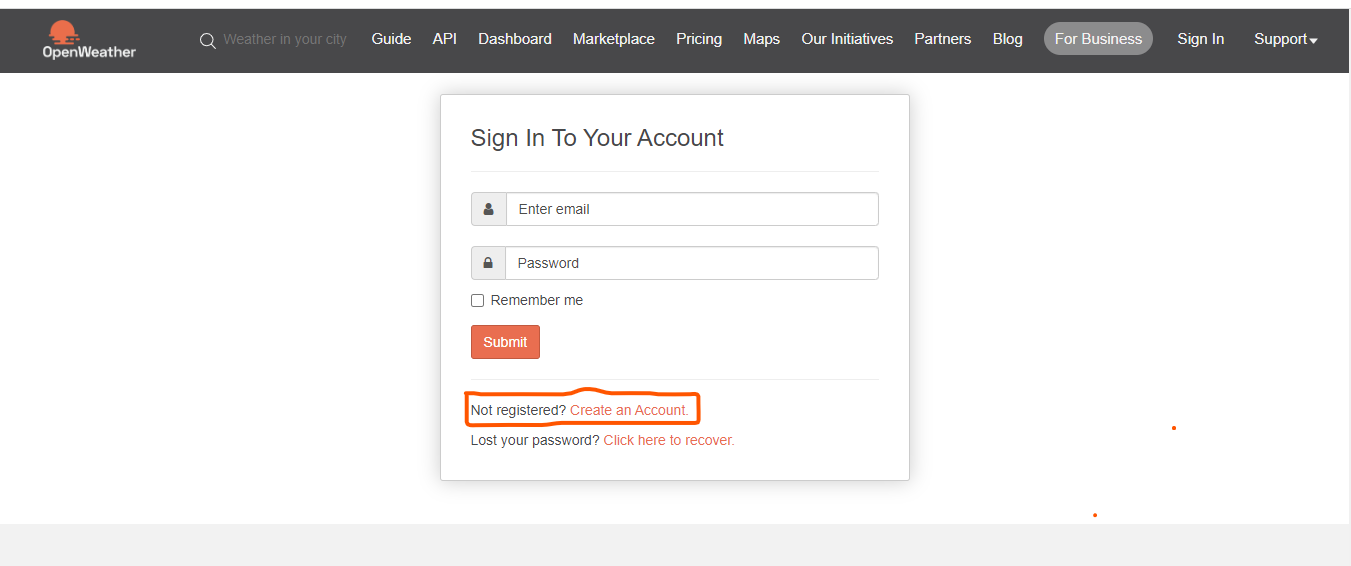
**Step 2:** If you do not have an account, click on the "Not Registered? Create an account" option.
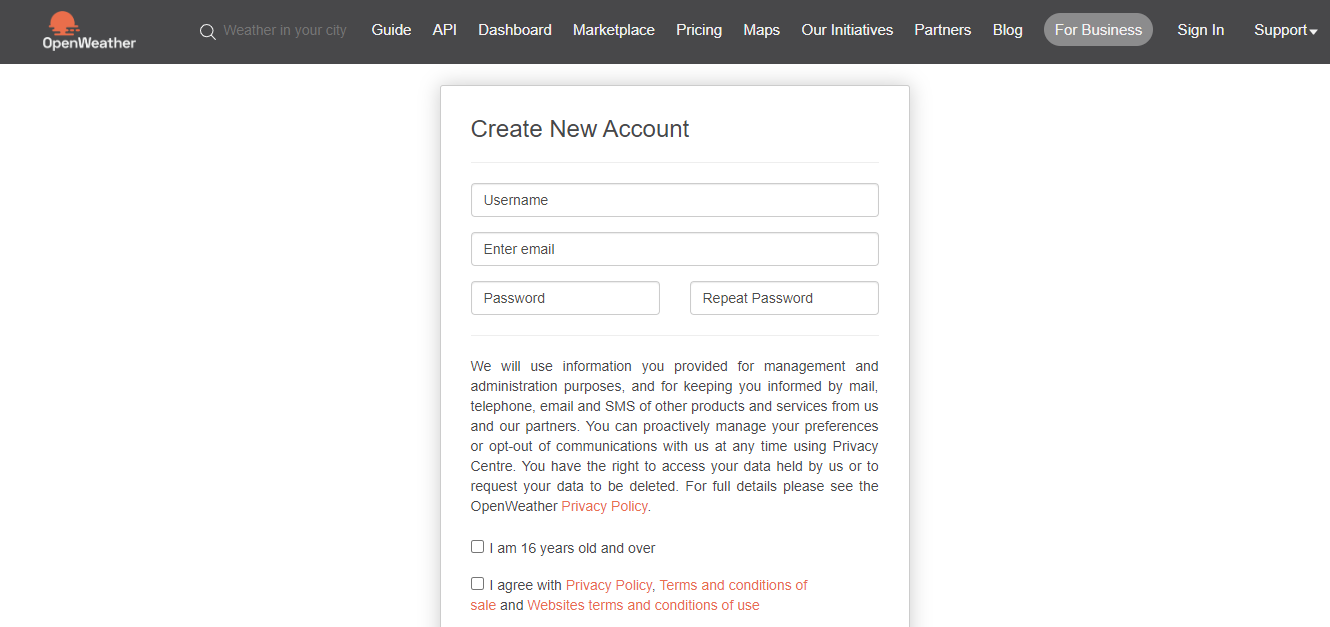
**Step 3:** Fill out the form and click on Sign up to create your account.
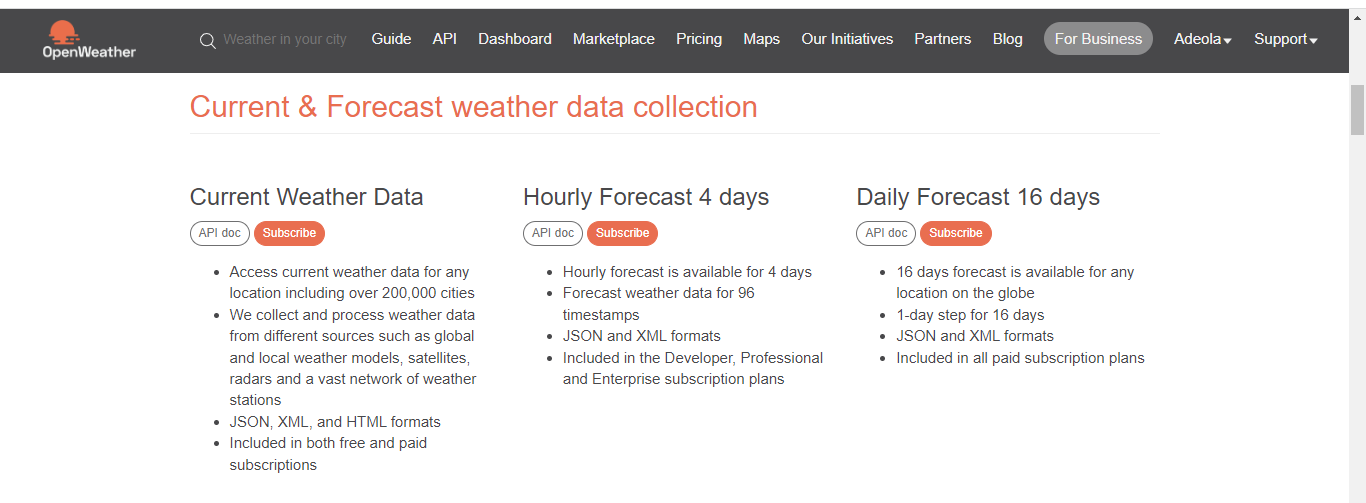
**Step 4:** Navigate to the menu and select the API option.
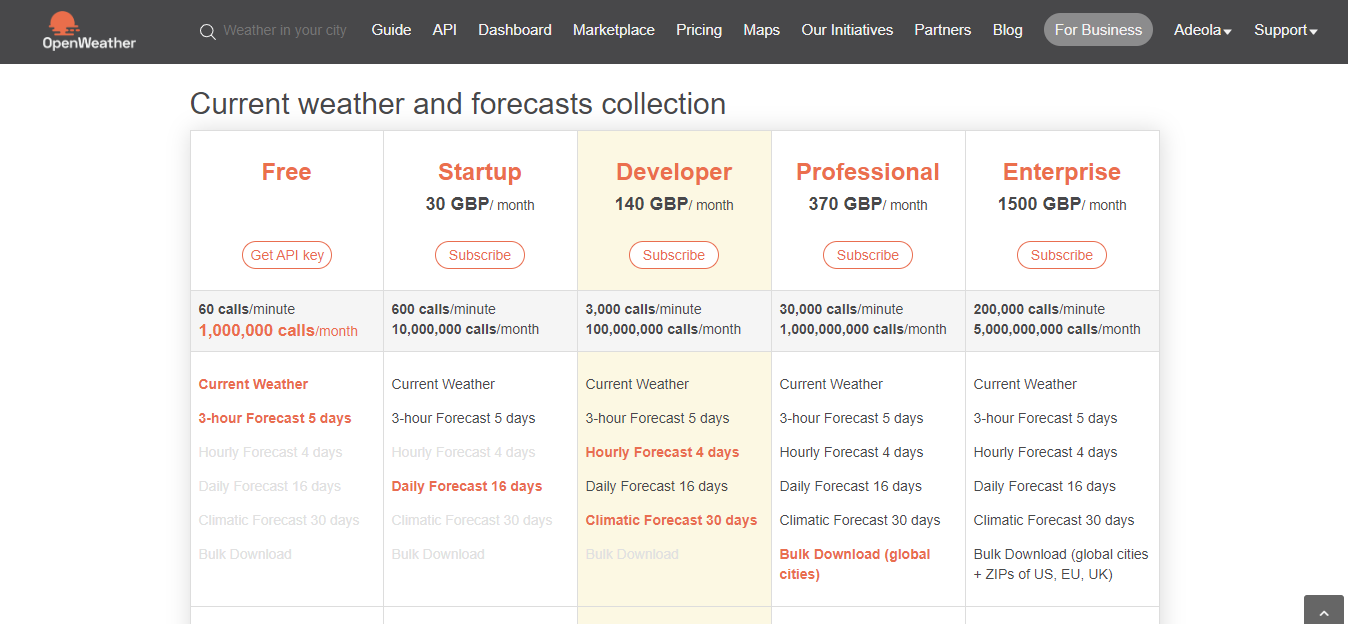
**Step 5:** To obtain the current weather data, it is necessary to subscribe to the Current Weather Data API service. Click on the Subscribe button to proceed.
**Step 6:** Next, a pricing window will appear. We don't require any paid plans. Therefore, choose the free option from the available choices, and we are nearly done.
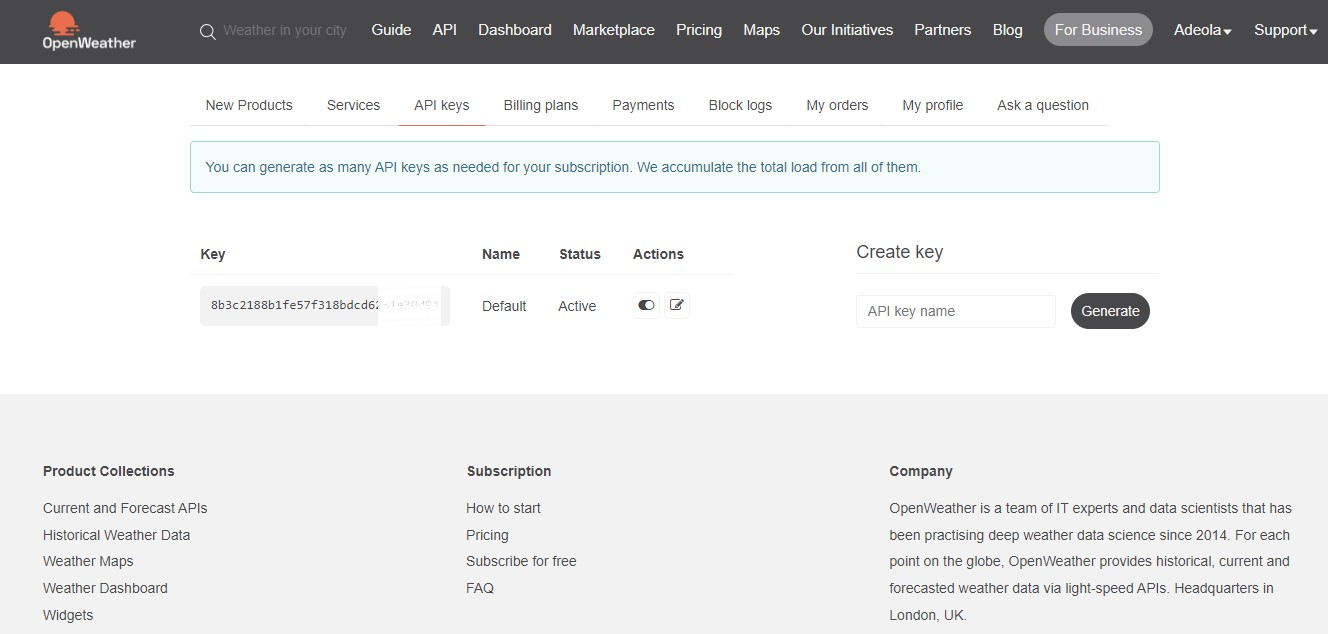
**Step 7:** Once you have successfully subscribed, locate your profile name in the top right corner and click on it. From the dropdown menu, select My API Keys.

**Step 8:** Your API key will be displayed in this section. Remember to keep it secure and avoid sharing it publicly with anyone.
Now that we have obtained our API key, let's dive back into building our app. 😎
## Step 5: JavaScript coding Part
Understanding how to integrate APIs in JavaScript is essential when it comes to utilizing APIs for web applications. I have provided the complete code below for you to review and gain a thorough understanding of its functionality.
- Let’s start by getting the API key and endpoint URL.
```js
// API key and endpoint URL
let apiKey = "8b3c2188b1fe57******************";//Enter your API key here
let apiUrl ="https://api.openweathermap.org/data/2.5/weather?units=metric&lang=en";
The code above defines the apiKey variable, which should be replaced with your own API key obtained from OpenWeatherMap. The apiUrl variable contains the base URL for making API requests to OpenWeatherMap's weather endpoint. It includes query parameters for units (metric) and language (English).
// DOM elements
let searchBox = document.querySelector(".search input");
let searchButton = document.querySelector(".search button");
let weather_icon = document.querySelector(".weather-icon");
Then we select the DOM elements using document.querySelector and assigned them to variables: searchBox (input field), searchButton (button), and weather_icon (image element for weather icon).
// Variable to store Celsius value
let cel;
The cel variable is declared to store the Celsius temperature value.
// Function to check the weather for a city
async function checkWeather(city) {
  try {
    // Make API call to fetch weather data
    const response = await fetch(`${apiUrl}&q=${city}&appid=${apiKey}`);

    if (!response.ok) {
      throw new Error("Unable to fetch weather data.");
    }

    // Parse the response JSON
    const data = await response.json();

    // Update the DOM with weather information
    document.querySelector(".city").innerHTML = data.name;
    const tempCelcius = Math.round(data.main.temp);
    document.querySelector(".temp").innerHTML = tempCelcius + "°C";
    document.querySelector(".humidity").innerHTML = data.main.humidity + "%";
    document.querySelector(".pressure").innerHTML = data.main.pressure;

    // Set the weather icon based on weather conditions
    if (data.weather[0].main === "Clouds") {
      weather_icon.src = "../images/clouds.png";
    } else if (data.weather[0].main === "Clear") {
      weather_icon.src = "../images/clear.png";
    } else if (data.weather[0].main === "Rain") {
      weather_icon.src = "../images/rain.png";
    } else if (data.weather[0].main === "Drizzle") {
      weather_icon.src = "../images/drizzle.png";
    } else if (data.weather[0].main === "Mist") {
      weather_icon.src = "../images/mist.png";
    }

    // Display the weather section and hide error message
    document.querySelector(".weather").style.display = "block";
    document.querySelector(".err").style.display = "none";

    // Store the Celsius value
    cel = tempCelcius;
  } catch (error) {
    // Display error message and hide weather section
    document.querySelector(".err").style.display = "block";
    document.querySelector(".weather").style.display = "none";
    console.error(error);
  }
}
Next we define an async function named checkWeather that is responsible for checking the weather for a given city.
Here's an explanation of what the code does:
-
checkWeather()takes a parametercity, which represents the city for which the weather needs to be checked. - Inside the function, it makes an API call to fetch weather data using the
fetchfunction. The API call is made to the OpenWeatherMap API with the specifiedcityandapiKey. - If the API response is not successful (status code other than 200), it throws an error with the message "Unable to fetch weather data."
- If the API call is successful, it parses the response JSON using the
response.json()method. - The function then updates the DOM (HTML) with the weather information obtained from the API response. It sets the city name, temperature in Celsius, humidity, and pressure values to their respective HTML elements.
- Based on the weather conditions obtained from the API response, it sets the
srcattribute of theweather_iconelement to the corresponding weather icon image file. - It displays the weather section by setting the
displaystyle property toblockand hides the error message by setting itsdisplayproperty tonone. - The Celsius temperature value is stored in the
celvariable for later use. - If any error occurs during the execution of the
tryblock, it catches the error, displays the error message, hides the weather section, and logs the error to the console.
// Event listener for search button click
searchButton.addEventListener("click", () => {
  const city = searchBox.value.trim();
  if (city !== "") {
    // Call checkWeather function with the entered city
    checkWeather(city);
  }
});

// Event listener for Fahrenheit button click
document.getElementById("farenheit").addEventListener("click", () => {
  // Convert Celsius to Fahrenheit and update the HTML
  if (cel !== undefined) {
    let fer = Math.floor(cel * 1.8 + 32);
    document.querySelector(".temp").innerHTML = fer + "°F";
  }
});

// Event listener for Celsius button click
document.getElementById("celcius").addEventListener("click", () => {
  // Restore the Celsius value and update the HTML
  if (cel !== undefined) {
    document.querySelector(".temp").innerHTML = cel + "°C";
  }
});
Here’s what the code snippet above does:
- The search button has an event listener that triggers when clicked. It calls the
checkWeather()function with the entered city name obtained from the search input field. - The Fahrenheit button has an event listener that converts the Celsius temperature to Fahrenheit when clicked. It updates the HTML with the converted temperature.
- The Celsius button has an event listener that restores the Celsius temperature and updates the HTML when clicked.
Result
Here's the complete view of the Weather Application below.

Conclusion
Let's make it more fun! I would love to know about the weather in your area. Comment below with your current weather info, and let's see what the weather is like in different locations.
If you have any inquiries regarding the project, don't hesitate to ask. Thank you for reading, and stay tuned for more exciting projects in the Let's Build series!
I'm available on Twitter, LinkedIn, and GitHub. Keep an eye out for my upcoming blog post, in which I'll go over another important area of web development. As a developer, I'm glad to provide additional information. Until then, happy coding, and take care!

Top comments (1)
Nice tutorial.
Did you make the various weather icons too?