
Simple Tutorial: A Dockerized Node.js, React and Next.js Application
This is a simple tutorial aimed at showing you how to get a simple Node.js, Next.js and React App up and running with Docker on your local machine. It is aimed at beginner web developers looking to start a web project.
After following this tutorial, we should have a React + Next.js frontend application and it pulls data from a Node.js backend application.

Prerequisites: Install Git, Docker, and Docker-Compose
The prerequisites to complete this tutorial are git, Docker and Docker-Compose. These links should take you to the installation page for each software.
Git: Allows you to download the provided repository in Step 1.
Docker: Allows us to run code in containers, regardless of environment
Docker-Compose: Allows us to run multiple containers easily, we have both a frontend and a backend container in this project.
Step 1: Copy the Sample Application
We’ve provided a simple application for you to clone at the link below. Simply use git clone https://github.com/EMChamp/simple-nodejs-react-docker-app to clone the repo to your local machine.
Here is what the directory layout should look like. It isn’t important to understand every file, just check that you have a client directory, server directory, and docker-compose.yml in your directory.
![]()
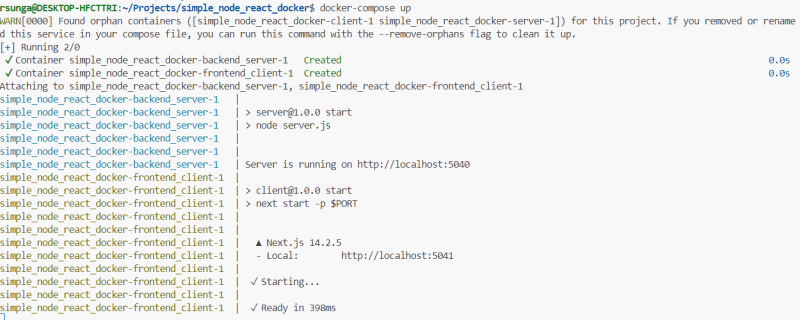
Step 2: Run on Docker
Use the following command in the simple-nodejs-react-docker-app directory docker-compose up
If all goes well we should see this output:
Step 3: Visit Website
In your web browser visit http://localhost:5041/, you should see the following page:
The string “Data from Backend API” is pulled from the backend and displayed on the page.
Now we have finished the tutorial and have a working Node.js, React and Next.js application running on Docker. As next steps you can choose to modify the code to suit an application that you would like to build.
In the next optional section, we will walk through the code.
Code Walkthrough
While it is not necessary to read this section to run the project, it may be useful as a reference to understand what the files do and what they affect if you plan to modify the code.
Here is what the directory contents should look like. It isn’t important to understand every file (which is covered below), just check that you have a client **directory, **server **directory, and **docker-compose.yml
simple-nodejs-react-docker-app/
├── client/
│   ├── package.json
│   ├── package-lock.json
│   ├── public/
│   │   ├── favicon.ico
│   ├── styles/
│   │   ├── styles.css
│   ├── pages/
│   │   ├── _app.tsx
│   │   ├── index.tsx
│   ├── tsconfig.json
├── server/
│   ├── package.json
│   ├── package-lock.json
│   ├── server.js
│   ├── Dockerfile
└── docker-compose.yml
Client
This section will cover the important files in the client directory and their purpose.
package.json will define the dependencies we need to run the application. It will also define our start and build commands.
{
  "name": "client",
  "version": "1.0.0",
  "private": true,
  "scripts": {
    "dev": "next dev -p $PORT",
    "build": "next build",
    "start": "next start -p $PORT"
  },
  "dependencies": {
    "axios": "^0.21.1",
    "next": "latest",
    "react": "latest",
    "react-dom": "latest"
  },
  "devDependencies": {
    "@types/react": "^18.0.0",
    "@types/react-dom": "^18.0.0",
    "typescript": "^4.7.0"
  }
}
src/pages/index.tsx will define the main page our application loads. It will display a simple page with a header saying “Simple Node.js and React App”. It will then load a string from http://localhost:5040/endpoint which is an endpoint defined by the server that is running on our local machine. This string is then used to populate the page.
import React, { useEffect, useState } from 'react';
import axios from 'axios';

const Home: React.FC = () => {
  const [data, setData] = useState<string>('');
  const [loading, setLoading] = useState<boolean>(true);
  const [error, setError] = useState<string>('');

  useEffect(() => {
    axios.get('http://localhost:5040/endpoint')
      .then(response => {
        setData(response.data);
        setLoading(false);
      })
      .catch(error => {
        setError('Failed to fetch data');
        setLoading(false);
      });
  }, []);

  return (
    <div className="container">
      <header className="header">
        <h1>Simple Node.js and React App</h1>
        <p>The data below is populated by our Node.js Backend. This page is build with React.</p>
      </header>
      <main className="content">
        {loading ? (
          <p>Loading...</p>
        ) : error ? (
          <p>{error}</p>
        ) : (
          <section>
            <h2>API Data</h2>
            <p>{data}</p>
          </section>
        )}
      </main>
    </div>
  );
};

export default Home;
src/pages/_app.tsx is the entry point for our application. It loads the global CSS stylesheet for all pages, including index.tsx and any future pages. The MyApp function wraps all our pages and ensures they have the necessary global styles and settings. Next.js handles Server-Side Rendering (SSR) by default, allowing pages to be rendered on the server before being sent to the client.
// _app.tsx
import '../styles/styles.css'; // Adjust path according to your structure

import type { AppProps } from 'next/app';

function MyApp({ Component, pageProps }: AppProps) {
  return (
      <Component {...pageProps} />
  );
}

export default MyApp;
src/styles/styles.css defines simple styling for our rendered web page.
body {
    margin: 0;
    font-family: Arial, sans-serif;
    background-color: #f4f4f4;
    color: #333;
  }

  .container {
    max-width: 800px;
    margin: 0 auto;
    padding: 20px;
    background-color: #fff;
    box-shadow: 0 0 10px rgba(0, 0, 0, 0.1);
  }

  .header {
    text-align: center;
    padding: 20px 0;
    border-bottom: 1px solid #ddd;
  }

  .header h1 {
    margin: 0;
    font-size: 2.5em;
    color: #0070f3;
  }

  .header p {
    margin: 0;
    font-size: 1.2em;
    color: #555;
  }

  .content {
    padding: 20px 0;
  }

  .content section {
    margin-bottom: 20px;
  }

  .content h2 {
    margin-top: 0;
    font-size: 1.8em;
    color: #0070f3;
  }

  .content p {
    font-size: 1em;
    line-height: 1.6;
    color: #555;
  }
Dockerfile configures a Docker container for a Next.js application. It uses the Node.js version 21 image, sets the working directory, copies the necessary files, installs dependencies, copies the application code, builds the Next.js application, exposes port 5041, and defines the command to start the application using npm start.
FROM node:21

WORKDIR /app

COPY package.json ./
COPY package-lock.json ./
RUN npm install

COPY . .

# Build the Next.js application
RUN npm run build

EXPOSE 5041

CMD ["npm", "start"]
Server Code
The server code is very simple in that it contains a barebones application.
├── server/
│   ├── package.json
│   ├── package-lock.json
│   ├── server.js
│   ├── Dockerfile
package.json defines the command to start our server on node.js and also the dependencies cors and express needed on the server.
{
    "name": "server",
    "version": "1.0.0",
    "main": "server.js",
    "scripts": {
      "start": "node server.js"
    },
    "dependencies": {
      "express": "^4.17.1",
      "cors": "^2.8.5"
    }
  }
server.js defines our server code using Express.js. It sets up an endpoint /endpoint that returns a string when accessed. The client can call this endpoint by sending a GET request to http://localhost:5040/endpoint to retrieve this data. CORS is configured to allow requests only from http://localhost, ensuring that only our client application can access this endpoint.
// server.js
const express = require('express');
const cors = require('cors');
const app = express();

// Use the PORT environment variable if it is set, otherwise default to 5040
const port = process.env.PORT || 5040;

// Enable CORS for specific origins
const corsOptions = {
  origin: 'http://localhost:5041',
};
app.use(cors(corsOptions));

app.get('/endpoint', (req, res) => {
  res.send('Data from Backend API');
});

app.listen(port, () => {
  console.log(`Server is running on http://localhost:${port}`);
});
Dockerfile configures a Docker container for the server application. It uses the Node.js version 21 image as the base, sets the working directory to /app, copies the necessary files, installs dependencies, copies the application code, exposes port 5040, and defines the command to start the application using npm start.
Root Directory
The root directory only has one file called docker-compose.yml that is relevant to the project (README.md is only used to for GitHub purposes).
docker-compose.yml defines the frontend and backend containers that make up the application. It specifies the appropriate ports to be exposed on each container and binds them to the corresponding ports on the host machine. It also defines environment variables that set the port for the React and Node.js applications, and ensures that the frontend container depends on the backend container.version: '3.8'
services:
  backend_server:
    build: ./server
    ports:
      - "5040:5040"
    environment:
      - PORT=5040
  frontend_client:
    build: ./client
    ports:
      - "5041:5041"
    environment:
      - PORT=5041
    depends_on:
      - backend_server
Conclusion
This tutorial is hopefully helpful as a guide on how to dockerize your Node.js and React projects. Dockerization is helpful especially when you want to launch your application on different environments. Many popular tools like Kubernetes require the use of containers so this gives you a head start as well when deploying to production.

Top comments (0)