Spring Boot currently support Java, Kotlin and Groovy as language preference to create an application. You can also choose Maven or Gradle as a build automation tool. You can choose your favourite IDE ranging from Netbeans, IntelliJ ,Eclipse or Spring Tool Suite.
We will be using Java and Maven with Spring Tool Suite.
We can create a Spring Boot application in different ways.
- Creating a maven project and adding dependencies
- Using Spring Tool Suite (STS )/IntelliJ built in feature
- Using Spring Initializr : https://start.spring.io
We will be using STS built in feature and will also look at Spring Initializr. In order to create first spring boot application using STS , click on File → New → Spring Starter Project.
It will open a popup , where default values can be modified.
We have modified name, group ,artifact and package default values.
Once modified as per your requirement ,click “Next”.
Now select Web from web stack and Devtools from Core stack.
Selecting Dev Tool is optional. It is just because of personal choice of not starting application again and again on saving the files. We will learn about DevTool later.
Web is an obvious choice as we are going to learn a web based Spring Boot application.
Click Finish. Now we have a sample Spring boot application ready to go.
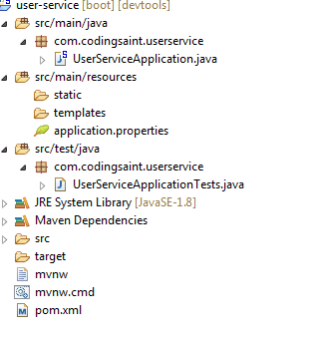
After clicking on finish , we will have project structure as shown in figure below.
Here UserServiceApplication.java inside com.codingsaint.userservice is the main class and entry point to our application.
Every Spring Boot Application has a main class, which acts as the entry point to application.
Let’s run it and see if Spring Boot application is really this easy to start and run. You can run it as a Java Application by right clicking on file and selecting Run as from menu and selecting “ Java Application” or “Spring Boot App” as an option.
Once you run it , you can see output as below on console ,where it does tell that application is running on port 8080.
In browser open http://localhost:8080/ and verify if server is up. Following output with 404 (default 404 of Spring Boot application) tells that server is up and running and obviously we have nothing mapped to be displayed for base URL so we are seeing this 404 error page.
In Next section , we will see how to handle incoming requests properly. We will also dive in Spring Boot Basics


Top comments (0)