TL;DR Use this gist as a reference for all of the steps found in this article: dokku-setup.sh

Dokku is a command-line application that makes deploying web applications and databases on your server (or VPS) simple. It describes itself as
An open source PAAS alternative to Heroku.
It doesn't have an official UI, which makes it a little less inviting to newcomers, but I believe it has actually helped me become more comfortable with the command line. And once you set up one application, it gets easier and easier.
I recently tried to install and use Coolify, and if you need a UI to understand everything, I get it. I was hopeful that I would like it, but I felt lost when I attempted to use it, and it requires root access to control Docker, which I did not feel comfortable with.
There are some unofficial UIs for Dokku, but I haven't tried them out, and they don't seem current.
I have been a proponent of self-hosting for a long time. I had an OwnCloud instance and Plex setup back in 2018. But after a few failed hard drives (and the realization that I only ever watch movies once), I decided to spin everything down and use commercial software that is cheap (free) and has built-in redundancies that I don't have to worry about.
But in 2021, my friend got me interested in Chia, and now I have a server sitting in my office "farming," which doesn't take a lot of CPU or memory, so I decided to start hosting my custom-built budget app so I wouldn't have to pay for hosting.
Fast forward to today, and I have about six applications running on this server that I use often. Some of them I built for my own use, and some are open-source projects.
Server Setup
This article assumes you already have a server or VPS setup, but I wanted to explain how I set up my server.
Physical
These specs seem to be more than enough to host quite a bit of applications without concern:
- 256 GB SSD
- 16 GB RAM
- 3.6GHz 6-Core CPU
Software
- Ubuntu Server
- UFW (Firewall)
- Dokku Version 0.34.4 (Installation Instructions)
Topology
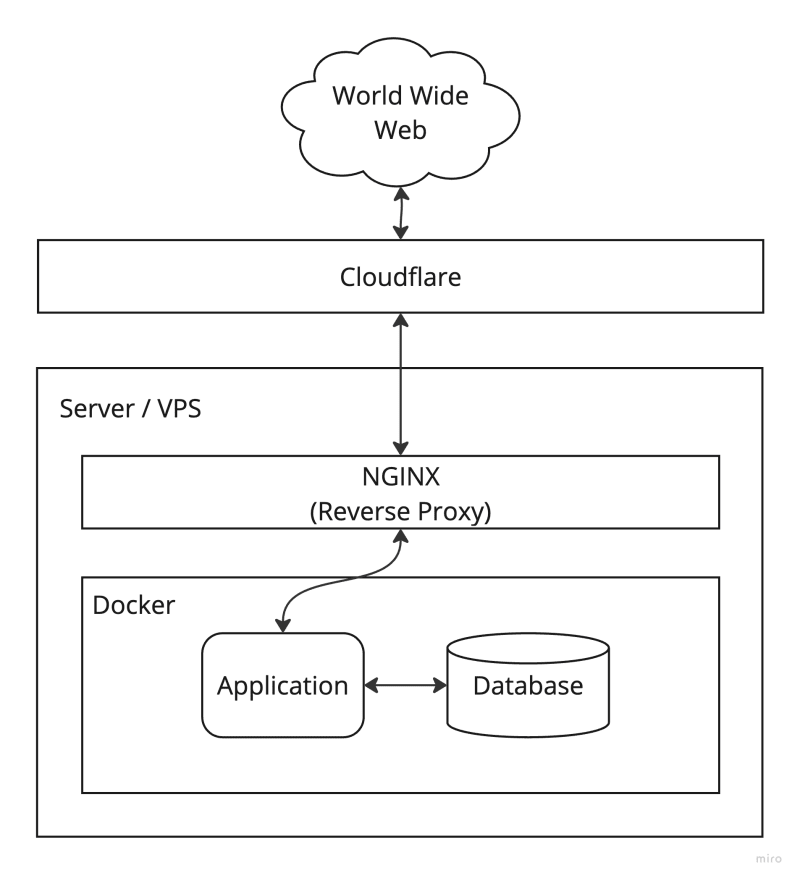
In this diagram, you can see how I have my server set up behind Cloudflare using their DNS tool to avoid exposing my IP address and help cache assets to limit the need to make direct calls to my server.
NGINX is running as my reverse proxy, directing a domain name to a specific container. Docker runs the applications and databases as isolated containers. These applications are independent of Dokku but are effectively controlled by Dokku, so we don't need to do anything with them directly.
Deploying an Application
For this article, we'll deploy an application that has been pretty useful to me since I recently installed it: Linkwarden. Linkwarden is a web-based bookmarks manager that allows you to collaborate, organize, and archive content from links in one place.
The basics of this installation will be to create an application pointing to a git repository with a Dockerfile that will build the container that runs the application.
While this article assumes you have installed Dokku using the instructions on their website, there are a few configuration steps that we want to run before continuing. You shouldn't need to execute these commands again if you have already run them.
dokku plugin:install postgres
dokku letsencrypt:set --global email <your-email@email.com>
dokku letsencrypt:cron-job --add
The first command will install the Postgres plugin so we can use it to set up a Postgres instance that will be independent of the actual application. The other commands set up LetsEncrypt so we can fetch an SSL certificate once, and it will automatically renew itself.
The first thing we'll do is create the application Docker container and the database container and link them together:
dokku apps:create linkwarden
dokku postgres:create linkwarden-db
dokku postgres:link linkwarden-db linkwarden
The dokku postgres:link line adds an environment variable, DATABASE_URL to the linkwarden application container.
This next step is something specific to Linkwarden, but it is helpful to know for any application that may be storing files is to point the data directory of the Docker container to a directory on the local machine:
sudo mkdir -p /opt/linkwarden/data
dokku storage:mount linkwarden /opt/linkwarden/data:/data/data
If you ever need to rebuild the application from scratch, you won't lose the files that Linkwarden has saved. In this case, it's archived downloads of the link content.
Now, let's point the application container to the git repository, set the necessary environment variable, and then build it:
dokku git:sync linkwarden git@github.com:linkwarden/linkwarden.git main
dokku config:set linkwarden NEXTAUTH_SECRET=`openssl rand -hex 32`
dokku ps:rebuild linkwarden
dokku ports:add linkwarden http:80:5000
The NEXTAUTH_SECRET='openssl rand -hex 32' sets NEXTAUTH_SECRET to a randomly generated string and avoids exposing secrets in the command line.
Once you run dokku ps:rebuild Dokku will pull down the necessary images based on the Dockerfile in the git repository and attempt to build and start up the application.
That last line sets up nginx, which is the reverse proxy that Dokku uses to point port 80 from your machine to port 5000 of the application container.
If you don't know what port the application container is exposing, you can run dokku ports:report to see the detected ports being exposed and copy that config to the dokku ports:add command.
The last thing we need to do is set up a domain to be able to access the application. Dokku does have a global domain based on the machine name by default, and then each app would automatically be set to <app-name>.global-domain.tld but I deactivated that (dokku domains:clear-global) to be able to add specific domains or subdomains manually.
This next part is a little complicated and probably causes me the most headaches because you need to make sure port 80 is accessible from the internet to be able to get an SSL certificate:
- Disable enforced SSL in Cloudflare
- Open up Port 80 in your NAT/Router
- Enable Port 80 via UFW (
sudo ufw allow 80)
dokku domains:add linkwarden linkwarden.your-domain.com
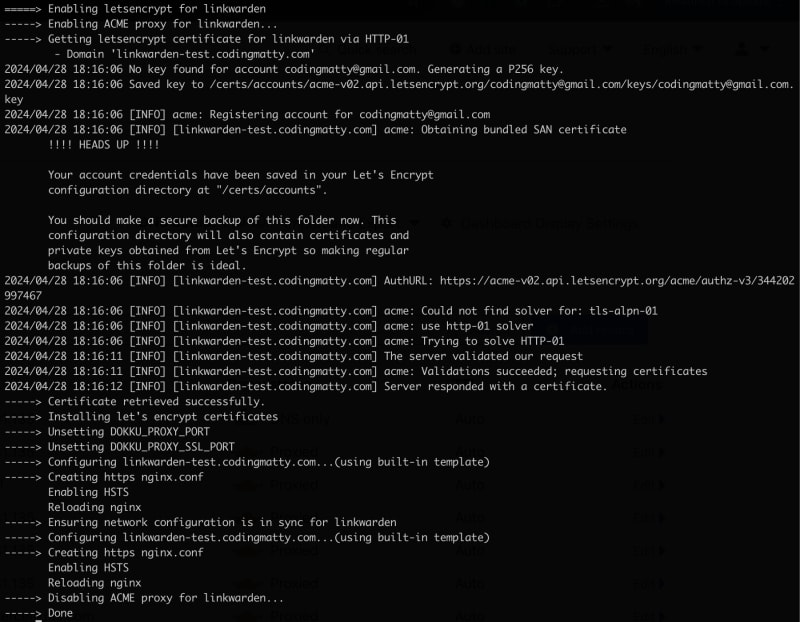
dokku letsencrypt:enabled linkwarden
If you run into issues, I would be careful not to attempt to run the letsencrypt command too much because there is a rate limit of 5 times per hour per email and domain combination.
Success will look something like the image below:
If your DNS is not set up correctly, you may see something like this:
2024/04/28 18:17:22 Could not obtain certificates:
    error: one or more domains had a problem:
[linkwarden-test.codingmatty.com] acme: error: 400 :: urn:ietf:params:acme:error:dns :: DNS problem: NXDOMAIN looking up A for linkwarden-test.codingmatty.com - check that a DNS record exists for this domain; DNS problem: NXDOMAIN looking up AAAA for linkwarden-test.codingmatty.com - check that a DNS record exists for this domain
If your port 80 isn't open, you may see an error message like this:
2024/04/28 18:18:48 Could not obtain certificates:
    error: one or more domains had a problem:
[linkwarden-test.codingmatty.com] acme: error: 403 :: urn:ietf:params:acme:error:unauthorized :: 2606:4700:3032::6815:4638: Invalid response from http://linkwarden-test.codingmatty.com/.well-known/acme-challenge/n9q8vjktpRkDGq5bKU2cvRLAGqkJy-3Lc2taCCyaxvw: 522
Once you have successfully received your SSL certificate, Dokku will automatically add port 443 to point to the same port of the Docker container that port 80 was pointing to with HTTPS enabled. You can validate this by running dokku ports:report and seeing https:443:5000.
I strongly recommend removing access to port 80 by reversing all of the previous steps to expose it:
- Enforce SSL in Cloudflare
- Close Port 80 in your NAT/Router
- Disable Port 80 via UFW (
sudo ufw deny 80) -
dokku ports:remove http:80:5000to remove the port being directed to the Docker container
That's it! You now have a running instance of Linkwarden 🎉

In this case, you should sign up, and then, if you want to prevent anyone else from signing up, go ahead and add the proper environment variable:
dokku config:set linkwarden NEXT_PUBLIC_DISABLE_REGISTRATION=true
This command will rebuild the application container and prevent any future sign-ups. Similar options are pretty typical with many self-hostable applications with login screens.
I hope this post helps you get up and running with Dokku. I would love to hear about what you've deployed on your server 😄
Let me know if you have any questions.
Find me on Threads or email me at codingmatty@gmail.com


Top comments (0)